There are different apps or platforms that you can use as your cloud storage manager. These apps or platforms will help you to manage multiple cloud storage account with ease. This, of course, will save you the time and stress of logging in and out of different cloud storage platforms.
Our discussions in the past two weeks would have exposed you to different cloud storage platforms. With less or no cash to spend on cloud storage, free cloud storage maybe your best option. However, with such an account you will get a maximum of 15gb for GDrive. With this option, there is a likelihood that you will have more than one free cloud storage account.
For example, you may sign up for Google Drive, OneDrive, Box, 4Shared, and Blomp beta cloud accounts. Combining these five (5) cloud drives will give you a total of [15+10+10+15+20] = 70gb of free storage space. When you choose this path, your cloud storage management adventure will be easier when your accounts are centralized.
How do we make this happen? Is it possible to manage multiple cloud storage account in one place? What app or platform will I use as my cloud storage manager to do all my jobs? How do I even implement this and start saving and sharing files with ease? These questions will be answered in this article.
Manage Multiple Cloud Storage Account using a Central Server
You can use an app or platform as your cloud storage manager for multiple cloud storage account. This makes it easier, you will not need to log in to each account but manage them in one central account. In this article, we will be discussing how to manage multiple cloud storage account using the following:
Multcloud online cloud storage manager
CloudHQ online cloud storage manager and productivity tools
Otixo workspace and cloud storage manager
MultCloud multiple cloud storage manager
Multcloud is a multiple cloud storage manager with free and premium features. With Multcloud you can achieve the following with one account:
- Connect all your cloud storage account and manage them online using a central account.
- Perform file operations such as upload, download, copy/cut, paste, preview and rename just like in Windows Explorer.
- Sync two cloud services or two folders on different cloud accounts or schedule sync or backup of data.
- Transfer files between multiple cloud drives. By this, you can move files from Google Drive to OneDrive using copy/cut and paste. After cloud transfer is started, it can continue even when you are offline.
- Backup data from one cloud to another, and also schedule MySQL backup.
- Manage public and private cloud file sharing
- Manage users and permissions to your Multcloud account and associated cloud drives.
- Use parallel data transmission technology to transfer, sync, and backup files across multiple clouds drive simultaneously.
The above and more are the benefits of using Multcloud as your cloud storage manager. However, some of the features are accessible to premium users only. With a free Multcloud account, you will have the following limitations:
- Data traffic limit of 30gb per month. This means that you will subscribe to a plan if you exhaust available data traffic or wait till another month.
- You will have access to only two synchronization modes. This means that you can sync files between only two cloud drives.
- You will not be able to schedule data transfer/sync, apply sync/transfer filter, and upload data using encryption protocols.
With that said, you are still left with great features that will help you manage multiple cloud storage account.
Get Started with Multcloud
- First, sign up with Multcloud.
- Second, confirm your email and log in to the Multcloud cloud storage manager’s dashboard.
- On the dashboard, explore the features of the Multcloud cloud storage manager. Using the buttons, you can add cloud drives, explore share files, sync, and transfer data.
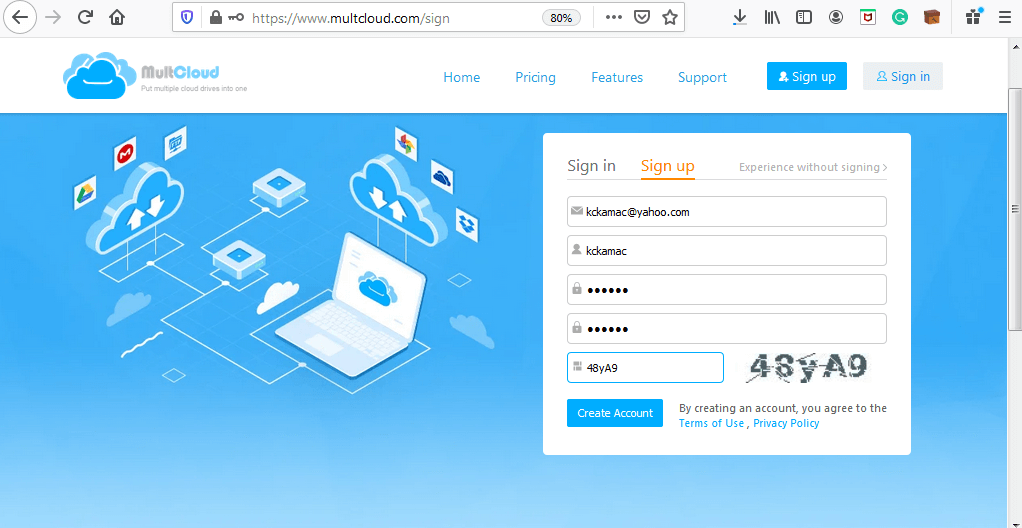
Adding cloud drives to Multcloud
- To add a drive, select Add Cloud Drives on the left pane or Add Clouds at the top bar. From the page that appears, select the cloud drive you want to add to your cloud storage manager.
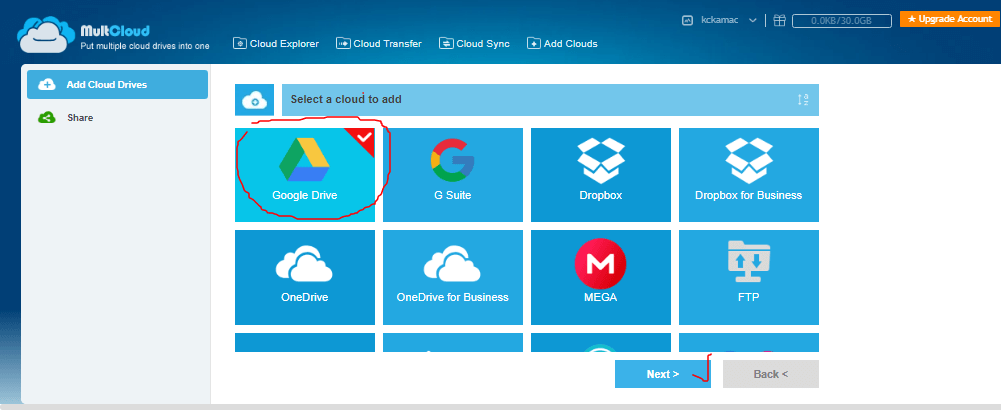
- Click Next to continue.
- On the page that appears, click Add ‘Cloud Drive’ Account to add the cloud drive. Note: ‘Cloud Drive’ is the name of the selected cloud drive, e.g. Google Drive.
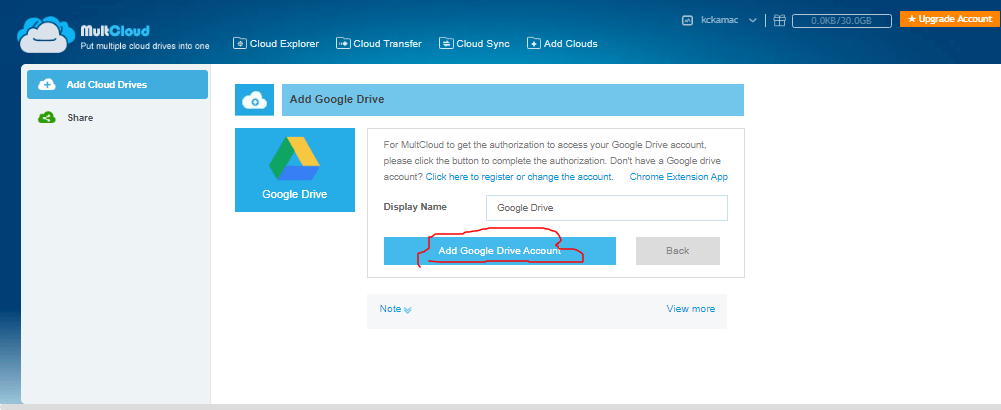
- Multcloud will open an authorization page for you to enter your cloud drive’s credentials.
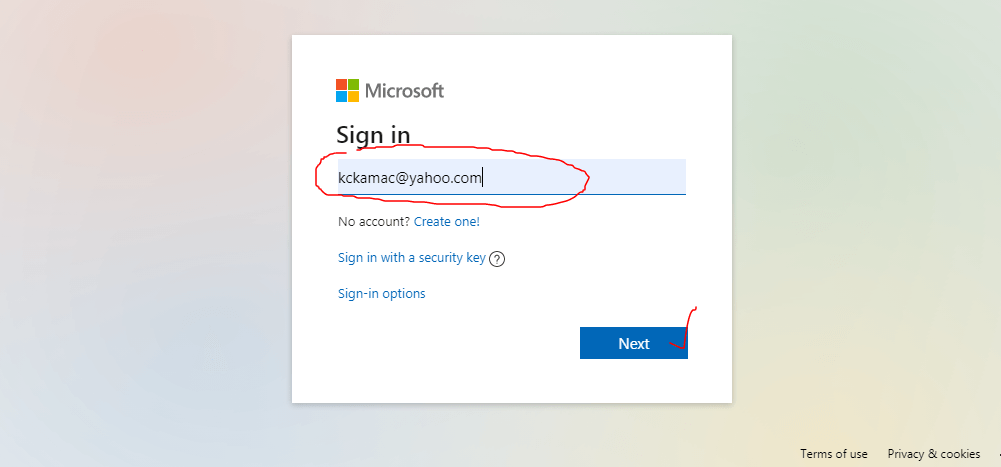
- Enter the necessary credentials and continue. (The process depends on the cloud drive you are adding).
- On the next page that appears, you will be required to allow Multcloud to access your cloud drive. Click Allow or Yes. The authentication process also depends on the cloud drive you are adding. For example, the process for Dropbox is different for Box.
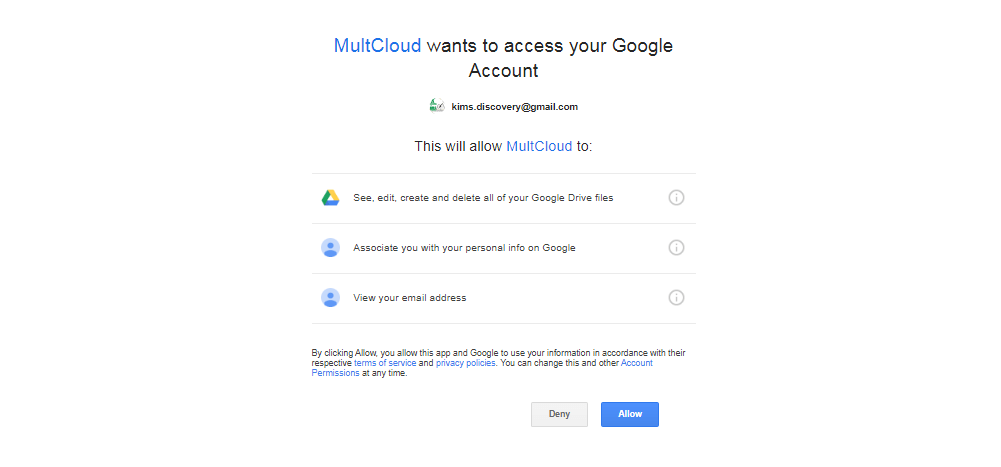
- You will now have access to all your cloud drive files in the Multcloud dashboard.
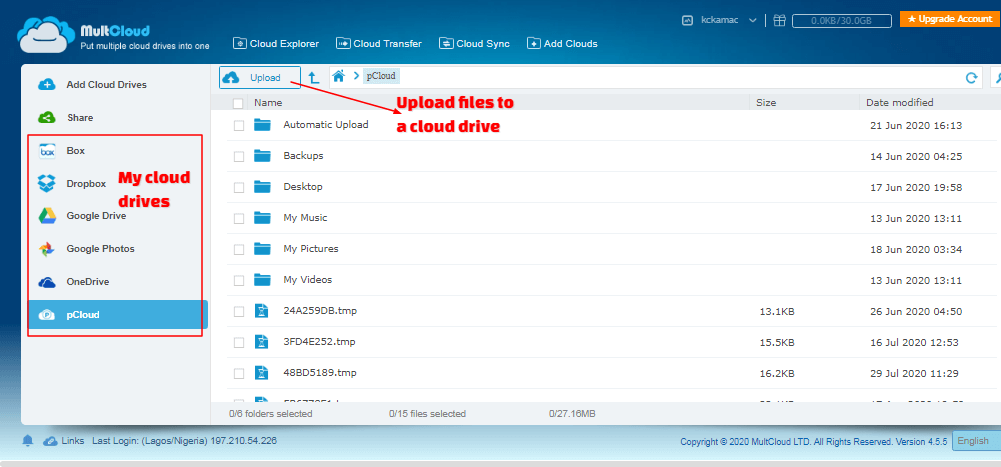
- Repeat the above process for as many as the number of cloud drives you want to manage. You can add up to five cloud drives.
Using cloud drives explorer in Multcloud
Now that you have added all the cloud drives to the Multcloud cloud storage manager, let’s explore the files.
- To view files and folders, and perform operations on them, click each cloud drive on the explorer window.
- To upload a file:
- select a cloud drive of your choice, and click the Upload button.
- On the upload dialog box, use the Add button to add files for upload.
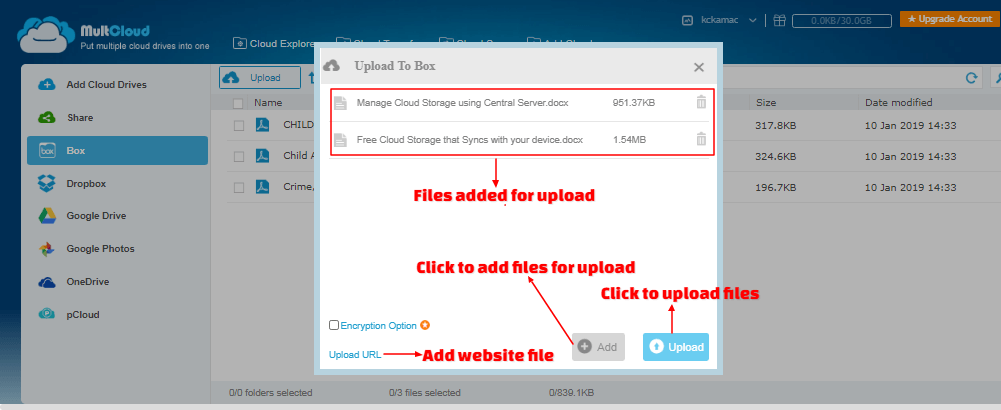
- Click the Upload URL button to upload a website page as a file. If you select this option, save the website file with a filename.ext in the filename box. The .ext is a file extension, e.g. .doc, .txt, etc.
- When you are done, click Upload to upload the files to the selected drive.
- To perform operations on files and folders:
- Select a file or folder.
- Right-click the file/folder or click a dropdown arrow next to the selected file/folder.
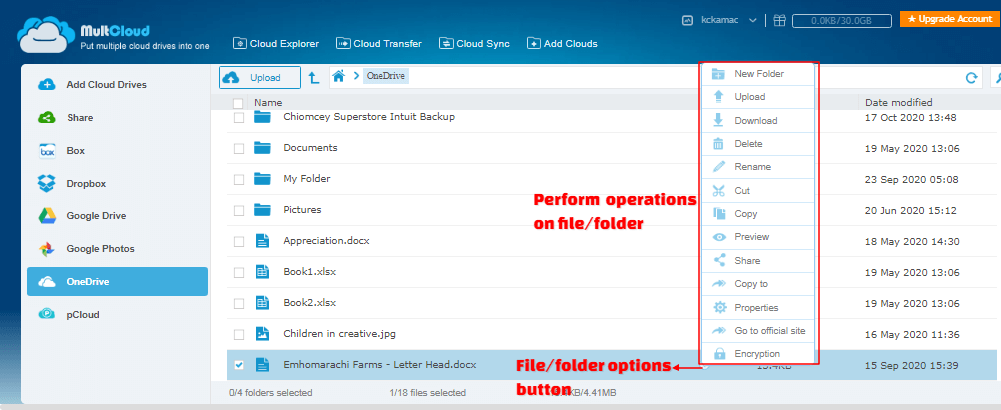
- From the dropdown menu, select your desired file operation: New folder, copy/cut, download, rename, delete, etc.
Transfer files between cloud drives
- To transfer file from one cloud drive to another in your cloud storage manager, do the following:
- Before you start a file transfer, create a folder. Transfer the files you want to transfer into the folder. Also, create a supposed destination folder in the destination cloud drive.
- When you are done with (a), select the Cloud Transfer button on the top bar of the Multcloud dashboard.
- The cloud transfer window appears.
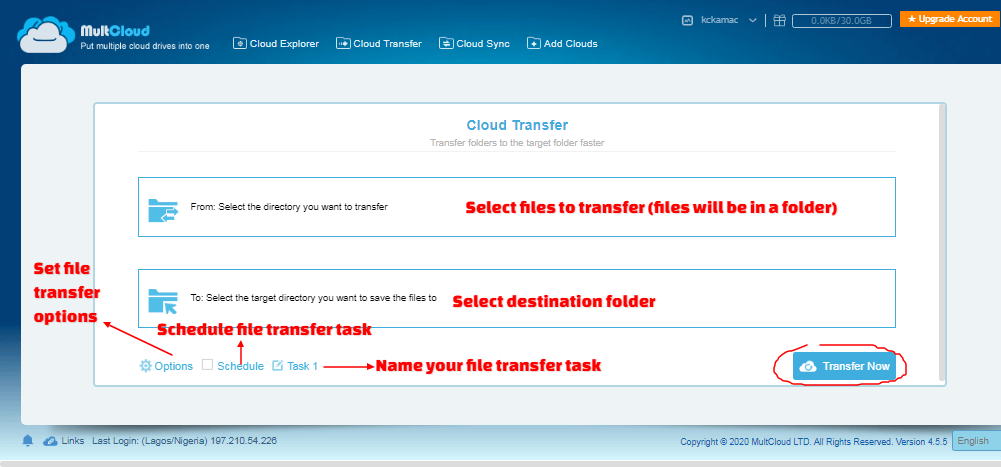
- On the cloud transfer window, select the source folder from the source cloud drive and click OK.
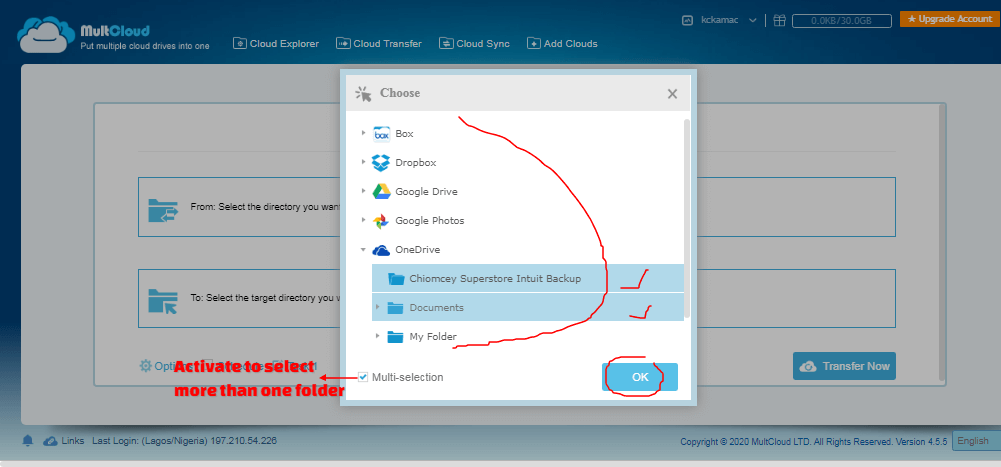
- Select the destination folder on the Cloud Transfer window, as you did above.
- Select the Options button and set appropriate options for the transfer. For example, in the field “If the destination location contains the file:”. Click the dropdown arrow button to choose an option.
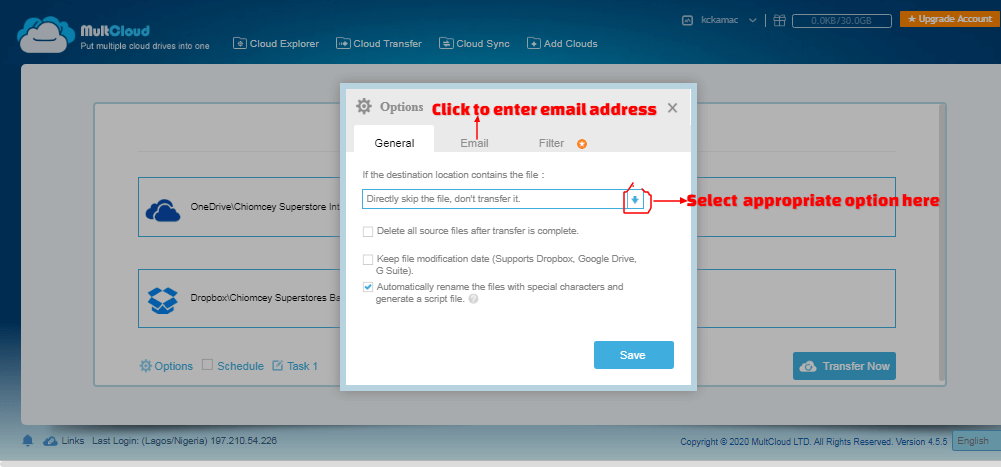
- Click the Email tab to enter an email address if you want to receive mail after the transfer. Click Save when done.
- Click on Schedule to schedule a transfer. This should be selected if you want daily, weekly, or monthly recurrence data transfer.
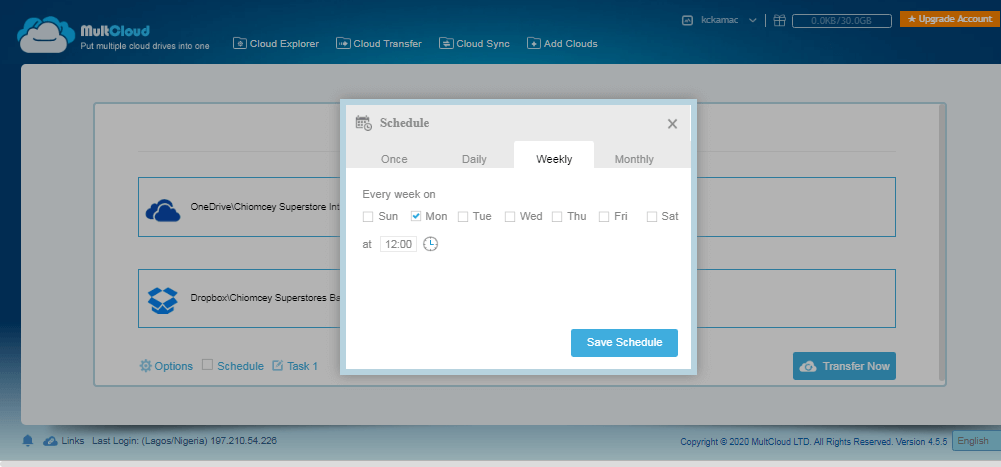
- On the dialog box that appears, select any of daily, weekly, or monthly occurrences. Then set the appropriate time for the transfer and click the Schedule button.
- Click on Task 1 and change the name appropriately or leave it as it is.
- When you are done with all setup, choose either Add Task Only or Add Task and Transfer Now.
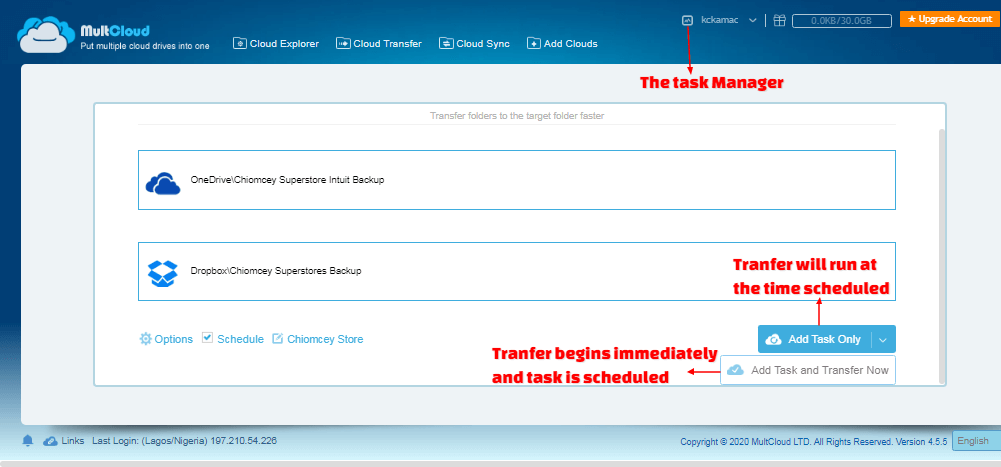
- Your transfer will begin or be scheduled as was setup. If you click on the Task Manager, you will see your scheduled task.
Sync files between cloud drives in Multcloud cloud storage manager
- To sync files/folder in Multcloud cloud storage manager, follow these steps:
- Select the Cloud Sync button on the top bar of the Multcloud Cloud storage manager dashboard.
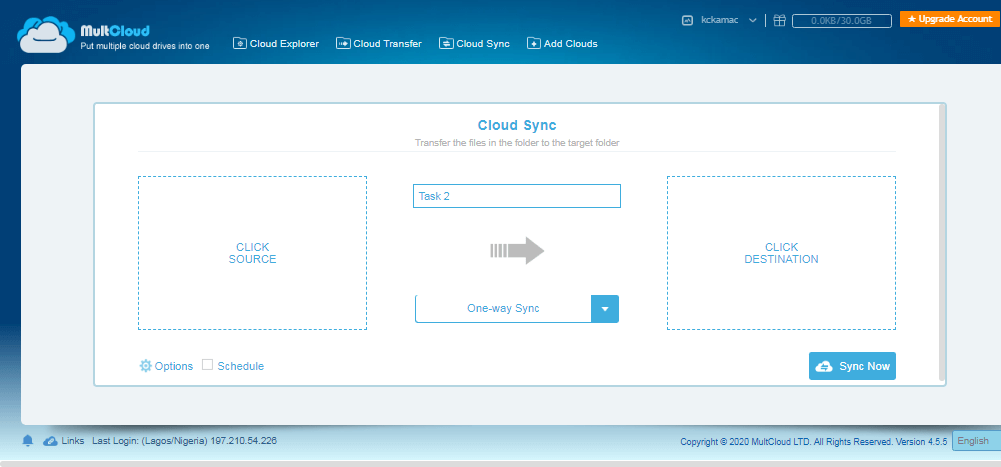
- Choose the source folder as you did in the File Transfer section.
- Choose the destination folder.
- Select one-way or two-way sync. In one-way sync, files added, modified, and deleted in the source folder will be replicated in the destination folder.
- In two-way sync, files added, modified, and deleted in the source folder will be replicated in and destination folder. Also, files added, modified, and deleted in the destination folder will be replicated in and the source folder.
- Click Options and choose appropriate options.
- Finally, select Schedule if you want to schedule the sync task.
- When done, select Add Task Only or Add Task and Sync Now.
Multcloud is a great online cloud storage manager to manage multiple cloud accounts in a central location. It will help you to increase your free cloud drive storage space. However, you can add only the cloud drives available on the platform.
Cloud HQ multiple cloud storage manager
CloudHQ is a cloud storage manager that handles mostly Google-based apps. It is a Gmail productivity tool that integrates GSuite with cloud and email solutions. With CloudHQ, you can back up your GSuite accounts, migrate and sync other cloud drives to GSuite. CloudHQ generally, integrates email productivity with cloud sync and backup solutions. Signing up for a CloudHQ account will help you to accomplish a lot, including:
- Exporting emails to Google Sheets, Excel, or CSV apps, and save emails as a pdf file.
- Forward multiple emails, as well as save emails to Google Drive.
- Create email campaigns and track open mails.
- Schedule emails and save emails to Dropbox and OneDrive.
- Create video emails, screenshots, and screencast recordings for Gmail, and many more.
Get started using cloudHQ cloud storage manager
To get started with CloudHQ cloud storage manage, first sign up for a free account Here.
- On the home page, click on the Sign up now or the Get Started button.
- On the Get Started page that appears, choose the Sync, Backup, and Migration product group as shown below.
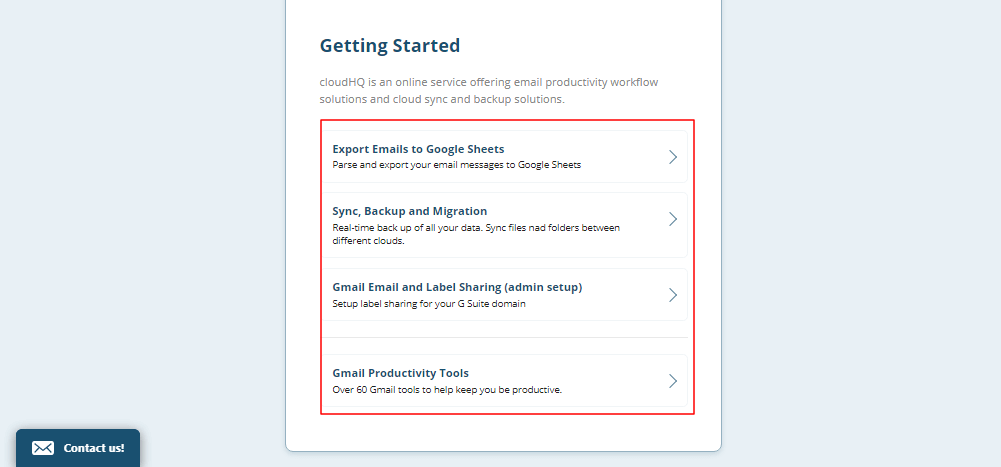
- On the Sync, Backup, and Migration page, enter your email address and click on the StartcloudHQ Setup button.
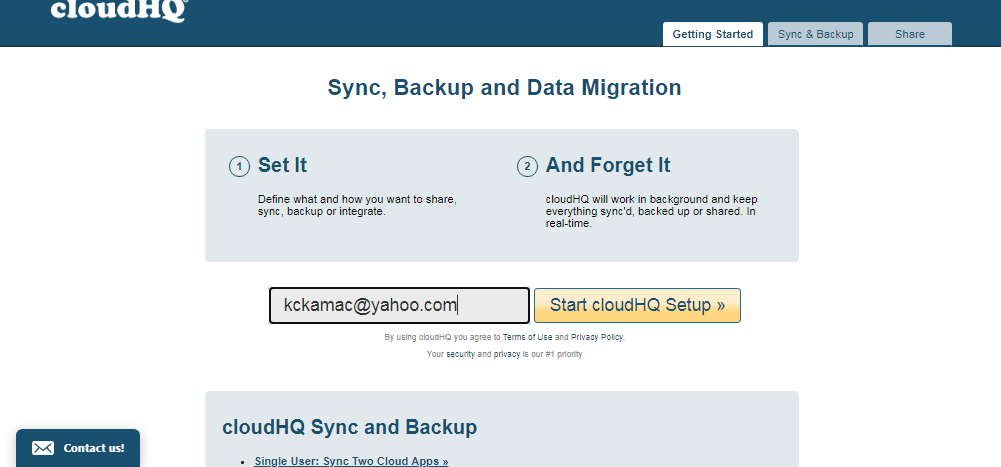
- You will be taken to the Create your cloudHQ account page. Enter your detail on this page, and click the Sign-Up button.
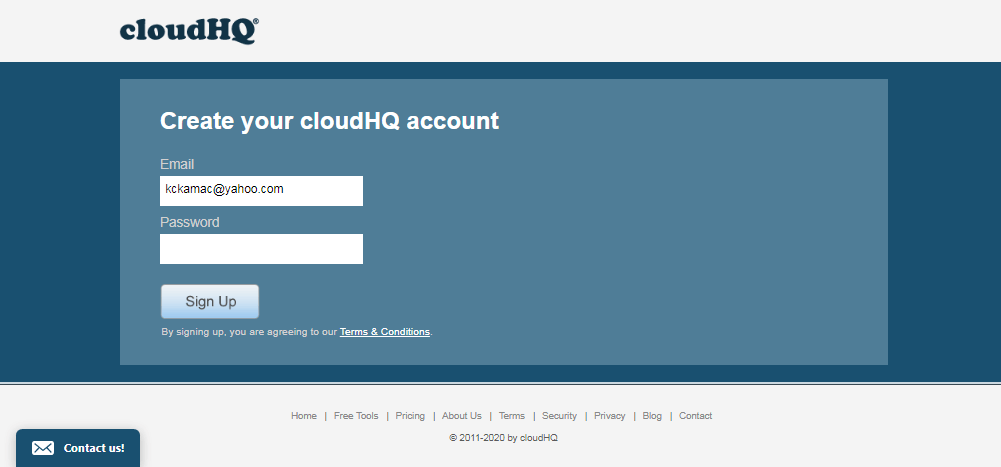
- You have successfully signed up for the cloudHQ cloud storage manager to manage multiple cloud storage account. You can go ahead to activate your email and login to start managing your cloud drives.
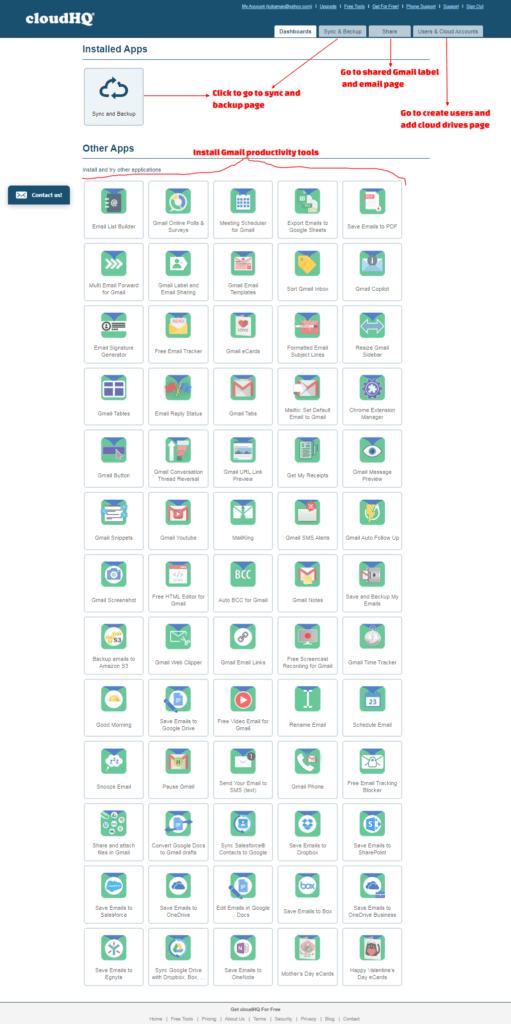
- Log in to the cloudHQ dashboard to explore the available tools as shown below. The productivity tools are mostly Chrome addons. You need a Chrome browser as well as a Gmail account to use them.
Add users to cloudHQ
- Adding users to your cloudHQ cloud storage manager:
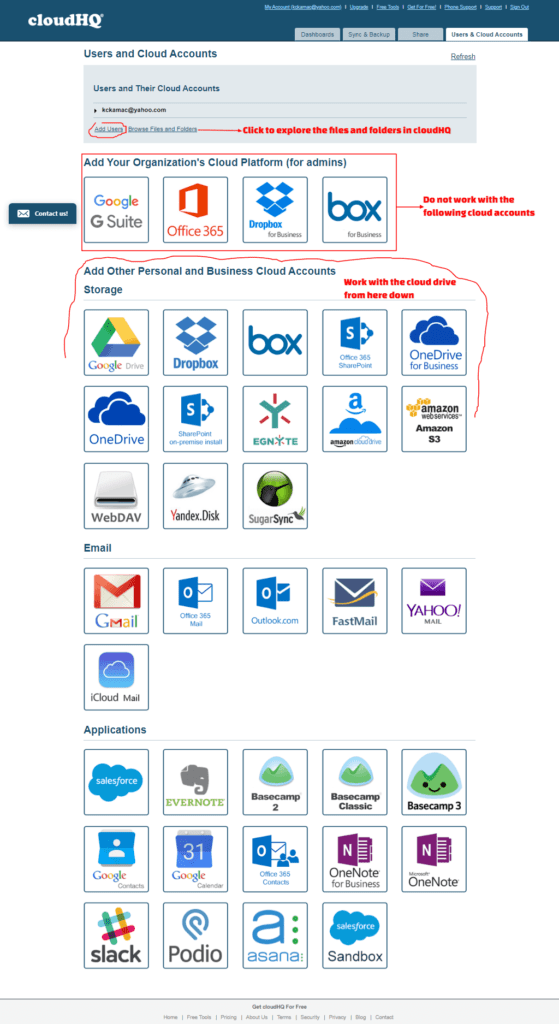
- Go to the Users and Cloud Accounts tab, and select Add Users on the page that appears.
- Fill in the recipient’s email addresses, separated by a comma, and an invitation message.
- Select Require user to give you full access to their cloud accounts option, and click the Send Invite button.
- If the invited user accepts the invitation, you will have access to his/her cloudHQ account as an Admin.
Add cloud drives to cloudHQ
- Adding cloud Drives to your cloudHQ cloud storage manager:
- On the Users and Cloud Accounts page, scroll down to select a cloud drive one at a time. Select a cloud drive from the Add Other Personal and Business Cloud Accounts group.
- After each selection, you will be required to Authorize cloudHQ to access the cloud drive like in Multcloud.
- Log in to each cloud drive and grant permission to cloudHQ to access each selected cloud drive.
- After adding all the cloud drives you desire, your user account will display each drive.
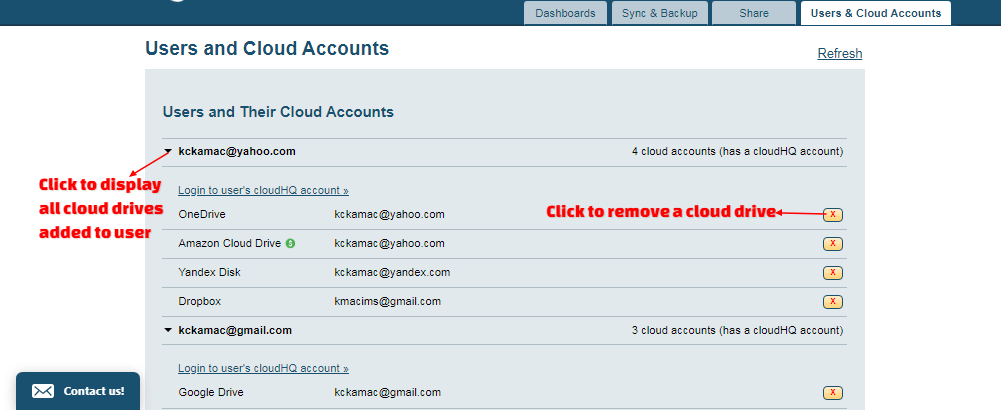
- From the drop-down arrow, view all added cloud drives. Use the delete button to remove a cloud drive you do not need.
Perform backup and sync in cloudHQ
- Sync or Backup a Drive using one-way or two-way sync:
- Select the Sync & Backup tab.
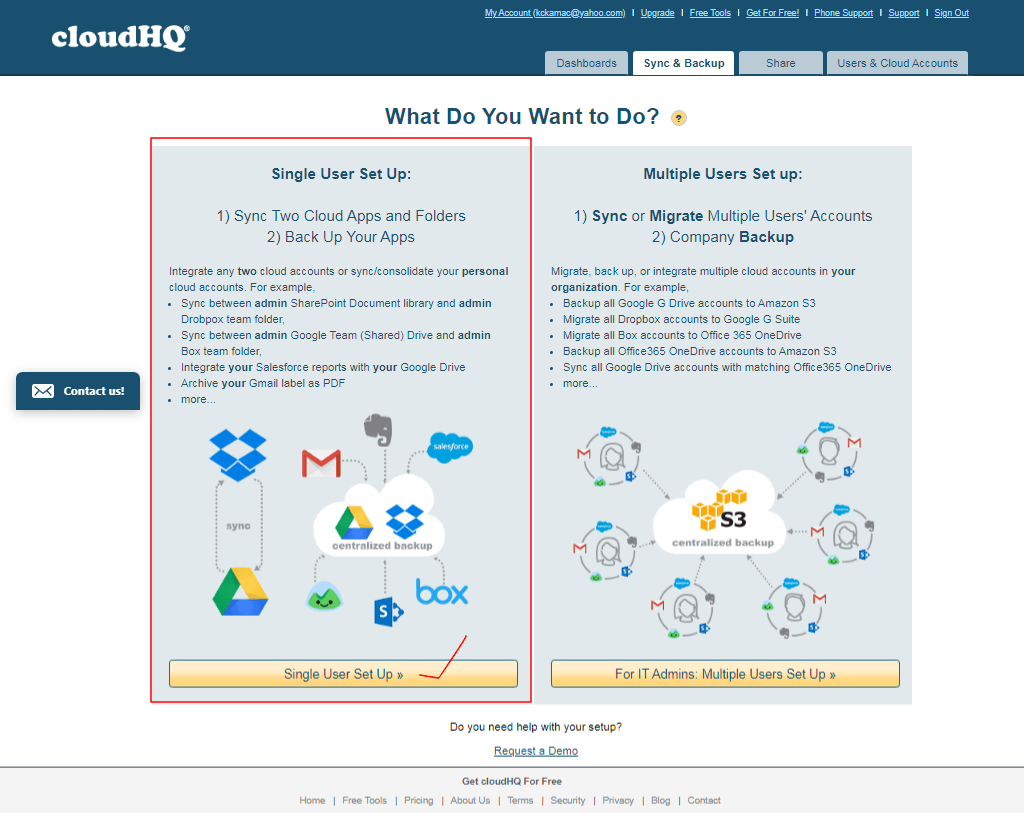
- On the page that appears, select Single User Set Up.
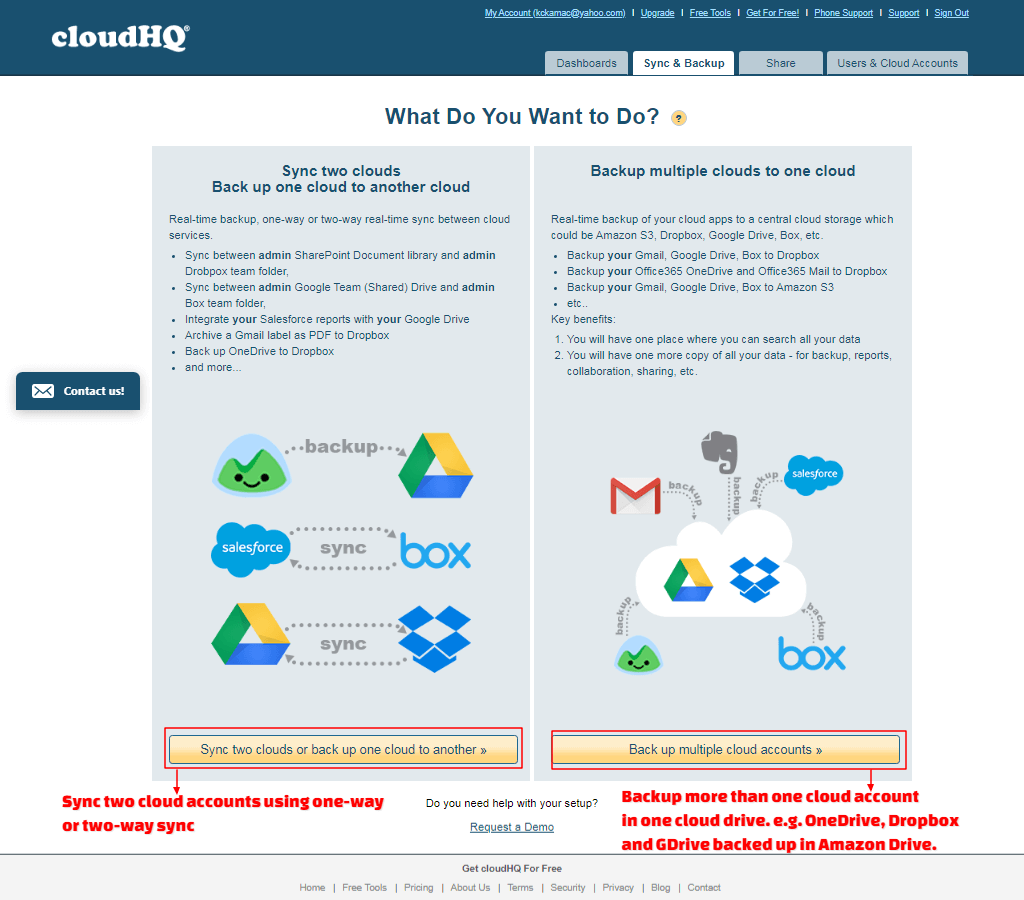
- On the next page that appears, select either Sync two clouds or Backup Multiple clouds to one cloud. Select Sync two clouds.
- On the page that appears, do the following:
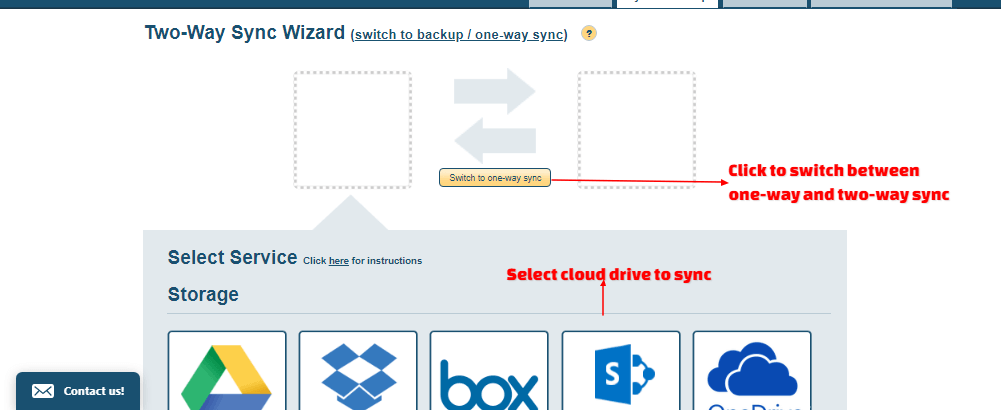
- Switch between one-way and two-way sync using the button or hypertext
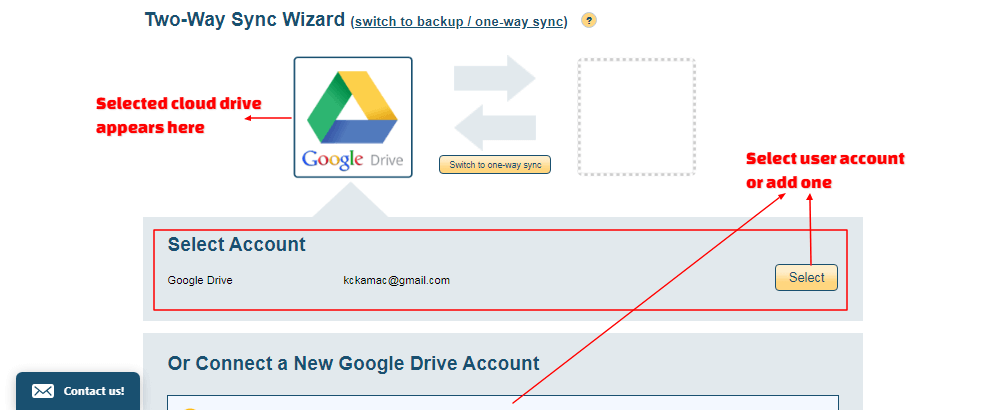
- Select a cloud drive to sync, e.g. Google Drive.
- You will be required to select the account associated with the selected cloud drive. Click the Select button next to the user account email.
- On the next page, specify what you want to sync or backup, e.g. entire drive, or a folder. Click Next.
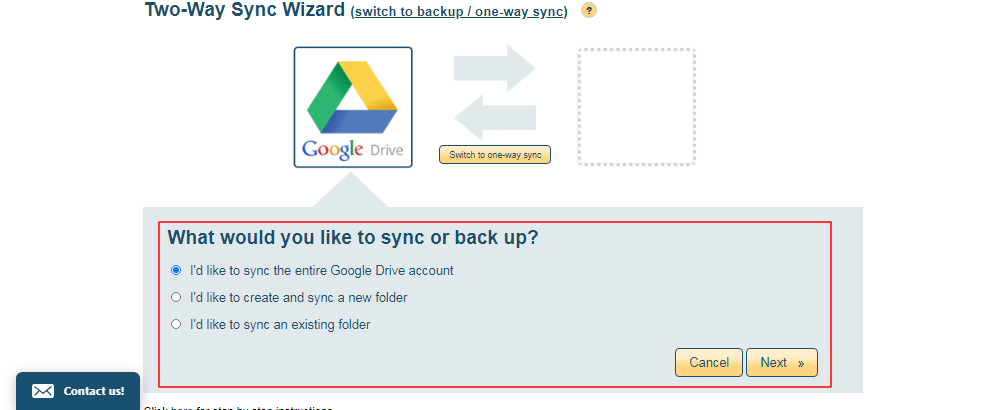
- On the next page that appears, select the second cloud drive and repeat the procedure.
- If you selected to create and sync a new folder option, you will be allowed to create the folder. If you selected to sync an existing folder option, a window will open for you to select the folder.
- On the last window, choose appropriate options as you desire.
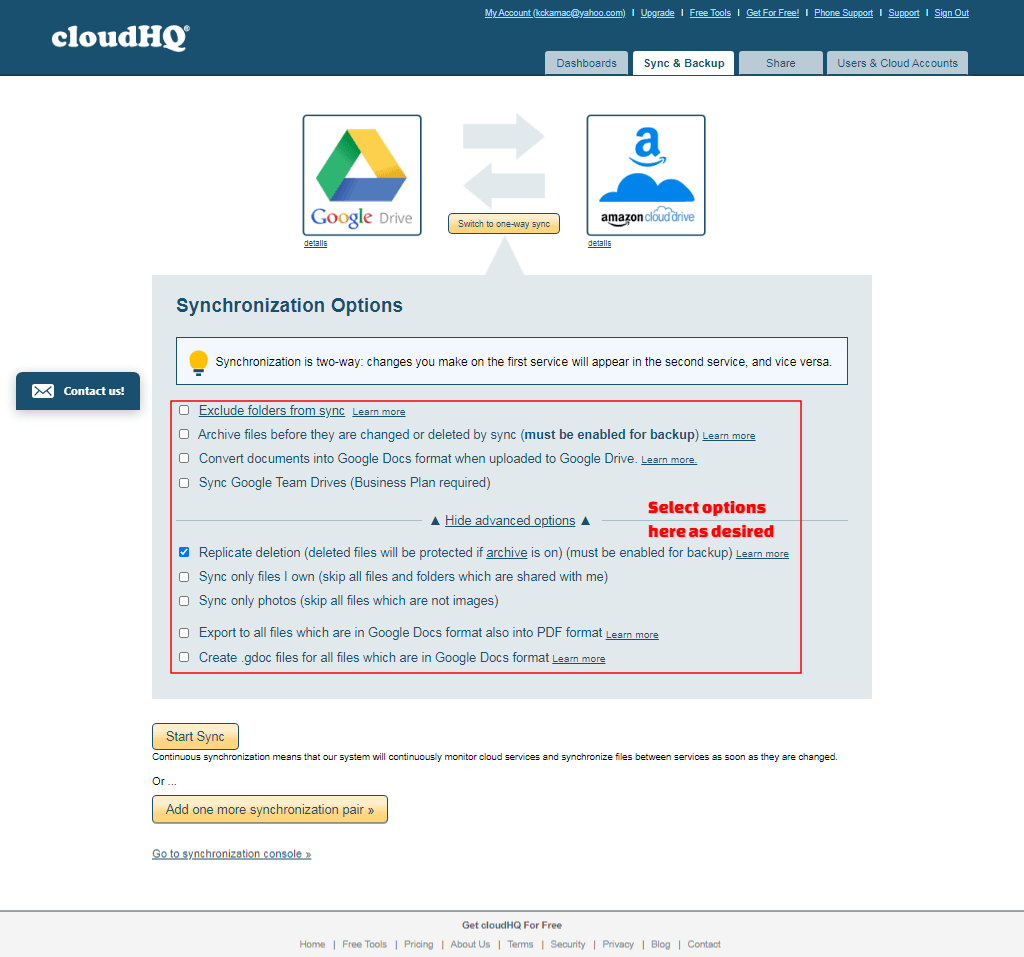
- Click the Start Sync button or the Add one more sync pair button.
Backup/ sync multiple clouds drive in one cloud drive
- To sync/ backup multiple cloud accounts in one cloud drive, follow the procedure in the video below.
CloudHQ is a great cloud storage manager that enhances productivity and helps you work smartly. You can sync and backup cloud drives with ease as well as connect to other cloudHQ user accounts as admin. However, it does not allow you to perform operations on files and folders. You can only share Gmail labels and Emails using the Share tab. Yet, it is a great tool to manage multiple cloud storage accounts in a central location.
Otixo multiple cloud storage manager
Otixo is a workspace where teams within and outside an organization work together remotely. Otixo is both a cloud storage manager and a collaboration workspace where you can achieve the following:
- Organize projects and teams in one location using channels
- Organize video/ audio meetings with teammates
- Chat, share screen, and files and folders with teammates
- Securely share files & folders from different cloud drives
- Securely upload files to your workspace, and many more.
- Have access to 25gb free cloud storage to store files.
Like other online cloud storage managers discussed above, Otixo has both free and premium features. With the free plan, you can maximize cloud storage management with few limitations. Let’s get started using Otixo.
- Go to the Otixo home page and click on Get Started.
- Once you verify your email address, the Create Workspace wizard will appear.
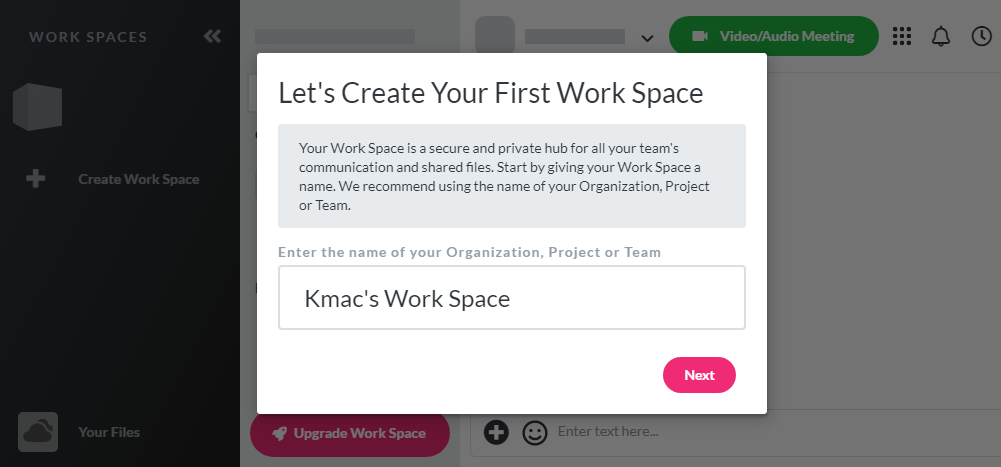
- Enter a Workspace name and click Next. You can also create a workspace from your dashboard using the + Create Work Space link.
- On the next page, add members to your work space. Enter individual members’ email addresses or use Add email addresses in bulk to add multiple emails separated with a comma.
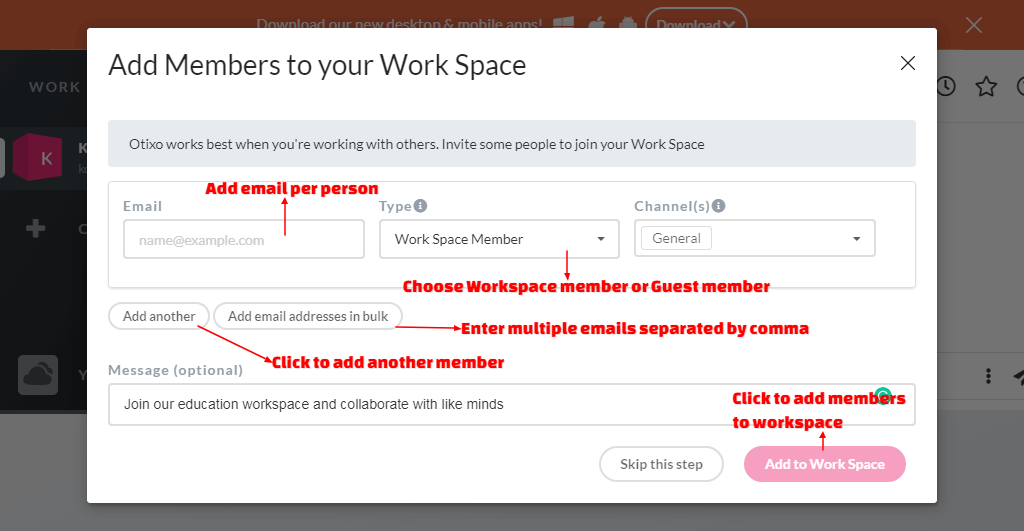
- For each invited member, select a membership type. Membership type could be Work Space Member or Work Space Guest. A Work Space Member can be added to more than one channel. A Guest member can be added to only one channel. Also, a Work Space Member can upload, download, copy, delete, share, preview, and chat with others. But a Guest Member can only upload, download, preview, and chat. For each work space member, you can add 4 guest members.
- The invited member will have an Otixo account to join the workspace.
Explore the Otixo Dashboard
- The Otixo cloud storage manager’s dashboard is self-explanatory.
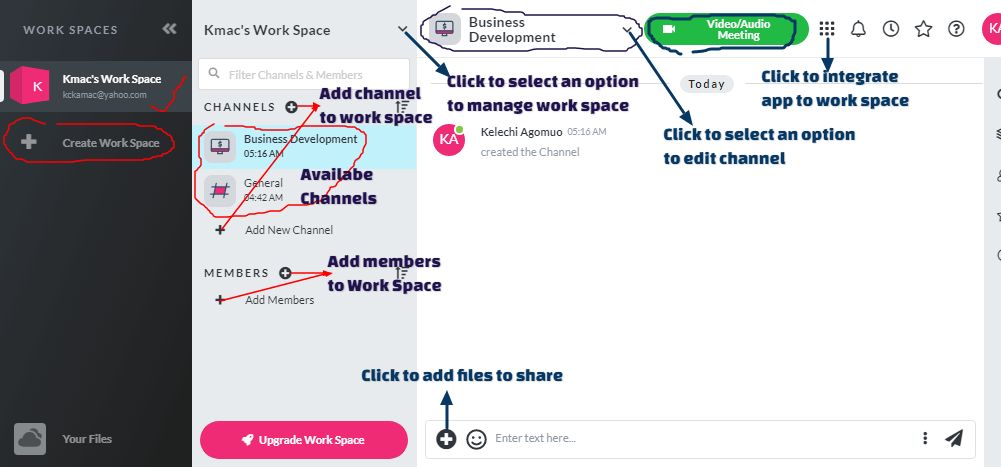
- Use the Work Spaces pane to create a Work Space.
- Select a Work Space on the Workspaces pane to view the channels and members associated with the selected work space.
- Click the drop-down arrow next to the selected Work Space. From the menu that appears, select an option to manage a work space. You can set work space settings, add and manage members from the menu.
- Click the drop-down arrow next to a selected work space channel. From the menu that appears, select an option to manage a channel. You can add channel members, edit, and delete a channel.
- Point at an icon on the right pane to view the icons use. E.g. show files, show members, etc.
Using Otixo as a Cloud storage manager
Otixo platform can handle workspace management and also be used as a cloud storage manager. To use it as a cloud storage manager, you will need to integrate selected cloud drives into a work space.
- On Otixo’s cloud storage manager’s dashboard, select the Your Files link.
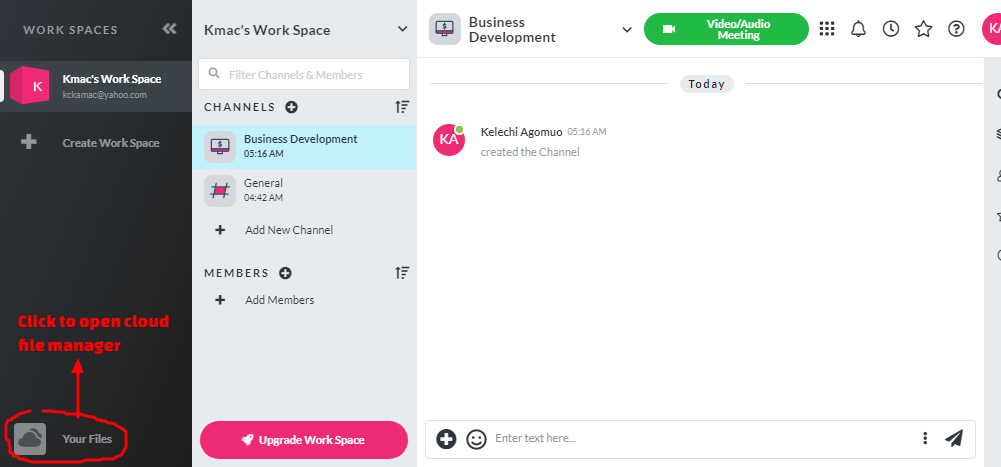
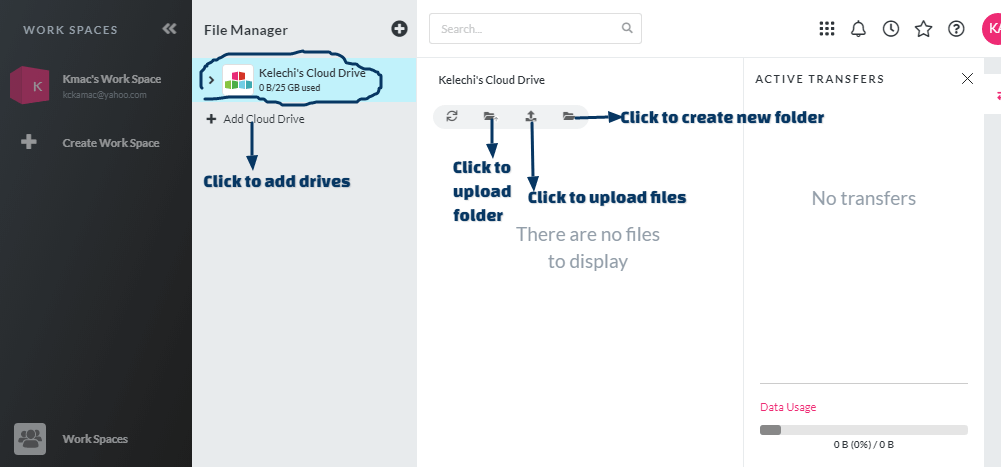
- On the File Manager window, select Add Cloud Drive to add a drive.
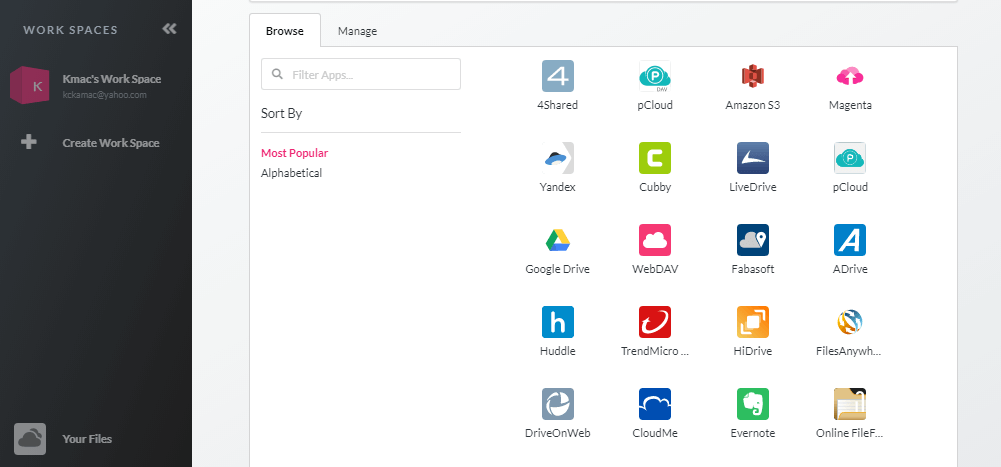
- On the File Manager Apps page, select the Browse tab. From the list of drives, select a cloud drive from the available cloud drives.
- Fill the dialog box that appears and grant permission to Otixo to access the selected cloud drive.
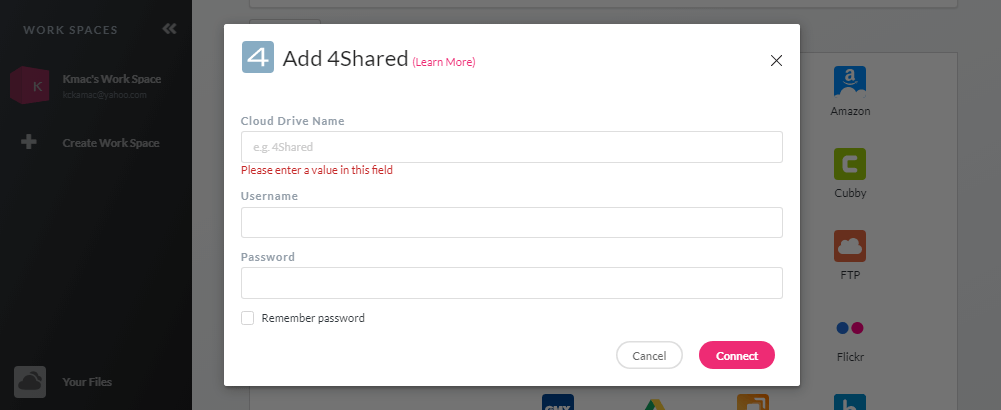
- Repeat the same process for as many drives as you want to connect to your Otixo cloud storage manager.
- After adding the necessary cloud drives, your Otixo File Manager will display all the drives.
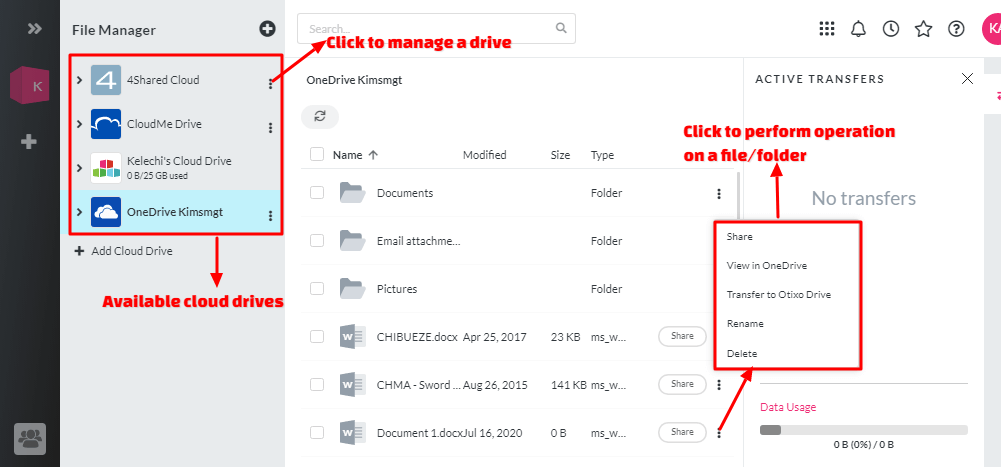
- Select each drive to view its content. On the cloud explorer window, click the ellipse next to a file/folder and select an item from the popup menu.
- On the File Manager Apps page, select the Manage tab.
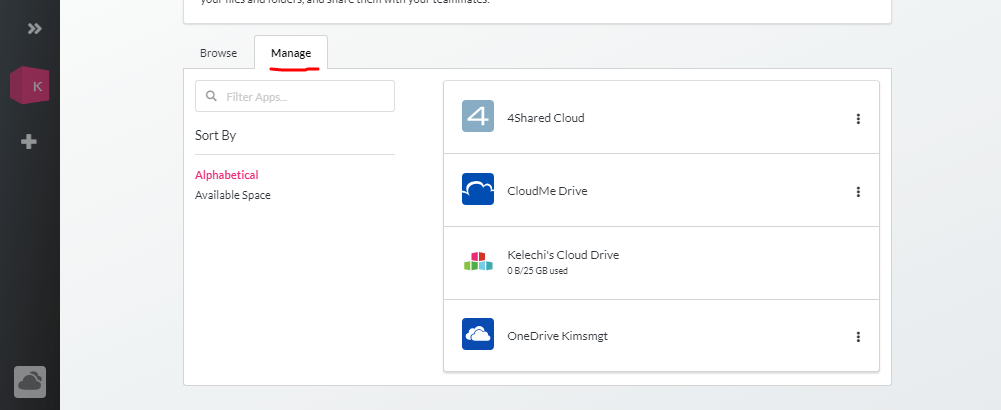
- Use the ellipse icon to edit or remove a cloud drive.
Otixo is a wonderful workspace and cloud storage manager that will assist anyone to manage multiple cloud storage accounts. However, it has some limitations which include:
- You cannot upload a file to a connected cloud drive within the Otixo app. You can only upload to Otixo’s local drive.
- You cannot transfer files from Otixo local drive to a connected cloud drive.
- You cannot perform sync and backup of files in Otixo.
Despite these and more limitations, the Otixo app is great for managing and sharing files from different drives. Using Otixo, files meant for a given workspace can be gathered in one place.
Integrating apps to Otixo (Optional)
To integrate apps to Otixo, you need Zapier’s account. If you do not have a Zapier account, click here to sign up for free.
- Sign up for Zapier. Don’t bother, if you already have Zapier’s account.
- On Otixo’s dashboard, select the Apps Integration icon.
- On the App Integration Tool page, select the Manage tab. On the Manage tab, select the Authenticate with Zapier button.
- On the Zapier authentication page, log in to your Zapier’s account with your email and password.
- Then grant Otixo permission to connect to your Zapier account by clicking the Authorize button.
- On the App Integration Tool page, select the Browse tab. Under Filter By, select Documents or any other app category.
- Select a cloud drive from the list of available drives to add. We selected Box.
- From the dialog window that appears, select your desired zaps for Box. Particularly, select Get notified in Otixo when a file is added to your Box folder.
- On the next page that says, Which of these statements describe you right now? Select the option that suits you. Click Next.
- On the next window, log in to Box and to Otixo respectively to allow Zapier access to both accounts.
- On the Connect your apps page, select a folder under Box that will trigger zap. Also, select a work space/channel under Otixo.
- Click the Turn on Zap button when done. You are all set.
- Repeat the same process to connect other cloud drives with Zapier.
Conclusion
We have had an in-depth discussion on how to manage multiple cloud storage accounts in one place. Three (3) notable online cloud storage manager apps were discussed: Multcloud, CloudHQ, and Otixo. Each of these apps is unique and be used to manage cloud storage in different forms.
Multcloud provides features for full cloud storage management, though with few limitations. CloudHQ integrates Gmail productivity tools with cloud sync and backup for individuals and IT admins. With its features, one can do more in the workplace. Otixo combines cloud storage management within a workspace. Using Otixo, you can manage and share files for each channel and collaborate with members of the channel.
A simple guide is:
- If you want to increase your cloud storage, use multcloud, Odrive and/or Air Explorer.
- If you want to increase productivity and manage storage securely from one location, use cloudHQ.
- If you want a central collaboration workspace for your files and teammates, use Otixo.
Which of these tools do you prefer and for what purpose? There are other cloud storage manager apps that we could not discuss in this article. They are the Odrive app and the Air Explorer app. Have you heard of any of these apps? What features key features make them unique and different from the above 3 apps?


