The IF statement in Excel is one of the logical functions in Microsoft Excel. It is used to return values when used alone and when used alongside other logical functions. The IFS function in Excel makes it easier to use multiple conditions than the nested IF statements. It returns the value_if_TRUE for up to 127 conditions.
The IF logical function has three (3) arguments. It returns one of two values based on the stated conditions. The first, if the condition is TRUE and the second, if the condition is FALSE.
For example, if a set of data represents the scores of students in an examination. And the examination board discloses that students who scored 60% and above passed while those who scored below failed. Then, a student will either pass or fail depending on his/her score. Those who scored 60% – 100% passed while those who scored 0 – 59.99% failed.
In this tutorial, we shall discuss how to use the IF statement in excel, including nested IF statements and the IFS function.
What is IF Statement in Excel?
The IF statement in Excel is a logical function used to make a comparison to return a value. The IF function is used to compare a statement to know whether it is TRUE or FALSE. When creating an IF statement, the IF function usually has two values. The first value is returned when the compared value is TRUE, and the second is returned when the compared value is FALSE.
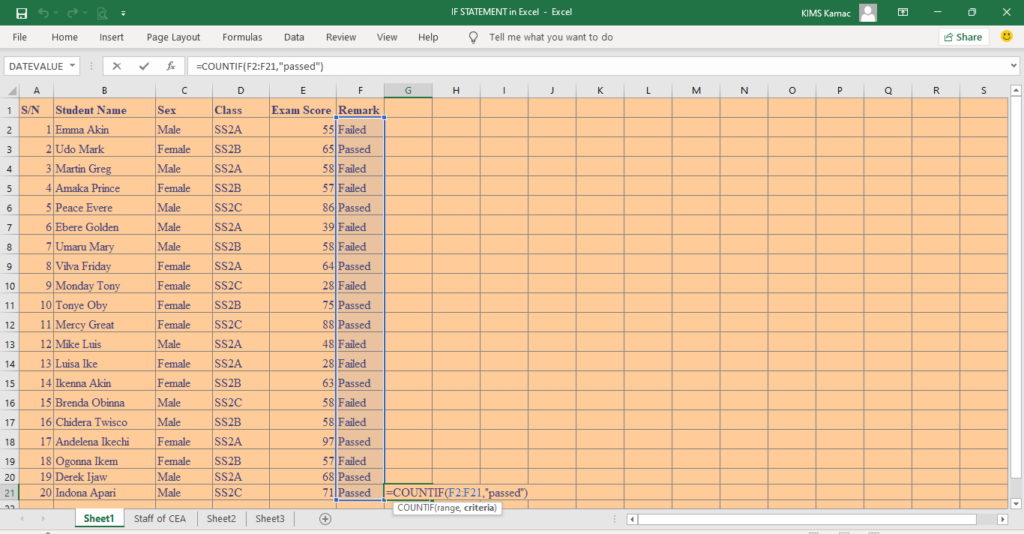
Take a look at the student exam scores shown in the worksheet below and the results of the IF statement.
Using the IF statement in Excel, you can easily determine those who passed and those who failed. You will achieve this by specifying the value when TRUE and the value when FALSE. For example, IF(value >=60, “Passed”, value <60, “Failed”).
Looking at the statement, you will understand that a student will either score >=60 or not. Hence, the condition will be either TRUE or FALSE. Therefore, the above statement can be rewritten as follow: IF(value>=60,“Passed”,“Failed”), indicating that a student will pass or fail based on his/her score.
The Remark column in the worksheet above is where we used the IF statement to display who passed or failed.
Syntax of IF Statement in Excel
The syntax for the IF statement in Excel is given by: IF(logical_test, [value_if_true], [value_if_false])
Where:
- logical_test: is a required condition that must be specified. This argument represents the condition that must be tested and evaluated to TRUE or FALSE. Such conditions can contain text, numbers, cell references, dates, logical operators, and functions.
- value_if_true: This is an optional argument. It represents a text, number, cell reference, date, or function that must be returned/evaluated when the logical_test is TRUE.
- value_if_false: This is an optional argument. It represents a text, number, cell reference, date, or function that must be returned/evaluated when the logical_test is FALSE.
In its simplest form, the IF statement gives you a value of YES/No depending on the result of the logical_test.
Uses of IF statement in Excel
As stated in our previous tutorial, logical operators output TRUE or FALSE values. But we can use them with the IF statement to output actual values. Hence, we use the IF statement in Excel to:
- Test if a condition is true or false, and output a value based on such test.
- To create conditional functions that must be evaluated based on stated conditions. IF statement accepts a function, therefore, we can evaluate a function based on a stated condition.
- To execute a task that will be triggered based on a value. We can use the IF statement to create conditional formatting which is triggered based on a specified value.
Generally, the IF statement can be used in any scenario that requires testing a condition that will evaluate to TRUE or FALSE.
Simple example
The simplest example of the IF statement is when used to evaluate a condition that results in YES or NO. The above example of Pass/ Fail is typical. Let us illustrate with the following examples.
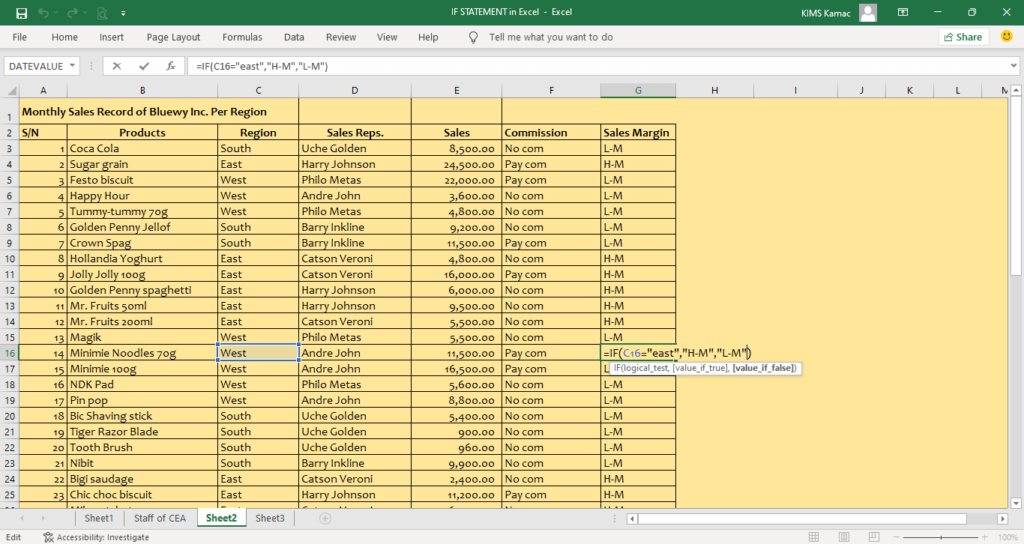
- The worksheet above represents the sales of a named company. Sales 10000 and above attract commission while sales below 10000 do not attract commission. Use the IF statement in Excel to identify sales that will receive a commission.
- Sales made in the East have a higher sales margin while sales in other regions have lower margins. Identify all sales that attract higher and lower margins.
The solution to simple IF statements example
- Let us identify the sales with and without commission. We will mark sales with a commission “Pay com” and sales without commission as “No com”.
- In the worksheet, create another column called commission in cell F2.
- In cell F3, enter the formula: =IF(E3>=10000,”Pay com”, “No com”)
- Use the autofill handle to drag the formula to all the cells in the column.
- The cells with 10000 and above are labeled “Pay com” and others “No com” as shown below.

- Let us identify regions that have higher and lower margins. We shall mark regions with higher margins as “H-M” and regions with lower margins as “L-M”.
- In the worksheet, create another column called Sales Margin in cell G2.
- In cell G3, enter the formula: =IF(C3=”east”,”H-M”,”L-M”)
- Use the autofill handle to drag the formula to all the cells in the column.
- The cells corresponding to the East region are labeled “H-M” and others “L-M” as shown below.
These examples show a very simple way to use the IF statement in Excel. There are more complex scenarios, which we shall illustrate with examples below.
IF Statement Practice Exercises in Excel
How to use Nested IF statements in Excel
The nested IF statement is a system of using an IF statement in another If statement. When you have multiple conditions to test, you can use the nested IF statement to arrive at an answer. When the nested IF statement is used, you will specify the condition and value if true. The value if false is usually replaced with another IF statement until all conditions are entered.
For example, in the worksheet below, students are graded A – F based on their score in an exam as follow:
| Score Range | Grade |
| 0 – 39.99 | F |
| 40 – 49.99 | E |
| 50 – 59.99 | D |
| 60 – 69.99 | C |
| 70 – 79.99 | B |
| 80 – 100 | A |
Let’s use the IF statement to grade the students based on their exam score using the steps below:
- Create a column called Grades in column G.
- In cell G2, enter the following nested IF statement: =IF(E2<40,”F”,IF(E2<50,”E”,IF(E2<60,”D”,IF(E2<70,”C”,IF(E2<80,”B”,IF(E2<=100,”A”,))))))
- Ensure that the number of bracket closures equals the number of IF arguments used.
- Autofill the formula in the remaining cells in the column.
- Note the sequence of the arguments. The function executes from the first argument. If the first argument is TRUE, it stops, if it is FALSE, it moves to the next IF statement, and so on.
- The result of the nested if statements are given below.
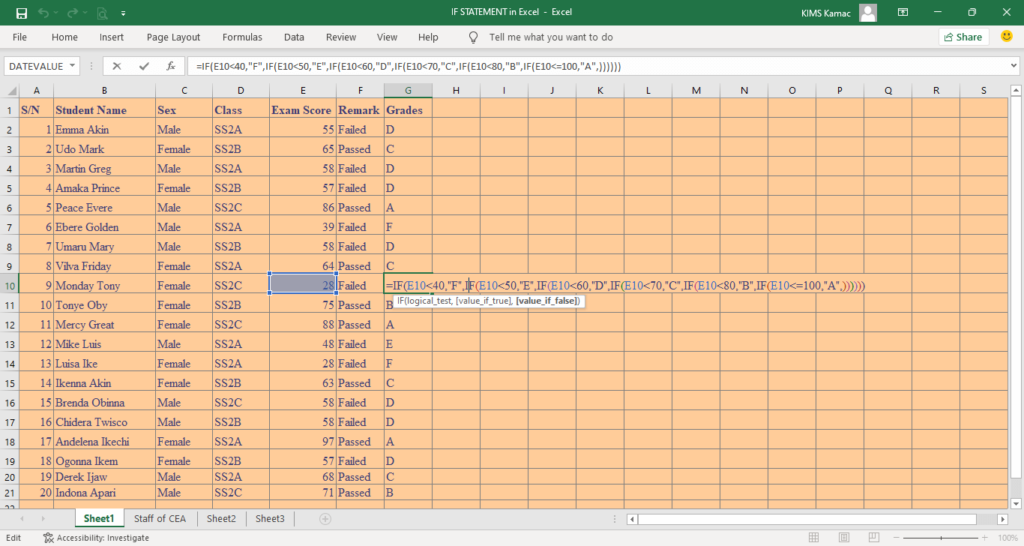
The logic behind the nested IF statements is that if the first condition is TRUE, the true value is evaluated. But if the condition is FALSE, it evaluates another If statement until the end of the argument.
Using OR in IF statement in Excel
You can combine the IF statement with the OR logical function to output a value. This will enable you to test more than one condition at the same time. You can even combine the OR, and the AND functions together depending on the conditions being tested.
Example 2: OR in IF statement
Let us illustrate the OR in IF statement in Excel with the following example. Assuming that the management of Bluewy Inc. wants to give a 7.5% commission to sales made in the East region or sales above 10000. Then, the solution can be achieved as follow.
- Create a column called Paid commission. A commission of 7.5% of sales will be paid to East regions or sales above 10000, and none to others.
- In cell H3, enter the following formula: =IF(OR(C3=”east”,E3>10000),7.5%*E3,0)
- The formula states, if sales are made in the east region or sales are above 10000, pay a commission of 7.5% of the sales.
- Copy the formula to other sales in the column using the autofill handle.
- The result of the OR in IF function is given in the worksheet below.
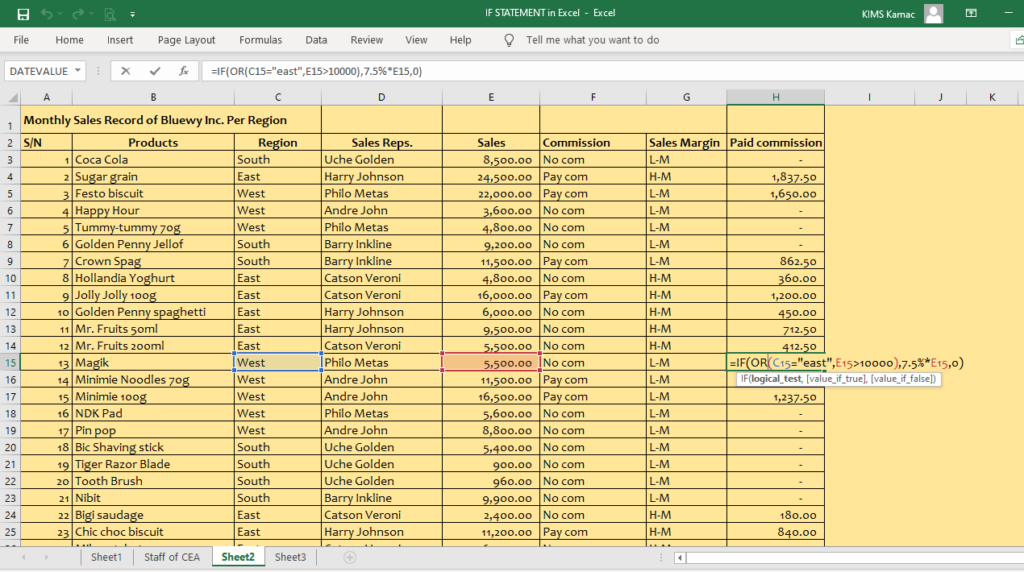
Notice the amount of commission paid out, and the sales that received the commission.
Multiple IF AND Statement in Excel
Like the OR logical function, you can also use the AND logical function with the IF statement in Excel. With the AND function, you can verify or compare multiple values at the same time.
Example 3: IF AND statement
Let us illustrate the IF AND statement in Excel with the following example. The management of Bluewy Inc. wants to give a 9% commission to sales above 10000 made in the East region. This means that sales made in other regions do not count, and sales not greater than 10000 in the east region do not count. Do the following:
- Create a column called 9% commission. A commission of 9% of sales will be paid to sales above 10000 made in the East region, and none to others.
- In cell I3, enter the following formula: =IF(AND(C3=”east”,E3>10000),9%*E3,0)
- The formula states that if sales are made in the east region and sales are above 10000, pay a commission of 9% of the sales.
- Copy the formula to other sales in the column using the autofill handle.
- The result of the IF AND function is given in the worksheet below.
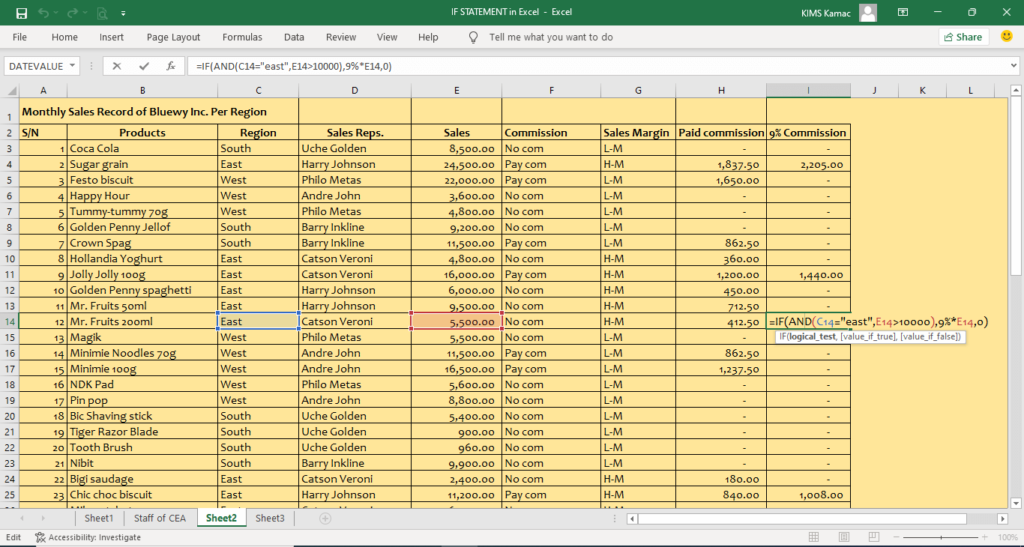
Notice that very few commissions were paid out. This is because the condition to receive a commission is stricter. The two conditions must be TRUE for a commission to be paid.
Example 4: AND OR in IF statements in Excel
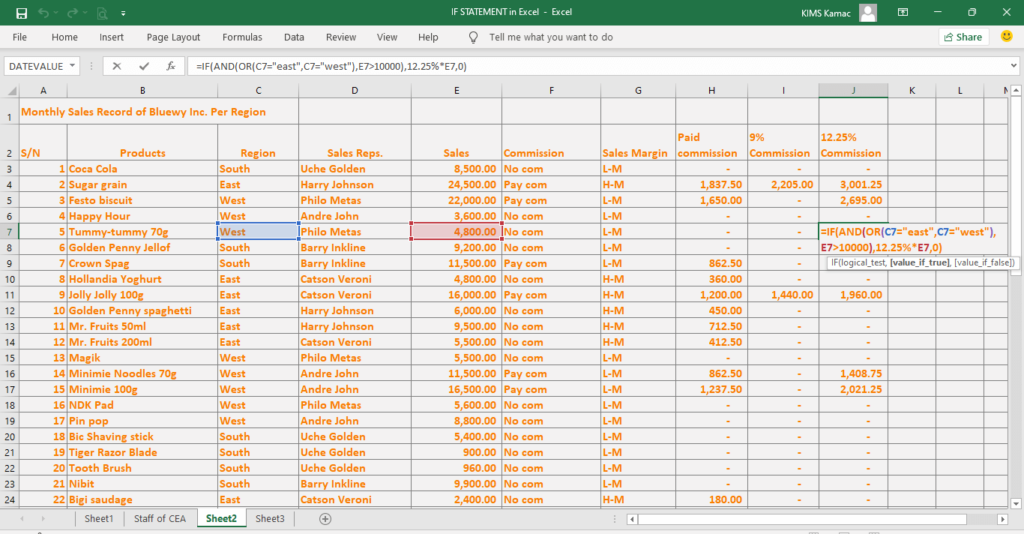
Let us combine the OR, and the AND IF statements in the following example. The management of Bluewy Inc. decided to pay a commission of 12.25% to any of the east or west regions with sales above 10000.
In this case, sales of ABOVE 10000 MUST be made in the East OR West regions. To solve this problem, we do the following:
- The OR function should be as follow: =OR(east, west)
- The AND function should be written thus, =AND(OR(east, west),>10000). This means that if the sales are in either east or west, it must be above 10000.
- Create another column called 12.25% commission, and enter the following formula in cell J3.
- Use the autofill handle to copy the formula to other cells in the column.
- The result of the OR AND IF function is shown below. Take note of who received the commission and who did not receive the commission.
How to Use IF Statements in Excel for Multiple Conditions (IFS function in Excel)
With the nested IF statement, we can test for multiple conditions at the same time. However, this pattern is confusing, especially for beginners. In Microsoft Excel 2019, and Microsoft 365, another function was introduced to remedy the situation. This function is called the IFS function.
The IFS function is used to test multiple conditions at the same time. When used, it will return the value of the first TRUE condition like the nested IF statement. Here, there is no value if false.
When using the IFS function, you are allowed to test up to 127 conditions at the same time. However, it is recommended not to use too many conditions. This is because you are required to enter these conditions in the correct order to avoid mistakes.
For example, in the nested IF statement, you can proceed as follow: <10, <20, <30, etc. If you do anything like <30, <10. <50, you will have the wrong result. Conditions must be entered in the correct order, and this might be difficult to build at times.
Syntax of the IFS function in Excel
The syntax of the IFS function is given by IFS(logical_test1, value_if_true1, [logical_test2, value_if_true2], [logical_test3, value_if_true3],…)
Where:
- logical_test1 is required and is the condition that must evaluate to TRUE or FALSE.
- value_if_true1 is required, and a value that must be evaluated or returned if the condition is TRUE.
- logical_test2 … logical_test127are optional conditions that must evaluate to TRUE or FALSE.
- value_if_true1 … value_if_true127 are optional values or functions that will be evaluated or returned if logical_testn is TRUE.
Example 5: IFS function in Excel
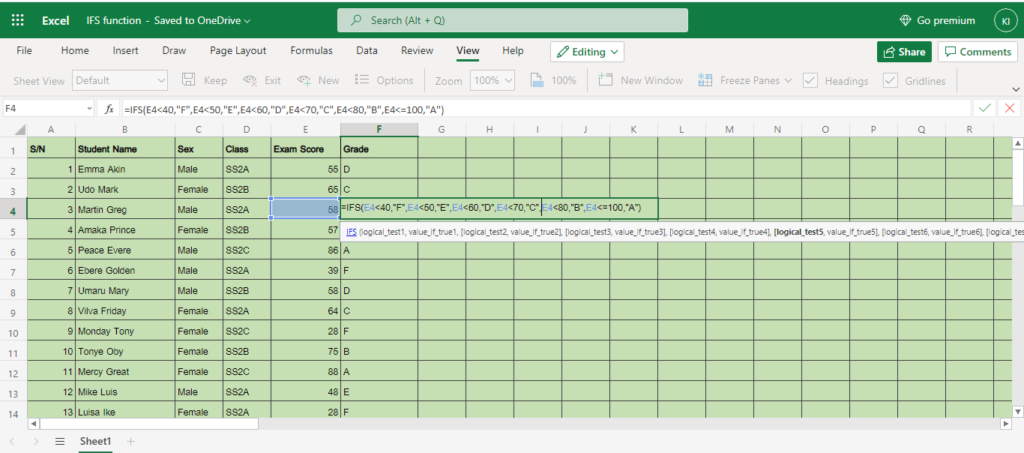
Let’s use the IFS function to grade the students based on their examination scores. We are rewriting the nested IF statement with the IFS function as follows.
- You must have Microsoft Excel 2019 or subscribe to Microsoft 365 to perform this task.
- If you have none of the above, connect to your OneDrive account, and open the Excel app.
- Enter the detail of the students’ results as shown in the worksheet below, using the grades in the nested IF statement.
- Enter the following formula in cell F2: =IFS(E3<40,”F”,E3<50,”E”,E3<60,”D”,E3<70,”C”,E3<80,”B”,E3<=100,”A”)
- Use the autofill handle to copy the formula to other cells in the column.
- Notice that the results of the function are the same as the results of the nested IF statement above. But this function is easier to use than that of the nested IF statement.
Conclusion
The IF statement in excel is very useful when you want to test a condition and output the result. It can be used alongside other logical functions to return a value as have been illustrated in this tutorial.
You can use the nested IF statement in Excel or choose to use the IFS function in Excel. Though the IFS function is easier to use, you must have Microsoft Excel 2019 or Microsoft 365 to use it. If you have none of the above, use your OneDrive account to access the Excel app to use the IFS function.
We used different examples to illustrate how to use the IF statement. If you have any questions, please, do reach out to us. Next week, we shall look at the Vlookup function in Excel.


