Formatting text in a document is relevant in all workspace environments. It helps to standardize a document, makes it readable and presentable to an audience. There is, therefore, a need to insert text in a document before formatting text.
Texts take over 90 percent of the content of a Microsoft Word document. Texts are so important that they must appear in every content created, no matter how small. Different documents such as letters, memos, resumes, etc., rely on texts to convey proper communication.
In documents such as flyers, banners, and letterheads, texts are needed for proper brand identification and information delivery. Texts also help to drive home ideas, as well as communicate to an audience.
Because of the importance of text, it is necessary to learn how to format text in a document. In this tutorial, you will learn how to insert and format text in a document by understanding the following:
- Inserting text in a document
- Formatting text in a document
- Using the clipboard commands
- Inserting text box and WordArt
- The drop cap command
- Using the spelling & grammar tool
Before you proceed, remember to explore the first three tutorials in this series. To understand how to work with Microsoft Word better, visit the links below.
- Microsoft Word Tutorial Level 1: What is Microsoft Word
- Microsoft Word Tutorial Level 2: Creating a Document
- Microsoft Word Tutorial Level 3: The Page Layout
Inserting text in a document
To insert or add a text in a document is the process of including text content in a document. You can add text to a document in four ways:
The keyboard input device:
This is the process of typing directly into the document through the keyboard input device. This can also be achieved by using the onscreen keyboard made available in your operating system. Typing is the most popularly used method, and it is popularly used in offices and business centers. Experts in using this method have mastered how to type from the keyboard. And this is usually measured in words per minute. Broderbund’s Mavis Beacon is a popular software used to learn and master typing to become an expert typist.
The clipboard:
This is the process of copying and pasting texts from another document. Texts can be copied from another word document, another application, or a web page. When the copied text is placed in a word document, it becomes part of the present document. This is a faster way of inserting text into a document. It is simply done by highlighting the text or group of texts in one document. Then copying and pasting the selected texts at the insertion point in the present document. The selected text will populate the present document.
OCR (Optical Character Recognition) software:
This is the process of scanning and converting hard copy text documents into a soft or digital copies. This method is gaining popularity and acceptance in the modern office workspace. It enhances productivity, makes it easier to manage paperwork, and eliminates the task of learning typing. Its main disadvantage is that some characters may not be accurately recognized by the software. From experience, some OCR can give up to 95% accuracy depending on the nature of the scanned document. Because of the inaccuracy, you will have to proofread the document thoroughly to identify and correct misinterpreted texts. Some popular OCR software include Readiris, ABBYY cloud OCR, Simple OCR, etc.
Speech to text software:
Though this has not gained much popularity, it is one of the fastest ways of inserting a text. It is the process whereby your voice is being recognized by your computer and spoken words converted to texts. It is made possible by machine learning and artificial intelligence. To achieve high accuracy when using this method, you will train your voice for accurate recognition. Microsoft 365 has the Voice command on the Home tab to ease text dictation.
With these four methods, you can easily insert text into a document. Choose any of the methods, let us start formatting your texts.
Formatting Text in a Document
Formatting text is the process of customizing the text in a document to conform to the desire of the creator. It entails modifying and tweaking text using various text features to make a document presentable.
Text features
Every text in a document has its characteristics. These characteristics include color, size, capitalization, etc. Some of the text features to be modified in a document include:
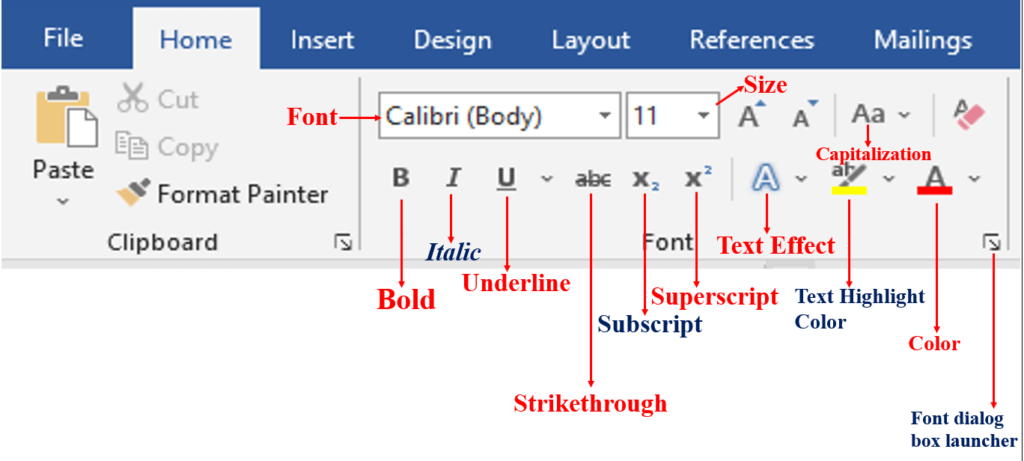
- Font, which represents a character presentation format. Fonts differ, and each font selected has a unique way of representing a text it applies to. Different font types can be selected from the list of fonts.
- Size, which represents the magnitude of a character or text in a document. There are acceptable character sizes for different types of documents, though this can be left to the user’s choice. For example, in academic research, sizes 12 and 14 are acceptable for thesis and projects respectively.
- Capitalization, which depicts a text in any of two cases: lowercase and uppercase. Other case types are variations of these two cases.
- Boldface, which is used to lay emphasis on a text. It makes selected text bold or dark to show its level of importance in a document. Most times, boldface is used on headings and subheadings in a document.
- Italic, which represents a style of a selected text. Italicize texts are slanted in nature, indicating deviation from normal. This feature is usually used on texts that represent foreign languages, scientific terms, etc.
- Underline, which draws a line under a text. Underline is usually used in the absence of italics and bold. But in recent times, it is rarely used in a document. However, there may be a need for you to use it in a document.
- Subscript, which creates a small letter below a line of text. It is used to create a letter to the base of a standard text, such as 102 (10 base 2).
- Superscript, which creates a small letter above a line of text. It is used to raise a letter above a standard text, such as X3 (X raise to power 3).
- Color, which adds beauty to a text. Color can be applied to a selected text to differentiate it from other texts for different reasons. It may be for beauty, aesthetics, to highlight a point, or for branding, etc.
- Others include text effect and text highlight color. They can be used to distinguish texts in a document.
Applying text formatting
Formatting text is very simple in modern word applications because of the use of ribbon commands. To apply text formatting in a word document, follow these steps.
- Select the text or group of texts you want to apply formatting on.
- On the Home tab, under the Font group, select any of the text features you want to modify.
- Any feature selected will be applied immediately to the document (see features icon in the diagram above).
- To change text font, do the following:
- Highlight the text or group of text you want to modify
- On the Home tab, under Font group, select the Fontdropdown arrow
- From the list that appears, select your desired font, e.g. Century Gothic
- The selected font is applied to the highlighted texts.
- To apply capitalization, do the following:
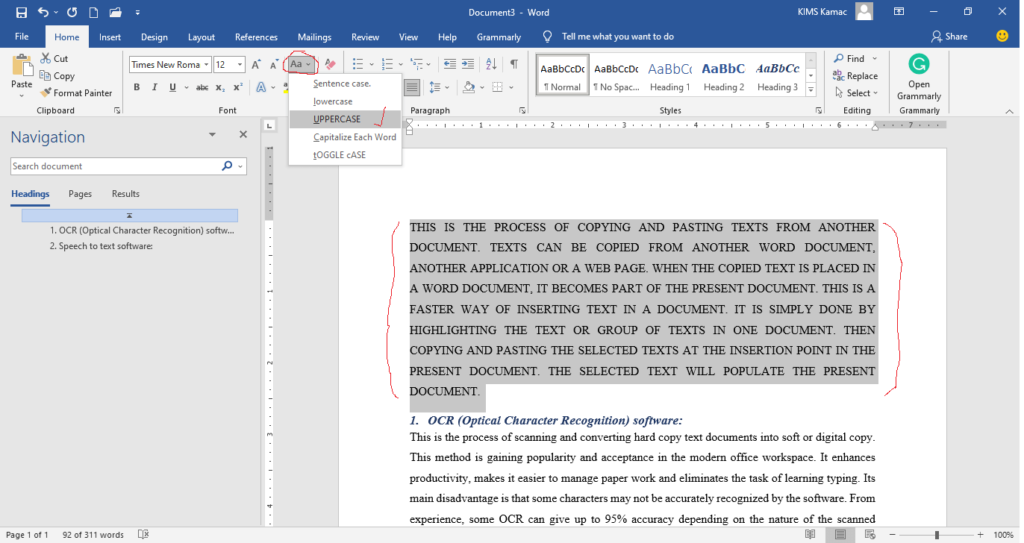
- Highlight the text or group of text you want to modify
- On the Home tab, under Font group, select the Change Casedropdown arrow
- From the list that appears, select your desired font, e.g. UPPERCASE
- The selected font is applied to the highlighted texts.
- You can also apply text formatting by using the font dialog box shown below. To use the font dialog box, do the following.
- Highlight the text or group of text you want to modify
- On the Home tab, under the Font group, select the Font dialog box launcher. The font dialog box appears.
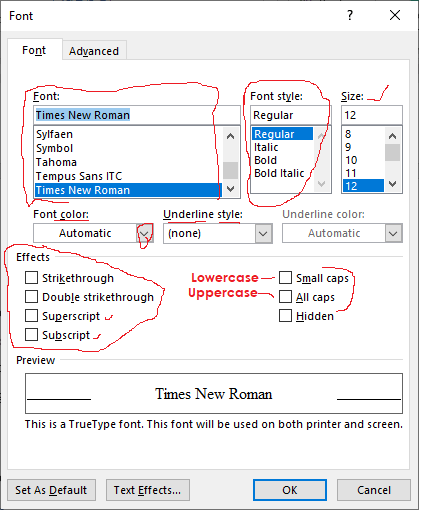
- On the font dialog box, select all the text features you want to modify (font, font style, text size, etc.
- Click the OK button when you are done.
Using the Clipboard Commands
The clipboard is a container where all items copied/ cut are temporarily kept for your use. When you activate the clipboard, items copied from other documents are also kept on the clipboard. This means that items copied from a webpage, Excel app, etc, are placed on the clipboard in a word document.
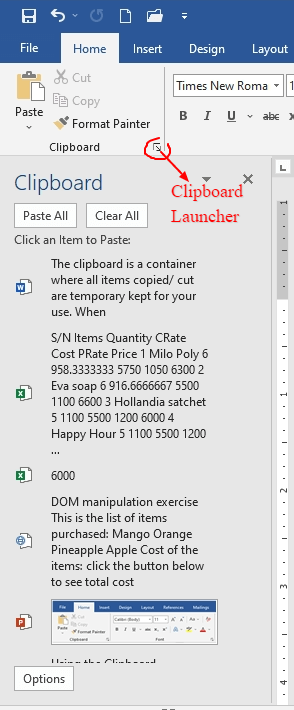
Storage on the clipboard is limited to 24 items. After 24 items are placed on the clipboard, newer items will displace the older ones in the order of First-in-First-Out. Each item on the clipboard displays the source apps icon, as shown in the diagram above.
To activate the clipboard, click on the clipboard launcher, on the Home tab, under the Clipboard group. An empty clipboard pane will appear if you have not copied any item. When you start copying items, the pane will be populated with the copied/cut items. Select each item on the clipboard to paste it on the insertion point in your document.
The clipboard commands
There are four commands on the clipboard group. Each command has a unique feature and purpose. The commands are named on the clipboard group and include:
- Cut, which is used to remove selected text or group of text and place them on the clipboard.
- Copy, which is used to create a copy of selected text or group of texts and place them on the clipboard.
- Format painter, which is used to apply selected formatting from one text to another. Instead of guessing the formatting features on a text you like, you can copy the formatting to another text. The format painter helps you achieve this result.
- Paste, which is used to add copied/cut content in a document. Items are added at the position of the cursor in a document. The paste command has subcommands, called paste options. These commands help you to paste an item with specific features. Let us examine them.
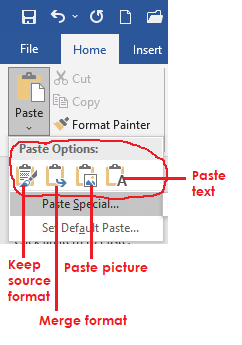
- Keep source formatting: if you selected this entry, then the item added to the document will retain its formatting features.
- Merge formatting: if this option is selected, then, the item added will change the formatting of the present document.
- Picture: if you chose this option, the item added will be converted to a picture.
- Text only: this option will strip the added item of all formatting features and keep only the text.
Applying the clipboard commands
The cut command:
- Highlight the text or group of text you want to cut (remove) from its present location.
- On the Home tab, under the Clipboard group, select the Cut icon. You can also press CTRL+X on the keyboard.
- The selected texts are placed on the clipboard.
The copy command:
- Highlight the text or group of text you want to copy (duplicate).
- On the Home tab, under the Clipboard group, select the Copy icon. You can also press CTRL+C on the keyboard.
- The selected texts are placed on the clipboard.
The paste command:
- Place the cursor in the position where you want to add the content you copied or cut.
- On the Home tab, under the Clipboard group, select the Paste icon. You can also press CTRL+V on the keyboard. Remember, you can choose any of the paste options.
- The selected texts are added to the document at the selected position.
The format painter command:
- Highlight the text or group of text you want to replicate its formatting.
- On the Home tab, under the Clipboard group, select the Format Painter icon. You can also press CTRL+SHIFT+C on the keyboard. The pointer changes to a brush with a line cursor.
- Use the brush-pointer to select the text or group of text you want to apply the format on.
- If you used the keyboard shortcut, then, select the text you want to apply the format on. On the keyboard, press CTRL+SHIFT+V.
- The formatting will be automatically applied to the selected text.
Inserting Textbox and WordArt
A textbox is a flexible tool that can be used to insert text at any location on the document. The WordArt is an artistic tool that adds flair to a text. Both textbox and WordArt are shapes that can be placed in any location without the limitation of the document margins. They can be very useful when creating documents such as letterheads, business cards, invitation cards, certificates, flyers, banners, etc.
In a document, you can use them to create bold headings or quotes that will attract the attention of readers. In the modern word app, the WordArt is a kind of textbox. In the older word app, Word 97 – 2003 applications, it was different. Therefore, you can work with the WordArt the same way you work with the textbox.
Inserting a textbox
To insert a textbox in your document, do the following:
- On the Insert tab, under Illustrations group, select Shapes.
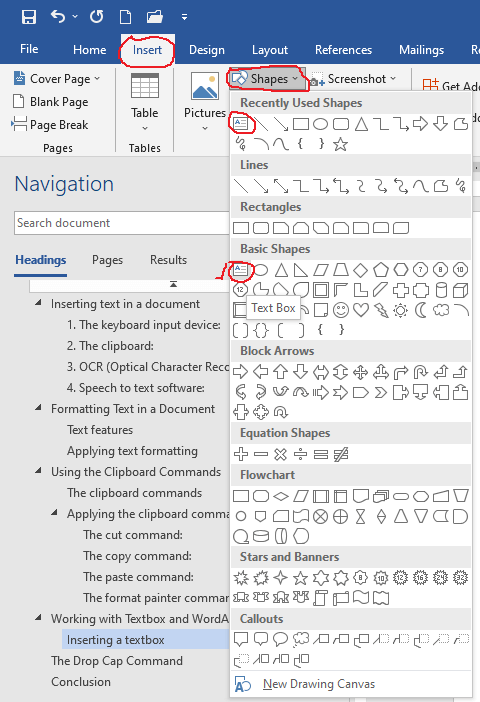
- From the shapes dropdown list, locate Text Box under Basic Shapes.
- Select the text box icon. The pointer changes to a cross.
- On the document workspace, click and drag to insert a text box.
- Start entering text on the text box as you desire. You can also adjust the size of the text box as you want.
- Drag the text box and position it where you desire on your document.
- Select the text box or its content and apply necessary text formatting as explained in the formatting text section.
- Select the text box. On the Format tab, under Shape Styles, select the Format Shape dialog box launcher.
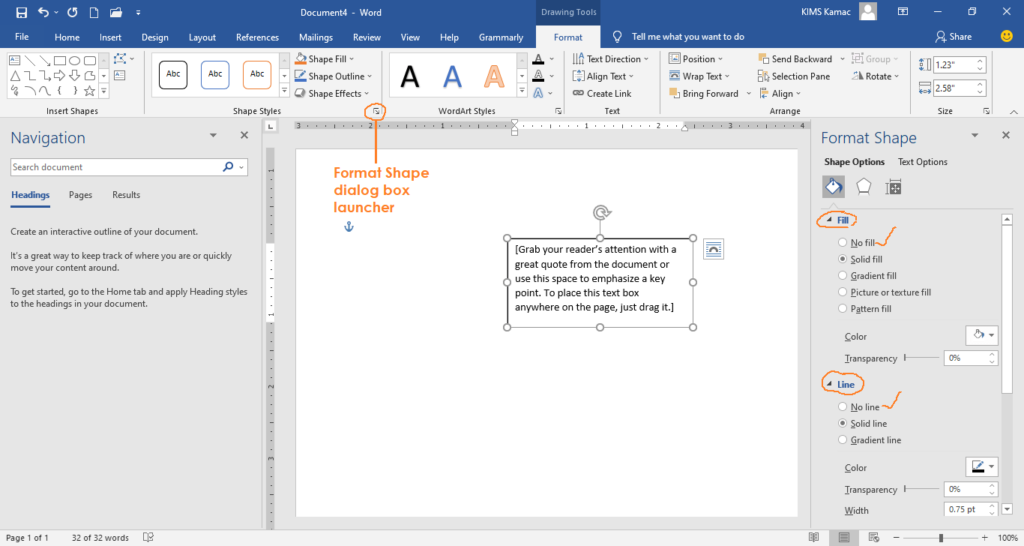
- On the pane that appears on the right, select Fill, and choose the No Fill radio button.
- On the pane that appears on the right, select Line, and choose the No line radio button.
The above 9 and 10 steps will remove the fill color and line border on the text box. This is necessary when you don’t want to show any of those features. You can decide to leave them if they are required to draw the attention you desire.
The text box has preset designs that you can insert into your document to create attention. To use the preset design, do the following:
- Go to the Insert tab, under Text group, select the Text Box.
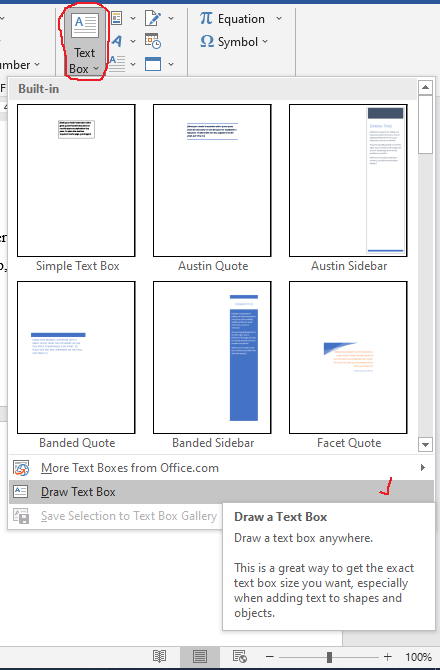
- From the dropdown list, you can select one of the preset text boxes.
- The selected text box is inserted into your document.
- If you wish to create your text box, select the Draw Text Box option from the menu list.
- Follow steps 3 – 10 above.
Insert a WordArt
To insert a WordArt in your document, do the following:
- On the Insert tab, under the Text group, select the WordArt icon.
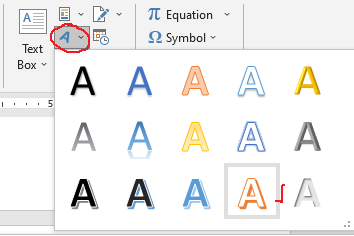
- From the dropdown list, select an artistic design of your choice. A text box with a “Your text here” inscription appears.
- Delete the inscription text and type your desired text to create a WordArt text.
- Drag the WordArt text you created and position it where you desire.
- You can select the WordArt text and apply all the text formatting as explained under formatting text.
The Drop Cap Command
The drop cap command is used to create a capital letter at the beginning of a paragraph. The created letter usually spans the first 2 to 3 lines of the paragraph to create a beautiful outlook. A drop cap is often seen in newspapers and magazines where it is used to begin a heading or subheading.
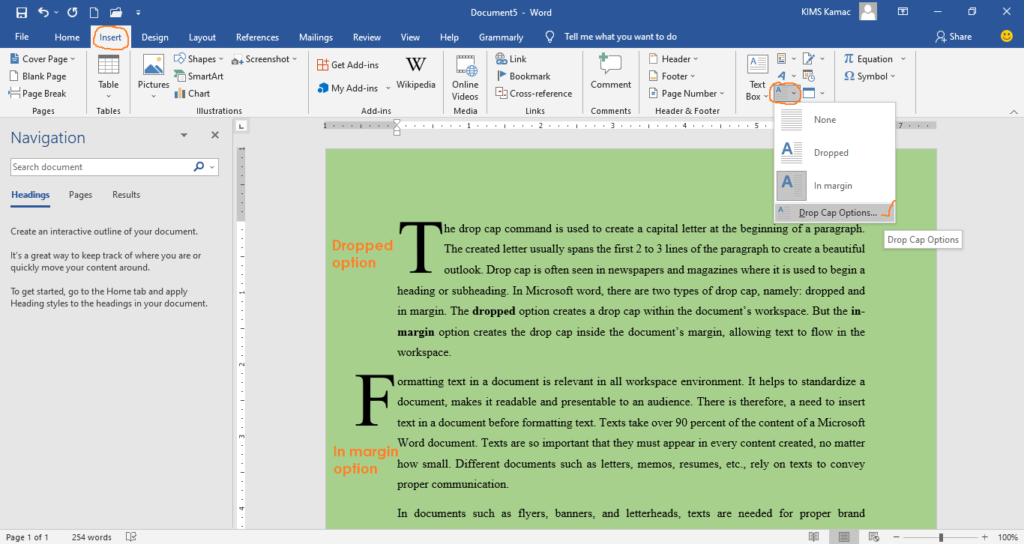
In Microsoft word, there are two drop cap options, namely: dropped and in margin. The dropped option creates a drop cap within the document’s workspace. But the in-margin option creates the drop cap inside the document’s margin, allowing text to flow within the workspace.
Applying drop cap in a document
To apply a drop cap in a document, follow the following steps:
- Select the paragraph you want to apply drop cap on.
- On the Insert tab, under the Text group, select the Drop Cap icon.
- From the list that appears (see image above), select any of the two options: dropped or in-margin.
- The selected drop cap option applies automatically to the selected paragraph.
Setting drop cap options
When you apply drop cap in your document, you have the option of customizing how the dropped text will appear. You can change the font, the number of lines dropped, and the distance from the text. To customize drop cap text, do the following:
- Select the drop cap text or the paragraph it applies to.
- On the Insert tab, under the Text group, select the Drop Cap icon.
- From the list that appears (see image above), select Drop Cap Options….
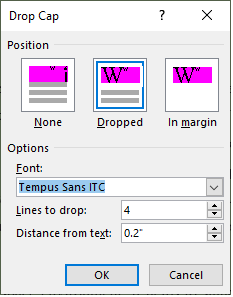
- On the drop cap option dialog box, select your desired font under Font: Also,select the number of lines to drop cap and the distance from the text.
- Click the OK button when you are done. The changes will take effect automatically.
Conclusion
We have come to the end of today’s Microsoft Word tutorial. We were able to look at formatting text in a word document. We began by discussing how you can insert text in a document followed by formatting text in a document.
Our discussion includes how to use the clipboard and the clipboard commands, inserting a text box, and WordArt. And concluded with the drop cap command. Detail on how to format the text box and WordArt was not discussed. We shall discuss them in a later tutorial under working with shapes. As you can see, inserting and formatting text are crucial and simple to apply in a word document. I want to believe that this tutorial is useful, and has helped improve your skill in using MS Word. We shall continue next week with Customizing Paragraphs in a document. If you feel we did not cover your pain point, please kindly let us know. We are open to your suggestions.


