Hear this:
- 71% of freelancers struggle with invoicing and payment – According to a 2015 survey by Freelancers Union, 71% of freelancers have struggled to collect payment from a client at least once.
- Freelancers spend an average of 10 hours per week on administrative tasks, including invoicing. According to a survey by Clockify, Freelancers often spend a significant portion of their time on administrative tasks, with invoicing being a major component.
- Invoice automation can save freelancers significant time – According to PYMNTS.com, the invoice automation process can significantly reduce the time freelancers spend on manual tasks, boosting efficiency and allowing them to focus on core business activities.
Automation tools streamline repetitive tasks, reduce errors, and allow freelancers to focus more on their core business activities.
Previous Parts on Excel Functions for Freelancers
- 10 Essential Excel Functions Every Freelancer Needs To Know For Managing Projects
- Excel Pivot Tables for Freelancers: Optimize Your Time And Resources Across Multiple Projects
As a freelancer, managing your finances efficiently is crucial for success. One of the most time-consuming tasks is creating and sending invoices.
In this guide, we’ll harness the power of the Excel Vlookup function to build an invoice automation system that will save you hours each month and impress your clients with its professionalism.
By the end of this tutorial, you’ll have a dynamic invoice system that:
- Automatically pulls client information
- Calculates totals and taxes
- Adapts to different currencies and regions
- Presents a polished, professional image of your business
Let’s dive in and transform your invoicing process!
Setting Up Your Invoice Automation Template
Setting up your invoice template in Excel is a crucial step towards streamlining your billing process. You can start by creating one from scratch or by selecting a template that suits your business needs.
An invoice template should include all necessary details such as invoice number, client information, description of services, prices, and payment terms.
Then utilize the VLOOKUP function to automatically fill in client information based on a unique identifier, saving you time and reducing errors.
What is VLOOKUP?
VLOOKUP (Vertical Lookup) is a powerful Excel function that allows you to search for a value in a table and return a corresponding value from another column.
In the context of invoicing, VLOOKUP can help you pull client data and pricing information from a separate table, making it easy to generate invoices.
Download or create an automated invoice template
If you do not have the time or skill to create a template, you can download and customize a free invoice template.
Download a template from Vertex42 or Invoice Simple.
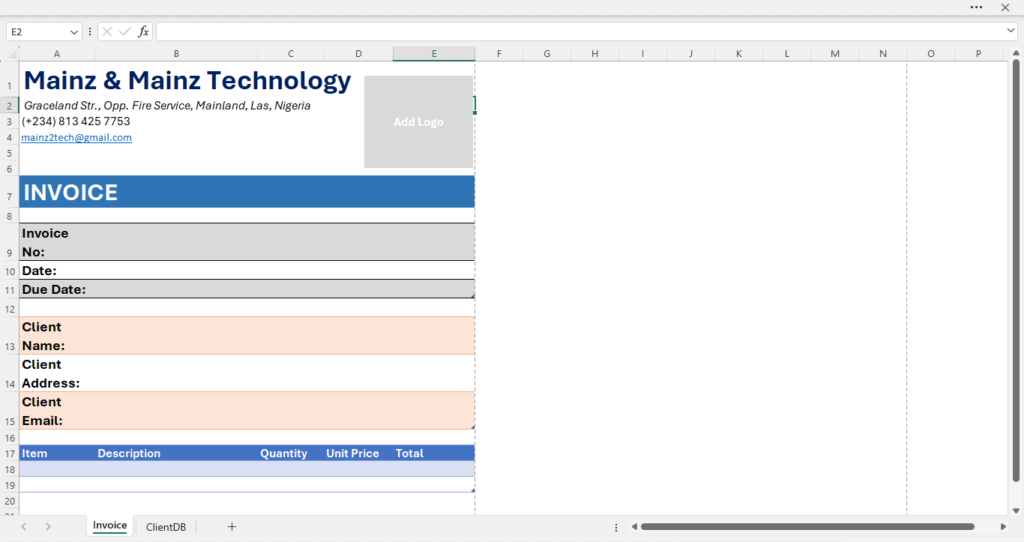
First, we’ll create a sleek, professional invoice template that will serve as the foundation for our automated invoicing system.
- Open a new Excel workbook and name it “Invoice Automation System”.
- In cell A1, type your business name and format it with a large, bold font.
- Add your business details (address, phone, email) in cells A2:A5.
- In cell A7, type “INVOICE” and format it to stand out.
- Create a table for invoice details:
- A9: Invoice Number
- A10: Date
- A11: Due Date
- Create a table for client details (we’ll automate this later):
- A13: Client Name
- A14: Client Address
- A15: Client Email
- Set up your item table starting at row 18:
- A18: Item
- B18: Description
- C18: Quantity
- D18: Unit Price
- E18: Total
- Name the worksheet “Invoice”. [customize your invoice as you wish to look great] Your invoice should be similar to or look better than this image.
Pro Tip: Use Excel’s built-in table feature (Insert > Table) for your item list. This will automatically extend formulas as you add new items. Also, add a logo and relevant colors in your template to show your brand identity.
Creating a Client Database
Creating a client database in Excel is a foundational step for automated invoice processing. By utilizing the VLOOKUP function, freelancers can efficiently manage client information and streamline their billing systems.
The database should include essential details such as client names, contact information, rates, and payment terms.
This organized approach not only saves time but also reduces the potential for errors when generating invoices, ensuring a smoother financial workflow for freelancers.
Now, let’s set up a separate sheet to store client information, which we’ll later use with VLOOKUP.
- Create a new sheet and name it “ClientDB”.
- Set up the following headers in row 1:
- A1: Client ID
- B1: Client Name
- C1: Address
- D1: Email
- E1: Default Currency
- Fill in some sample data for at least 5 clients as shown in the table below.
| Client ID | Client Name | Address | Default Currency | |
| 1 | TechCorp Inc. | 123 Tech St, Silicon Valley | info@techcorp.com | USD |
| 2 | Global Marketing | 45 Ad Lane, New York | hello@globalmark.com | EUR |
| 3 | Design Masters | 78 Creative Ave, London | design@masters.co.uk | GBP |
| 4 | FitnessPro LLc | 2546 Belle River, Canada | contact@Fitnesspro.ca | CAD |
| 5 | TechGear Inc. | Albuquerque, New Mexico | info@techgearinc.com | USD |
Note: The items in the ClientDB are required to create our automatic invoicing system. Your client database is not limited to them. You can create your ClintDB using the features you wish to capture.
Mastering VLOOKUP for Invoicing
Mastering the VLOOKUP function is essential for freelancers who want to automate their invoicing process in Excel.
This powerful function allows you to search for specific information in your spreadsheet, such as client names or invoice amounts, and automatically fill in the details.
By using VLOOKUP, you can streamline the creation of invoices, reduce errors, and save valuable time.
With a well-organized data table, VLOOKUP can transform your invoicing from a tedious task into a quick, efficient, and error-free process.
New to the Vlookup function? Dont’s worry, we’ve got you covered. Visit this link to learn the basics of Vlookup in Excel.
VLOOKUP is the star of our automatic invoice processing system. It allows us to automatically pull client information based on a unique identifier.
- Go back to your invoice worksheet.
- In cell B9 (next to “Invoice Number”), create a drop-down list of Client IDs:. Follow these steps:
- Select cell B9
- Go to the Data tab, under “Data Tools” select Data Validation.
- In the Data Validation dialog box, Set “Allow” to “List”
- In the Data Validation dialog box, click in the “Source” box and enter the following: =ClientDB!$A$2:$A$50 [The range depends on you].
- Now, let’s use VLOOKUP to populate client details as follows:
- In cell B13 ( for Client Name), enter: =VLOOKUP($B$9,ClientDetail,2,FALSE) {ClientDetail is the name of the table we created for our client’s database. You can substitute it for the range ClientDB!$A$2:$A$20)
- In cell B14 (for Client Address), enter: =VLOOKUP($B$9,ClientDetail,3,FALSE)
- In cell B15 (for Client Email), enter: =VLOOKUP($B$9,ClientDetail,2,FALSE)
Now, when you select a Client ID from the drop-down list in cell B9, the client’s details will automatically populate.
Pro Tips (Optional):
In the Client database, you can include columns for tasks or project type and hourly rate. By this, you can extend the Vlookup function in the Invoice Items section to populate the description and hourly rate. When creating your invoice you can only input the total hours worked.
If you added the items above, your updated table should look like this:
| Client ID | Client Name | Address | Default Currency | Task Type | Hourly Rate | |
| 1 | TechCorp Inc. | 123 Tech St, Silicon Valley | info@techcorp.com | USD | Web Design | 52 |
| 2 | Global Marketing | 45 Ad Lane, New York | hello@globalmark.com | EUR | App Development | 105 |
| 3 | Design Masters | 78 Creative Ave, London | design@masters.co.uk | GBP | E-commerce web App | 65 |
| 4 | FitnessPro LLc | 2546 Belle River, Canada | contact@Fitnesspro.ca | CAD | SEO Content | 45 |
| 5 | TechGear Inc. | Albuquerque, New Mexico | info@techgearinc.com | USD | WordPress Update | 15 |
Input the following formulas:
- In cell B18 (for Description), enter: =VLOOKUP($B$9,ClientDetail,6,FALSE)
- In cell D18 (for Unit Price – i.e. Hourly Rate), enter: =VLOOKUP($B$9,ClientDetail,7,FALSE)
Now, it’s your turn:
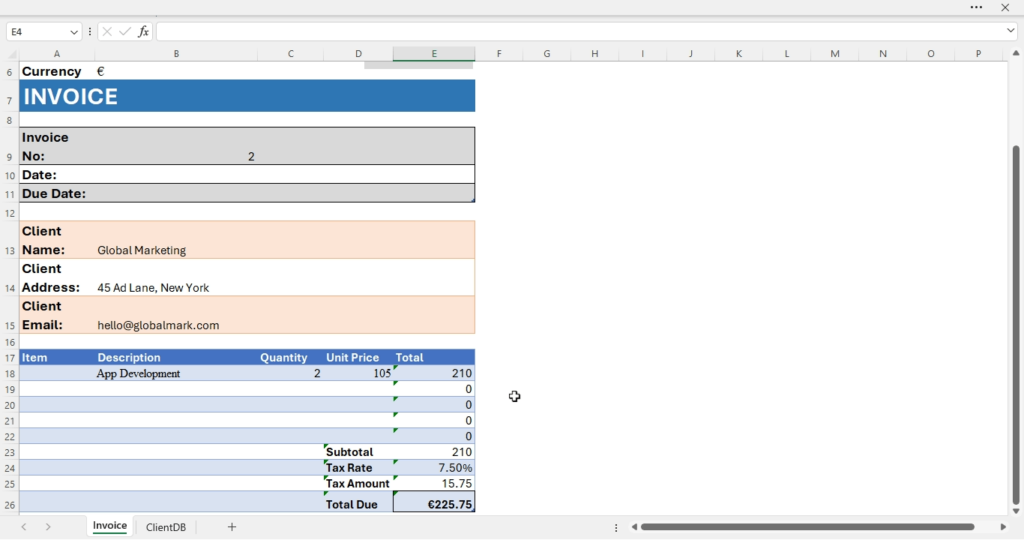
If you followed the above instruction, select 2 from the Invoice No.: (Cell B9). Your invoice should automatically populate, like the image below. Display the sample of your invoice in the comment box below.

Automating Calculations
In this section, we’ll add formulas to calculate the totals, subtotal, and tax amounts in their respective cells in our invoice template.
Let’s add some formulas to automate our calculations. This will complete the invoice automation process.
- In cell E18 (first Total cell), enter: =C18*D18
- The formula will automatically fill down the other total rows in the table. If you are using range, use autofill handle to drag this formula down to automatically calculate totals for each item.
- In cell D23, enter “Subtotal” and in E23, sum the totals: =SUM(E18:E22)
- In cell D24, enter “Tax Rate” and in E24, enter your default tax rate (e.g., 7.5%)
- In cell D25, enter “Tax Amount” and in E25, calculate the tax: =E23*E24
- In cell D26, enter “Total Due” and in E26, sum the subtotal and tax: =E23+E25
Pro Tip: Use the ROUNDUP function to ensure your totals are always rounded to two decimal places, e.g., =ROUNDUP(E23+E25, 2)
Customizing for Different Regions and Currencies
Since freelancers deal with clients worldwide, our invoices must capture different currencies. In this section, we’ll customize our invoice to adapt to various regions and currencies.
To make our invoice automation system truly global, let’s add currency customization:
- In the ClientDB sheet, add a new column H1: “Currency Symbol”
- Fill in the appropriate currency symbols for each client (e.g., $, €, £)
- In your invoice sheet, add a new cell A6 for the currency symbol
- In B6, use VLOOKUP to pull the correct symbol: =VLOOKUP($B$9,ClientDetail,8,FALSE)
- Update your Total Due cell to reference this currency symbol by entering the following formula:
- In Cell E26, enter: =CONCAT($B$6,SUM(E23,E25))

Now your invoice will automatically use the correct currency symbol for each client.
Tips for Efficiency and Professionalism
- Use Excel’s themes and styles to give your invoice a cohesive, professional look.
- Add your company logo to the top of the invoice for brand recognition.
- Create a macro to automatically save a copy of each invoice as a PDF when you’re done.
- Set up data validation rules to prevent errors where necessary.
Troubleshooting common issues
- #N/A Error: This usually means your VLOOKUP can’t find the specified value. Double-check your Client IDs and ranges.
- #REF! Error: This indicates a problem with cell references. Ensure all named ranges and cell references are correct.
- Incorrect Calculations: Always use parentheses to clarify the order of operations in complex formulas.
Conclusion
Congratulations! You’ve now created an automated invoice system that will save you time and present a professional image to your clients. As you use this system, continue to refine and customize it to fit your specific needs.
By mastering the art of automated invoicing with Excel VLOOKUP, you can streamline your freelance business and save time.
With this step-by-step guide, you’ll be able to create dynamic invoice automation that pulls client data and pricing information, customized for different regions, with ease.
Remember, the key to mastering Excel is practice and experimentation. Don’t be afraid to try new functions and features to make your invoice automation system even more powerful.
Questions and suggestions are entertained in the comment box, kindly use it to interact with us.


