Page layout or document layout or page setup or document setup can be interchanged to mean the same. Page layout is a term that is used to describe all commands that help you position your document for printing.
Setting up your document in Microsoft Word entails putting in place the pages, margins, and orientation of the document. How you effectively set these items up will affect the final look of your document when it is printed.
In modern ICT, documents can be shared or transmitted from one place to another through electronic means. In this case, the page layout may not matter. However, if the transmitted documents must be printed, the layout of the document calls for attention. This is where expertise and mastery of page layout commands are required.
This Microsoft Word tutorial will help you understand how to effectively do the following:
- Select the appropriate page size for your document
- Position the orientation of your document to reflect the professional standard
- Adjust margins of your document to enhance printing and filing
- Setup columns and breaks in a document to reflect organizational or industry standards.
This tutorial will help you become an expert in working with different kinds of documents including:
- Letters and envelopes
- Books and newsletters
- Newspapers and magazines, and many more
You can continue with this tutorial with no difficulty. Meanwhile, this is the third tutorial of a series. If you wish to visit the previous tutorials, you can get them using the following links.
Selecting appropriate paper size and orientation
Paper size
Different paper sizes are used in different organizations to document and archive information. The executive and A5 paper sizes are usually used for memos while official documents use A4 paper size.
In many government establishments, the legal (foolscap) paper size is used for official documents. While the letter and A4 sizes are mostly used in businesses and institutions of learning.
When creating a document, the paper size of that document is paramount, especially if it MUST be printed. For example, invitation cards, certificates, envelopes, book covers, etc., require different sizes depending on use.
Microsoft Word application provides different paper sizes which you can choose from when creating a document. The paper size selected reflects the hardcopy size when the document is printed. For example, you can create a flyer or invitation card with an A5 or A6 paper size. Certificates require a letter paper size while a poster can use any of A2, A3, or A4 sizes.
When setting up your document, it is advisable to set your paper size first before adding contents. This will save you the trouble of adjusting the contents, especially when it contains images and shapes.
How to select a paper size
Let us assume that you are creating an invitation card that will be printed with A6 paper size.
- In a new blank document, go to the Layout or Page Layout tab, depending on your version of the word.
- Under Page Setup group, select Size.
- From the dropdown menu, choose a paper size of your choice. In this case, choose the A6 paper size.
- The workspace will adjust to reflect the selected paper size. Larger paper size will enlarge the workspace while a smaller size will reduce the workspace.
- You can begin to create your document.
Use a custom paper size
There are times you may want to use the paper size that is not on the list. In this case, you will have to define your paper size. For example, you might want to use a 5”x7” paper size for your invitation card. Since this exact size is not on the list, how do you choose such a size?
To choose a custom paper size, you will use the page setup dialog box.
- In a new blank document, go to the Layout or Page Layout tab, depending on your version of the word.
- Under Page Setup group, select Size and choose More Paper Sizes…
- You can also select the Page Setup dialog box launcher icon.
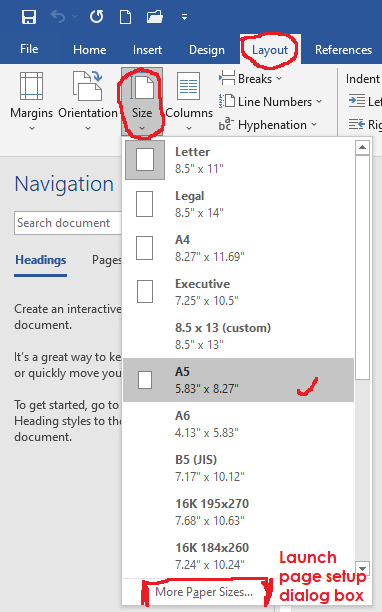
- On the page setup dialog box, go to the Paper tab.
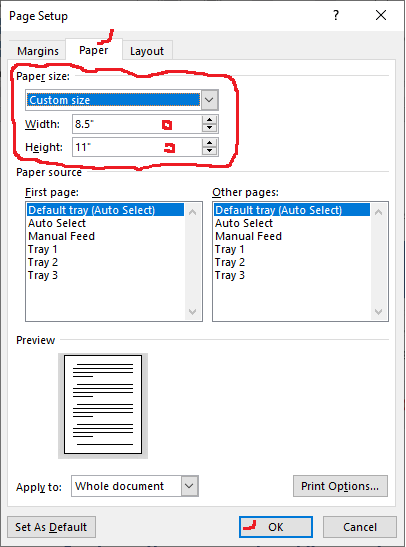
- Under Paper Size: enter the actual with and height in their respective text boxes.
- Click OK when done. The changes will take effect immediately.
Page orientation
Orientation defines the wideness or tallness of your document. There are two different types of page orientation.
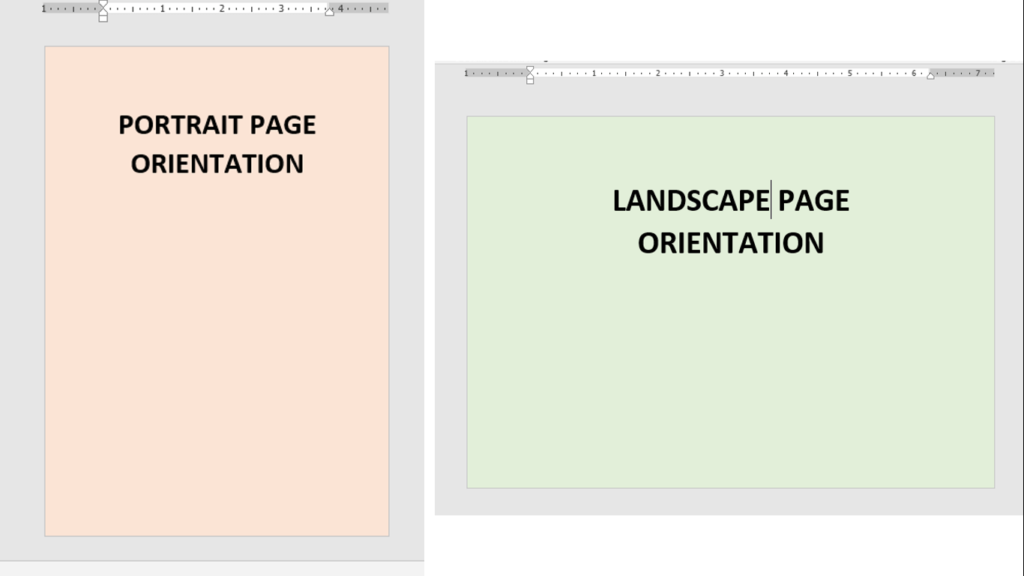
- Portrait: Meaning that the height of the document is longer than the width
- Landscape: Meaning that the width of thedocument is longer than the height
Most official documents and educational papers use the portrait page orientation, but most cards and certificates use the landscape.
Setup page orientation
- In a new blank document, go to the Layout or Page Layout tab, depending on your version of word.
- Under Page Setup group, select Orientation.
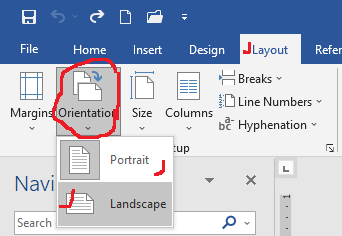
- From the dropdown menu, choose either Portrait or Landscape. By default, your document opens with a portrait orientation.
You can also change the page orientation from the page setup dialog box, under the Margins tab.
Adjusting margins and hyphenation
Page margins
Margins define the space around a document. Every document has four sides: left, top, right, and bottom. The empty spaces where users do not place contents are called margins. Therefore, we have the left margin, top margin, right margin, and bottom margin.
Benefits of margins in a document
- Margins are important because they give room for binding or filing documents. With a generous margin, you will bind or file a document without hiding the contents.
- In an electronic collaboration, margins can give room for comments. When you print the document, the comments appear in the margins.
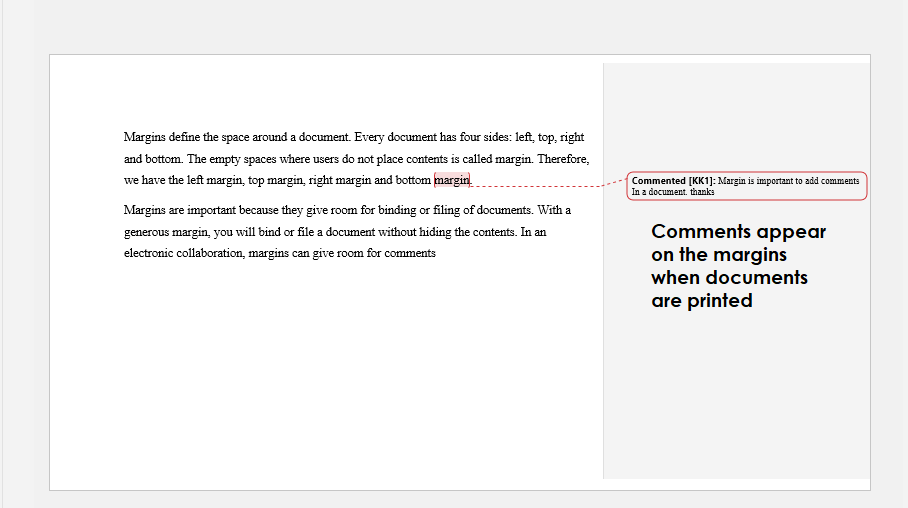
- Margins also make documents attractive and easier to read. Readers can take notes on the margin area while studying.
Setting your page margins
By default, Microsoft Word provides a margin of 1’’ to all the four sides of a document. You may decide to increase or decrease the margins depending on the nature of your document. There are preset margins to choose from:
- In a new blank document, go to the Layout or Page Layout tab, depending on your version of word.
- Under Page Setup group, select Margins.
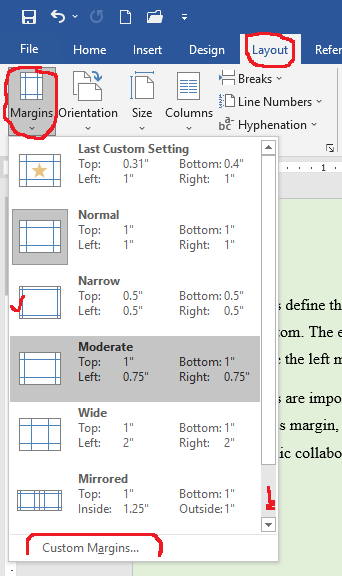
- From the dropdown menu, select one of the preset margins. Each one specifies the margin size in inches.
- Your document adjusts automatically.
If you decide not to choose any of the preset margins, you can set a margin for your document. In this case, you will launch the Page Setup dialog box.
- In a new blank document, go to the Layout or Page Layout tab, depending on your version of word.
- Under Page Setup group, select Margins and choose Custom Margins…
- You can also click on the Page Setup dialog box launcher, and go to the Margins tab.
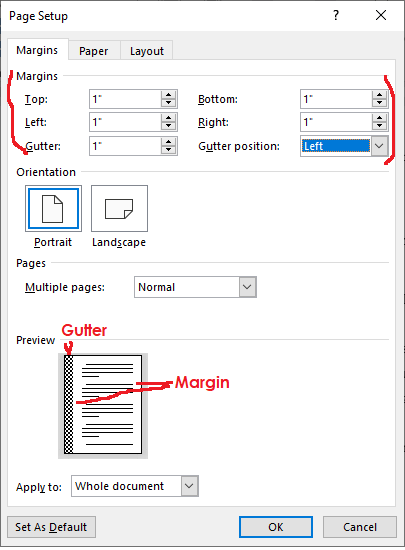
- Under Margins enter the number of inches for each side of the document. Top, Left, Bottom, and Right.
- For the Gutter, you can leave it as it is. However, if you want to give more room for binding or filling, you can set this value.
- Click OK when you are done.
Hyphenation
Hyphenation is a system that defines how the word that ends a line should wrap to the next line. By default, if there is no room for a word to enter in a line, the entire word is moved to the next line. However, if you want to manage space, you can hyphenate a word with a dash (-). The remaining part of the word will be moved to the next line.
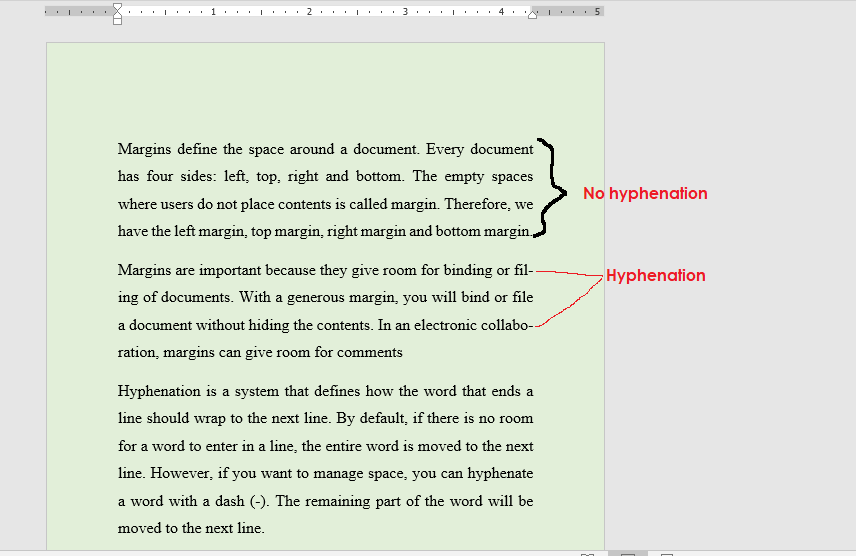
Hyphenation helps to ensure that large gaps are not left in between words, especially in a justified document. By default, hyphenation is turned off in the Microsoft Word application, but you can turn it on.
Applying hyphenation
You can simply add automatic hyphenation to your document. But the manual hyphenation will take you through the entire document. It will show you where hyphens need to be applied for you to accept or reject it.
- Go to the Layout or Page Layout tab, depending on your version of word.
- Under Page Setup group, select Hyphenation.
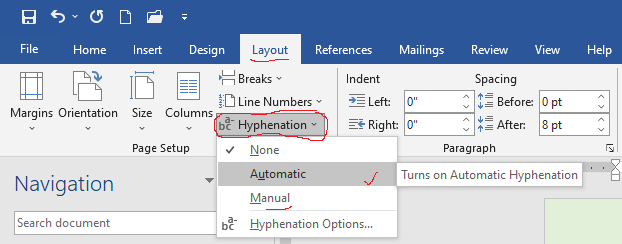
- From the dropdown menu, select either Automatic or Manual hyphenation.
- If you selected Automatic hyphenation, hyphenation will be applied automatically in your document.
- If you selected Manual hyphenation, the manual hyphenation dialog box will appear at each location that requires hyphenation.
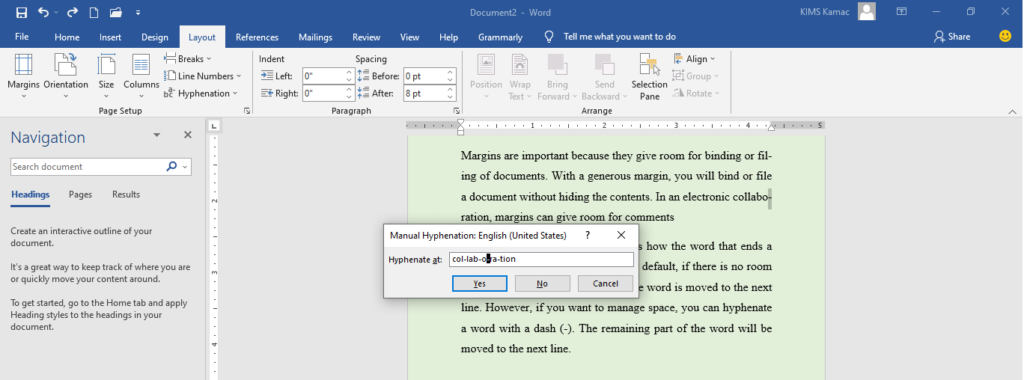
- On the Hyphenation dialog box, select the appropriate hyphenation you want in the hyphenation box.
- Click Yes to apply the hyphenation to the selected text and continue.
- Click No so that the hyphenation will not be applied to the selected text and continue.
- Click Cancel to cancel manual hyphenation.
Remove hyphenation from your document
For an Automatic hyphenation, you can simply go to Hyphenation and select None. All automatic hyphenation will disappear. But for a manual hyphenation, do the following:
- On the Home tab, under Editing group, select Replace. You can press CTRL+H on the keyboard. The find and replace dialog box will appear.
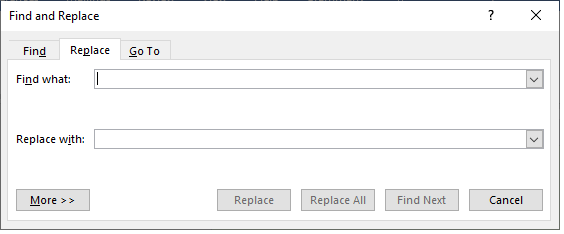
- On the dialog box, select the More>> button to reveal other options.
- On the dialog box, select the Special button.
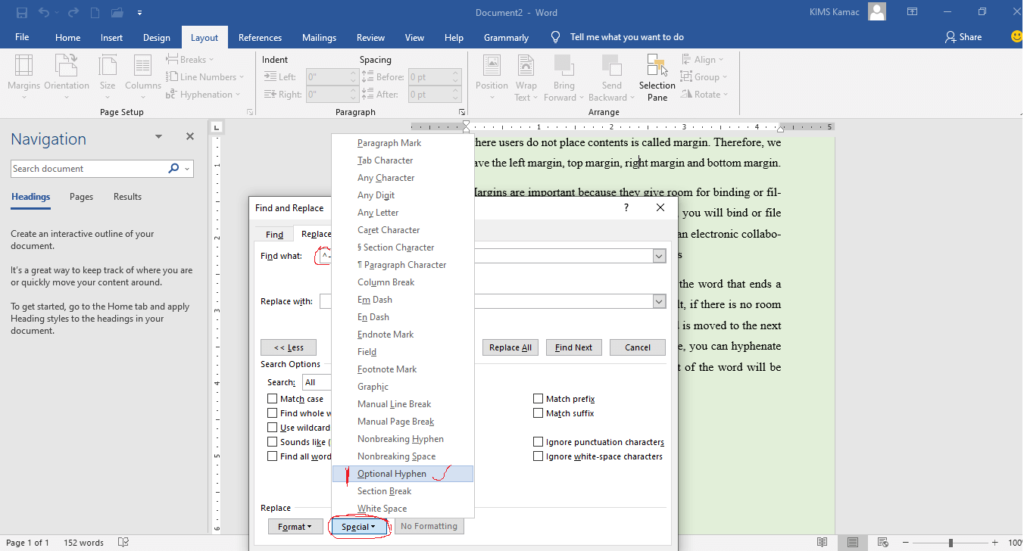
- From the menu that appears, select Optional Hyphen. The entry is automatically made for you in the Find What box.
- Select the Replace All button to replace all hyphenation.
Implementing paragraph and line spacing
A paragraph is created each time you press the Enter key on the keyboard. All texts that wrap in a multiline before the Enter key is pressed on a keyboard belong to one paragraph. Microsoft word differentiates between paragraph spacing and line spacing.
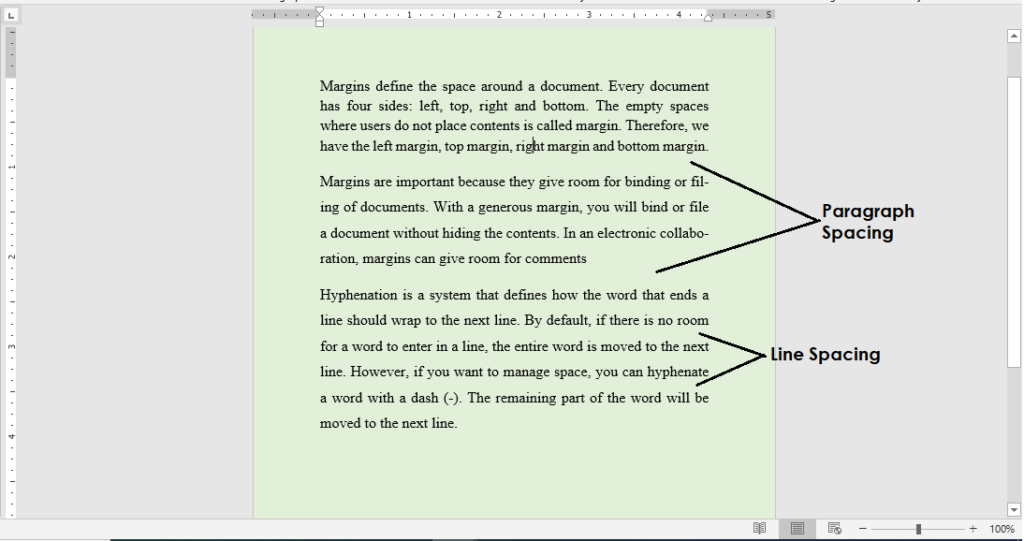
Paragraph spacing is therefore the space that separates two paragraphs, i.e., in-between two Enter keys. Line spacing is the space that separates two or more lines in a paragraph. Line and paragraph spacing help to standardize a document and make it attractive and easy to read.
There are different spacing requirements for different kinds of documents. For example, academic research usually uses 2.0 line spacing.
In Microsoft Word, you can set two paragraphs spacing:
- Before: This creates the specified spacing in points before you begin a paragraph. Or above a selected paragraph(s) in a document.
- After: This creates the specified spacing in points after you begin a paragraph. Or below a selected paragraph(s) in a document
Also, you can choose from the preset line spacing, including
- 1.0 (Single line spacing): This creates a single line spacing between lines of texts in a paragraph. If a paragraph or group of paragraphs are selected, this command creates a single line spacing between them. You can also use the key combinations CTRL+1 to apply this line spacing to paragraph texts.
- 1.5 line spacing: This creates a 1.5 points line spacing between lines of texts in a paragraph. If a paragraph or group of paragraphs are selected, this command creates a 1.5 line spacing between them. You can also use the key combinations CTRL+5 to apply this line spacing to paragraph texts.
- 2.0 (double line spacing): This creates a double line spacing between lines of text in a paragraph. If a paragraph or group of paragraphs are selected, this command creates a 2.0 line spacing between them. You can also use the key combinations CTRL+2 to apply this line spacing to paragraph texts.
- Others: There are other preset line spacing that is not commonly used in a document. They include the 1.15, 2.5, and 3.0 line spacing. Depending on your requirements, you may want to experiment with these line spacing options. But the 1.15 line spacing can be used in place of the 1.0 line spacing. It gives a document a more attractive look than the 1.0 line spacing.
Apply a paragraph spacing
By default, Microsoft Word comes with a 10-point or 8-point After paragraph spacing depending on your version. The spacing Before a paragraph is usually 0. You can define your paragraph spacing at will. To apply paragraph spacing,
- Select the paragraph or group of paragraphs you want to apply paragraph spacing too.
- Go to the Layout or Page Layout tab, depending on your version of word.
- Under Paragraph group, locate Spacing,

- Under Spacing, enter a value in the Before or/ and After box.
- Value can be 0 and above.
Apply a line spacing
To apply a line spacing to a paragraph or group of paragraphs,
- Select the paragraph or group of paragraphs you want to apply line spacing to.
- Go to the Home tab, under Paragraph group, locate and select the Line and Paragraph Spacing icon.
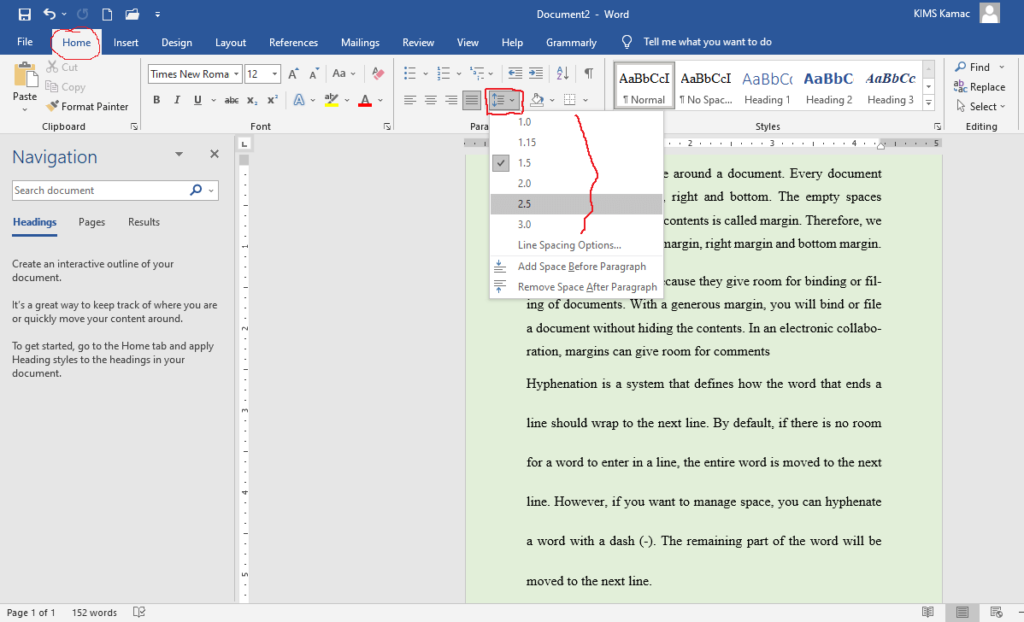
- From the list of preset line spacing, select a suitable line spacing for your document.
- It applies to the selected paragraphs.
Working with columns
You can create multiple columns in a word document, just as seen in newspapers. When you create columns in a word document, you will fill the first column before jumping to the next. But you can force a word to jump to another column by applying column break (see page breaks).
By default, documents in Microsoft word have a single column. There are preset columns you can choose from, including two, three, left, and right columns.
- Three creates a 3-column document with equal sizes
- Two create a 2-column document with equal sizes
- The left creates a 2-column document with a narrower left-hand side
- Right, create a 2-column document with a narrower right-hand side.
You can create more than 3 columns by choosing the More Columns… option and enter the exact number of columns. Moreover, the more columns you add to your document, the less space is available for content.
Add a preset column to your document
You can add a preset column to your document before you start adding content or after adding content. To add a column after adding contents, you will select the section of the document you want to apply columns to. Then apply the selected column.
To apply a preset column, follow the steps:
- Go to the Layout or Page Layout tab, depending on your version of word.
- Under Page Setup group, select Columns.
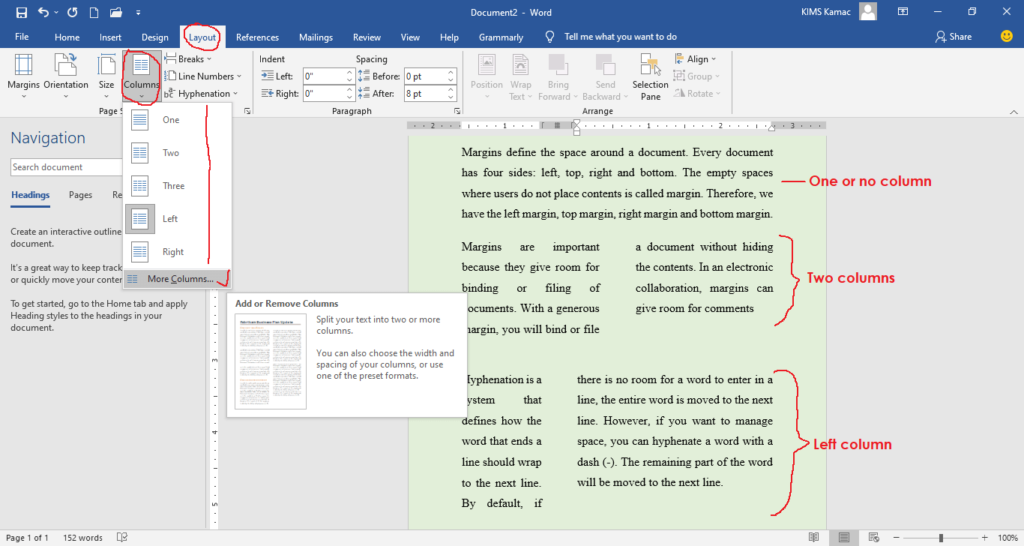
- From the list of preset columns, select a suitable column to apply to your document.
- Remember to highlight a group of paragraphs you want to apply columns to if you have already created content.
Add a custom column to your document
- Go to the Layout or Page Layout tab, depending on your version of word.
- Under Page Setup group, select Columns.
- From the dropdown list, select More Columns… the more columns dialog box appears.
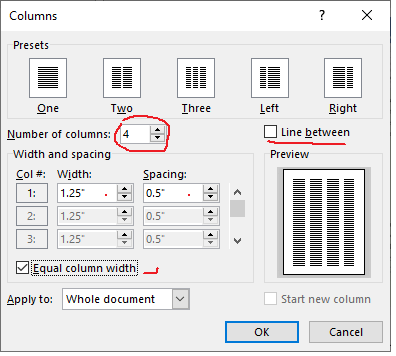
- On the dialog box, enter the number of columns, the width, and spacing in-between columns.
- If you already have content, under the Apply to: select This section. You should have selected the section before opening the More Columns dialog box.
- Click OK to apply your changes.
Utilizing section breaks in page layout
We introduced sections in our discussion above. Sections are an electronic division of documents that enhances document management. These divisions are not ordinarily visible to you in the print layout view. But you can see them when you change to the Draft view.
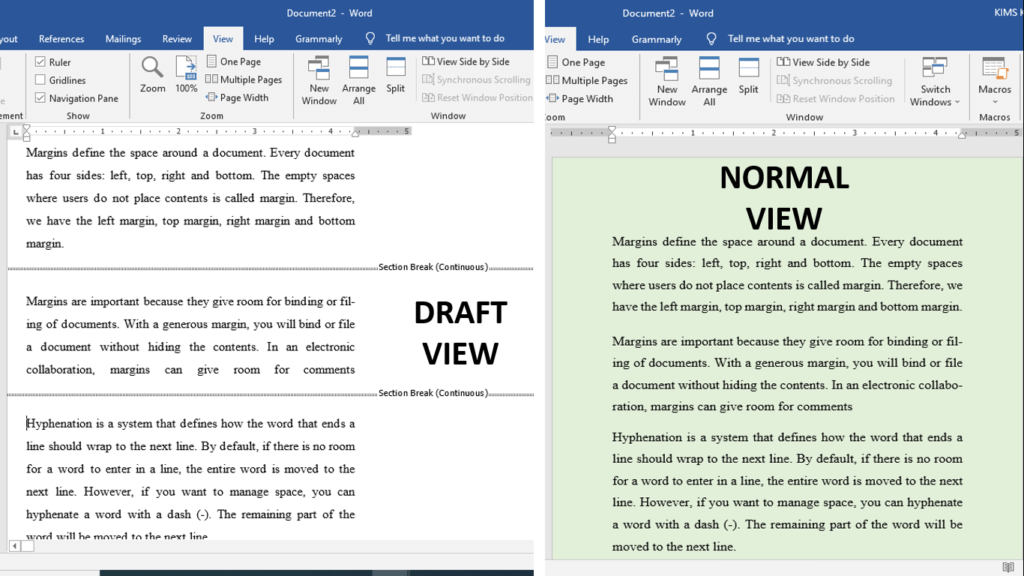
Why use layout document in sections
- Sections help you manage a large word document.
- It also helps you apply specific formats to different sections. For example, you can apply columns to a particular section and different page orientations to another section.
- It helps enforce a pattern in a document.
Page breaks
There are two types of breaks: page breaks and section breaks. The most important type of page break is the Column Break. The column break forces word to jump the cursor to the next column when the first column is not filled. To add a column break:
- Go to the Layout or Page Layout tab, depending on your version of word.
- Under Page Setup group, select Breaks.
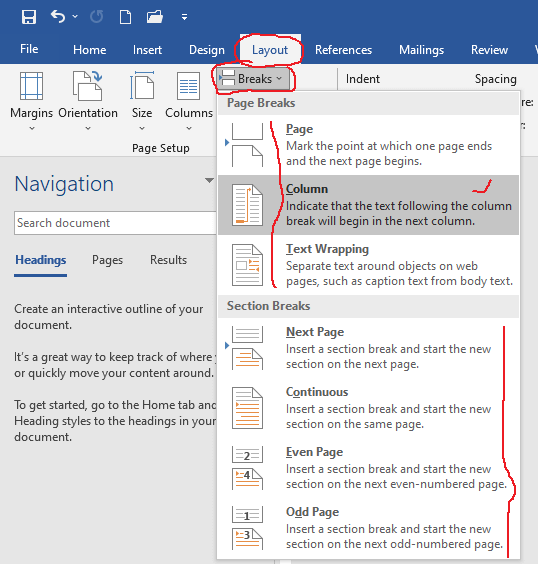
- From the dropdown list, select Column. The cursor insertion point jumps to the next column.
Section breaks
There are two major forms of section breaks:
Applying section breaks
- Click the insertion point where you want the section break to start
- On the Layout or Page Layout tab, depending on your version of word.
- Under Page Setup group, select Breaks.
- From the dropdown list, under Section Breaks, select Next Page. The section will automatically start on the next page.
- You can do this over and over throughout the document to create different section breaks.
- To apply Continuous section break, instead of selecting Next Page, select Continuous.
If you already have content in your document, then, do the following:
- highlight the paragraph or group of paragraphs you want to apply section breaks.
- Then follow steps 2 – 4 above.
Section break example
When you have applied appropriate section breaks, you can apply document formatting to any of the sections. For example, you can apply landscape orientation to a section, and columns to another section. You can also apply different page numbering and margins to different sections. To apply different orientations to a section, do the following:
- Select the section you want to apply page orientation to.
- On the Layout or Page Layout tab, depending on your version of word.
- Under Page Setup group, select Margins.
- From the Margins dropdown list, select Custom Margins…
- On the Margins dialog box, under Orientation, select Landscape.
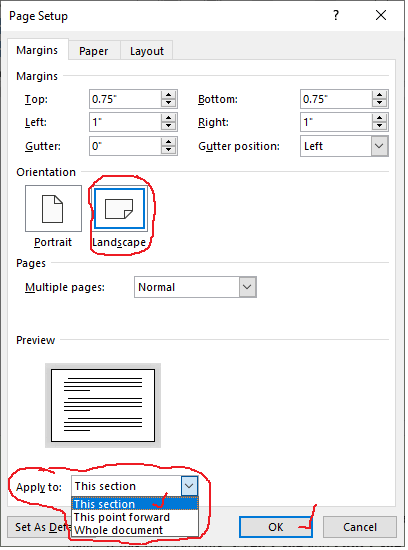
- Under the Apply to section, select This section from the dropdown list.
- Click OK to apply.
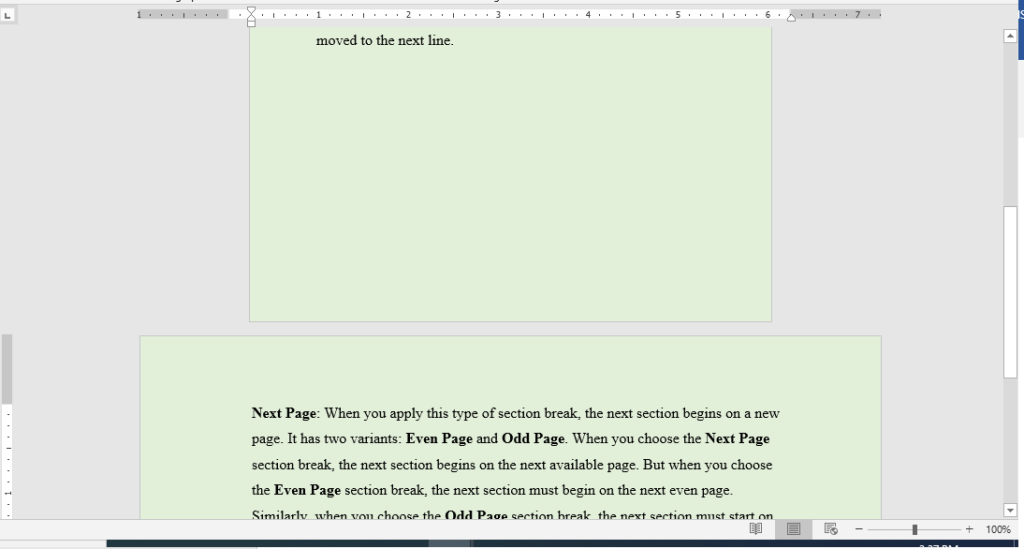
- The selected section changes to a landscape page orientation.
- Follow the same steps to apply different page numbers, and columns to different sections.
Conclusion
I believe that the lessons learned in this tutorial will help you master page layout and document formatting. You should be able to choose appropriate paper sizes for different categories of documents.
Depending on whether a document will be filed or bound, you should adjust margins to ensure contents are not covered. Also, you should determine whether to use hyphenation or not depending on the type of document.
You should have understood the difference between line spacing and paragraph spacing and how to use them. In addition, you can conveniently work with columns introduced in Microsoft word tutorial level 1.
Finally, section breaks should be a useful addition when creating content that is lengthy and requires sectioning. With this knowledge, you can conveniently layout documents of any kind. This knowledge of page layout should help you create printable documents. Now that you have added this skill to your line of skills, we shall focus on working with texts. Keep a date with us next week, as we teach you how to work with texts in a word document. Your questions and contributions are welcome.


