As a PowerPoint user, you should know how to organize a PowerPoint presentation into a logical structure. A logically structured presentation will help you leave a thought in the mind of your viewers. Structuring a presentation is an important step when creating standard and professional presentations.
A well-structured and organized presentation:
- Is easier to understand by the audience
- Helps the audience to retain the information and make it part of them
- Makes the presenter flow with the topic with a greater confidence
- Enhances a hitch-free presentation whereby the presenter and audience are happy.
To strategically organize a PowerPoint presentation, you will need to start with the following:
- Understand the topic or subject of the presentation
- Structure the topic into sub-topics or headings, e.g. Introduction, problems, objectives, solutions, prospects, and conclusion.
- Create the presentation and add content and effects to the presentation
- Add a desirable structure to the presentation.
There are two major ways you can organize a PowerPoint presentation for easy flow of the presentation and audience accessibility. They include:
- Adding sections to a presentation
- Creating a table of contents for a presentation
In this tutorial, you will learn how to organize a PowerPoint presentation by adding sections and a table of contents.
- Adding Effects to PowerPoint Slides in a Presentation
- How to Add Audio to PowerPoint Slides
- How to Use Templates and Slide Master in PowerPoint
Create a Section to Organize a PowerPoint Presentation
What is a section in PowerPoint?
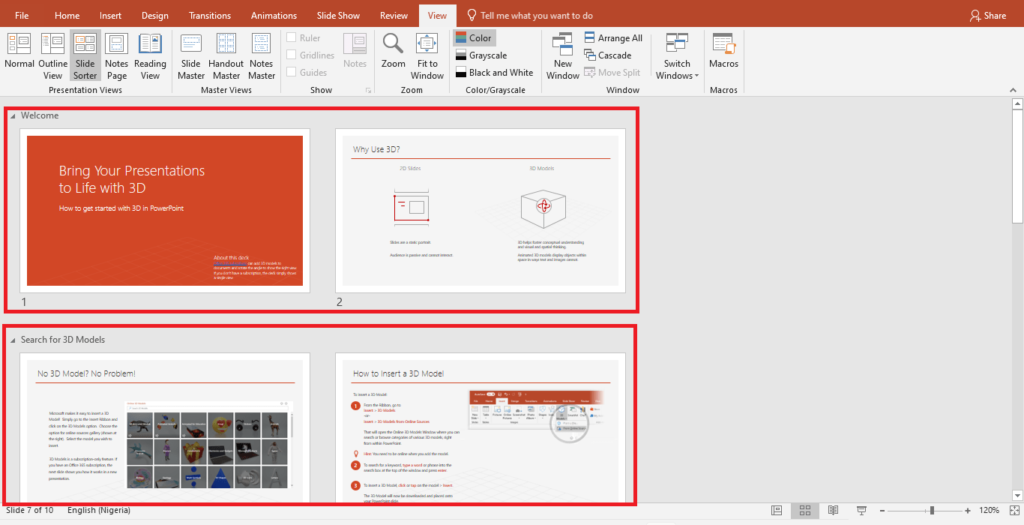
Sections are named groups or categories of slides in a presentation. They are used to bring together slides that are topically related. In its simplest form, a section is used to organize slides into chapters, segments, or divisions.
In a large PowerPoint presentation, sections make it easy to navigate through a presentation, especially, during the slideshow. You can decide to show or hide a section.
For example, in a presentation, you can group slides related to the introduction into one section. While slides that discussed the solution can be grouped into another section.
How to add a section in a PowerPoint presentation
You can create a section in Normal view or Slide Sorter view. Whichever view you choose, you will achieve the same result. In this tutorial, we will use the normal view.
To create a section in your PowerPoint presentation, do the following:
- In the PowerPoint presentation window, right-click between a slide thumbnail.
- From the popup menu that appears, select Add Section.
- A Rename Section dialog box appears with the name Untitled Section.
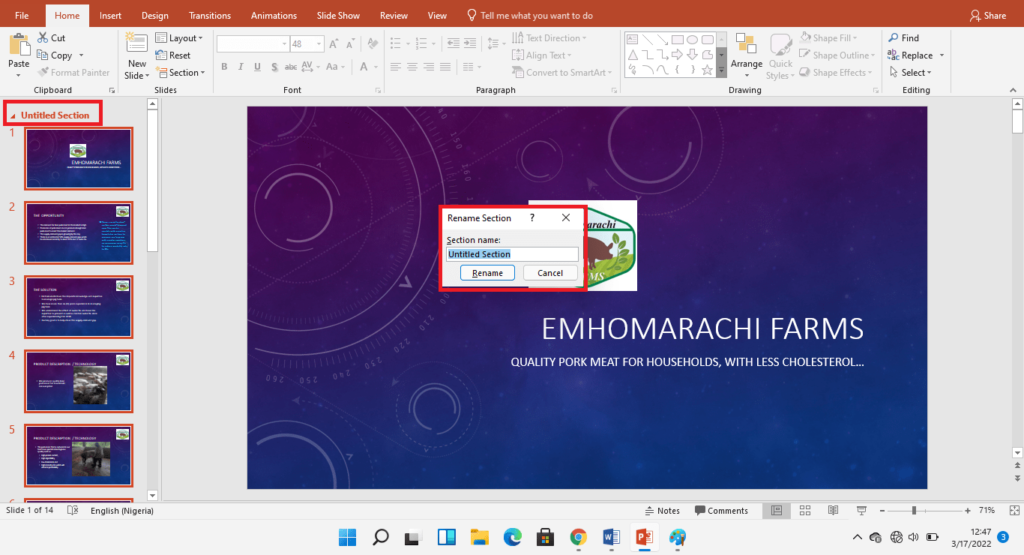
- In the dialog box, delete the untitled section and type a suitable name for the section. Then click the Rename button. You have created your first section.
- Scroll down and right-click between the slide that ends the first section and select Add Section.
- Follow the steps 3 – 4 above. Continue until you have added all the sections you want for the presentation.
Important tips:
- To collapse a section, click the arrow next to the section name. Click the arrow again to expand the section. You can also double-click the section name.
- To reorder sections, click the section name, then drag and drop the section above or below other sections. You can also right-click a section and select Move Section Up or Move Section Down from the popup menu.
- To move a slide into another section, select the slide thumbnail, then drag and drop it in the desired section.
- You can also do all of the above in the slide sorter view.
Rename a section
You can rename a section in the normal view but let us use the slide sorter view. To rename a section, do the following:
- On the View tab, select Slide Sorter under Presentation Views. All sections and the slides under them are displayed.
- Right-click a section name and select Rename Section from the menu that appears.
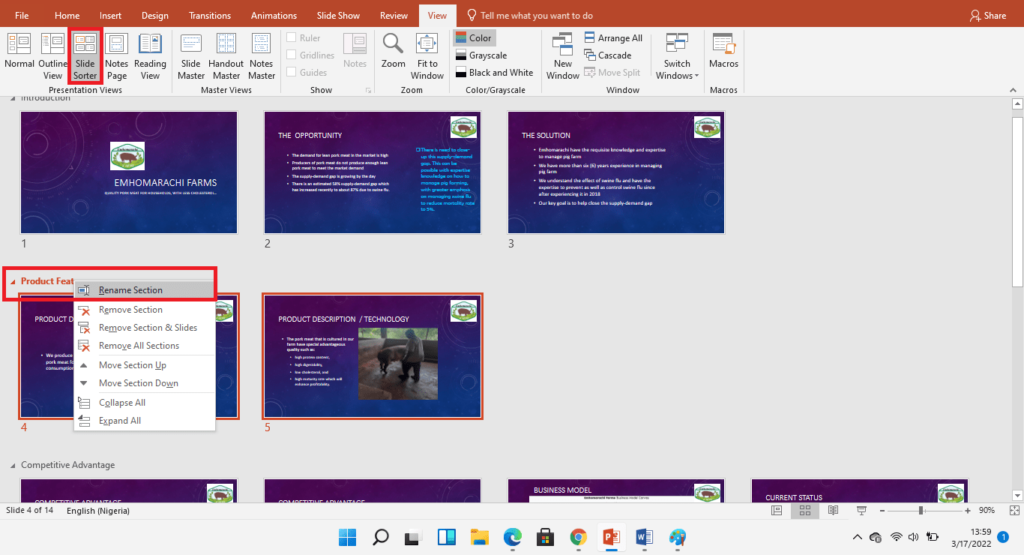
- Delete the existing name and enter another name for the section and click the Rename button.
Delete a section
To delete a section, do the following:
- Right-click the section name you want to remove. From the menu that appears, do any of the following:
- To remove the selected section, select Remove Section
- To remove the section and associated slides, select Remove Section & Slides. You can also select the section name and press Delete on the keyboard.
- To remove all sections in the presentation, select Remove All Sections.
- Note the following:
- You cannot remove the top-most section except you chose to remove all sections.
- When you remove a section, all slides associated with the section are added to the higher section.
Create a Table of Content to organize a PowerPoint Presentation
To create a table of contents in Microsoft Word is easy using the heading styles and the reference tab. But such tools as heading styles and table of contents command are not in PowerPoint.
This makes creating a table of content in PowerPoint more tasking. In this section, you will learn how to effectively organize a PowerPoint presentation with a table of contents.
With a table of contents, viewers can easily navigate through the presentation. It also enables viewers to see the entire presentation at a glance and interact with the contents.
To create an interactive table of contents in your PowerPoint presentation, follow these steps.
- Insert a new slide where the table of contents will reside
- Use the outline view to identify and copy and paste the presentation titles
- Add a link to each title or entry in the table of contents
- Create a link back to the table of contents slide
Insert a new slide
Insert the slide for the table of contents immediately after the topic of the presentation. To do this,
- Select the first slide in the presentation or the slide that will precede the contents slide.
- Press CTRL + M on the keyboard to insert a new slide.
- Right-click the new slide thumbnail, point to Layout and select Title Only.
- Enter the title for your Table of Contents, e.g. contents, presentation summary.
- Save your presentation.
Identify presentation titles
You can scroll down the slides to identify and copy titles on each slide of the presentation. But the outline view makes it easier and faster.
Before using the outline view, you should have used a layout that has the title placeholder. To use the outline view and identify presentation titles, do the following.
- On the View tab, under Presentation Views, select Outline View. The slide thumbnails in the presentation will switch to the outline view.
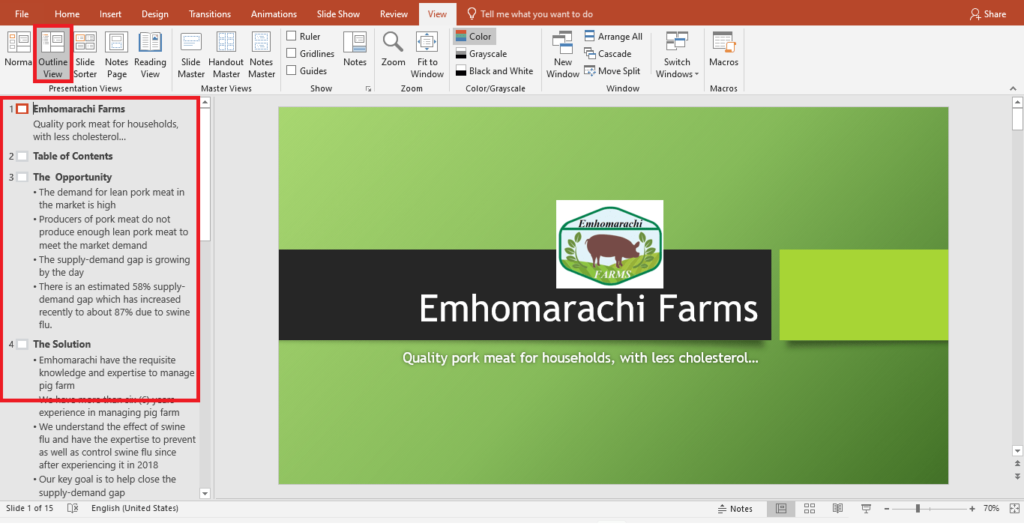
- In the slides outline, right-click any of the slide titles.
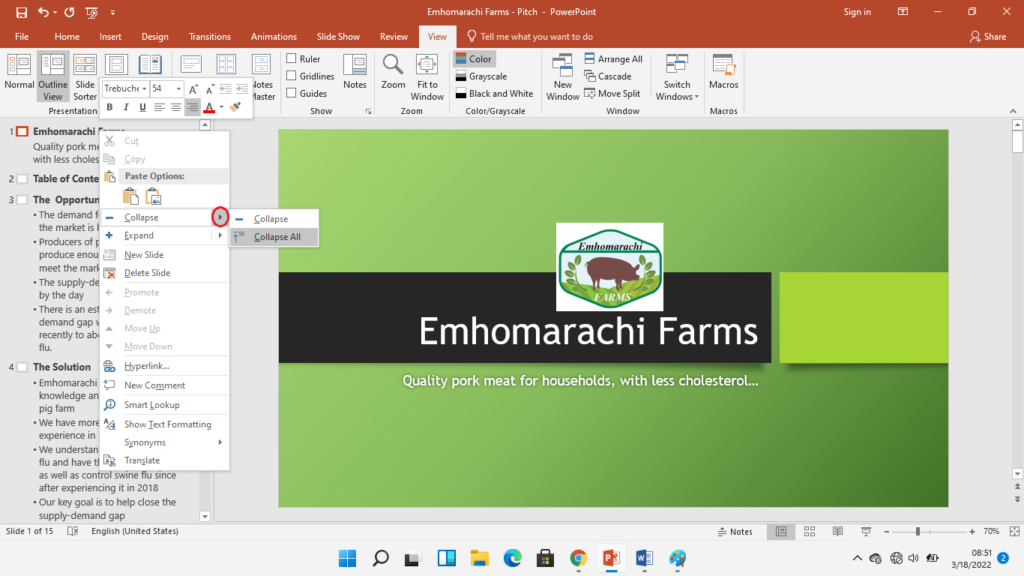
- From the menu that appears, click the arrow next to Collapse, and select Collapse All. The contents of the slides will be hidden leaving only the slide titles.
- Highlight all the slide titles in the outline or press CTRL+A on the keyboard.
- Right-click the highlighted outlines and select Copy from the menu or press CTRL+C on the keyboard.
- Go to the table of contents slide. On the Home tab, under Drawing, select the Text Box tool.
- Drag to draw a text box on the table of contents slide. Then paste the copied outline in the text box.
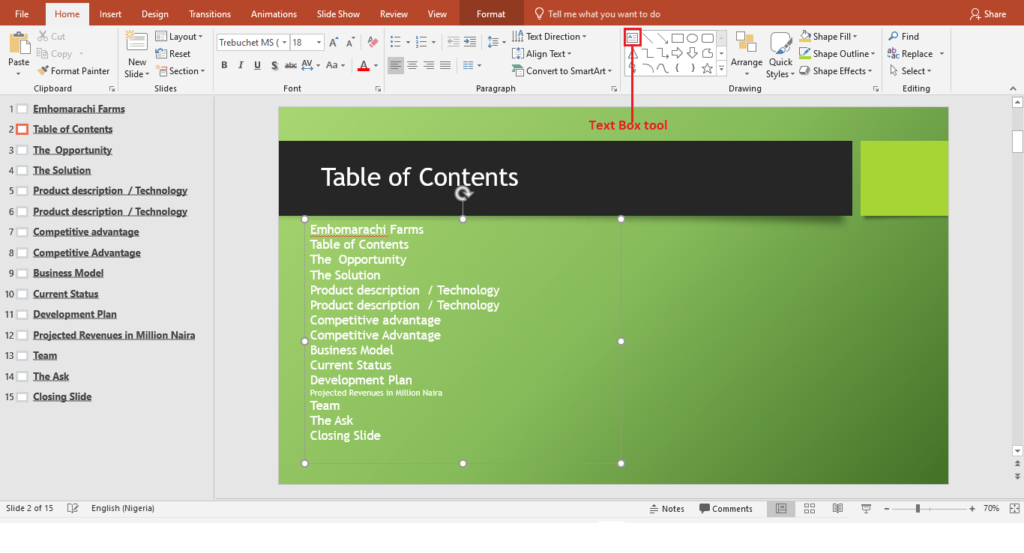
- You can decide to leave the contents like that and go to the next step. But it will be better to make it look attractive as shown below.
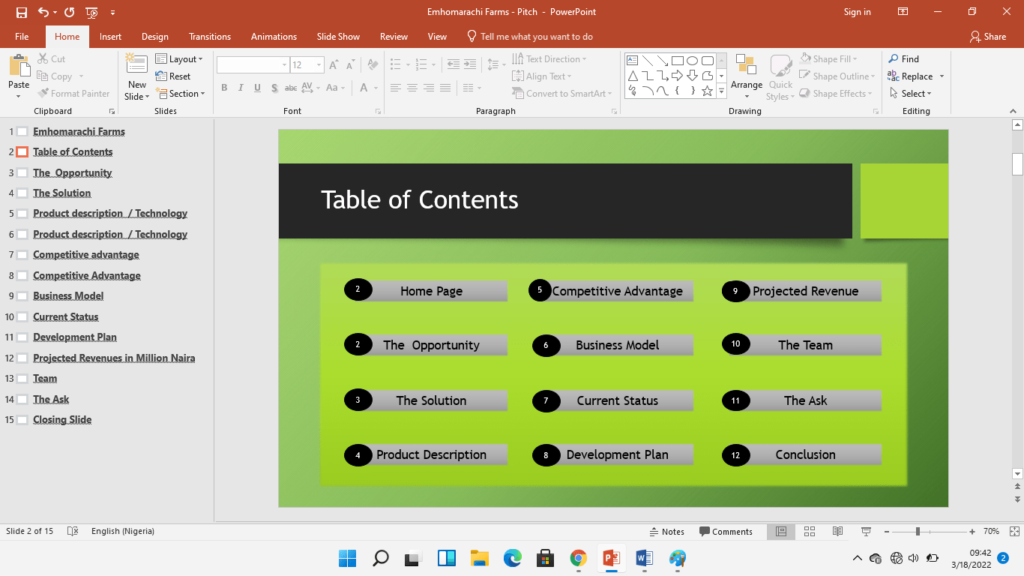
However, whether it should look attractive or not the most important thing is to make it interactive. This leads us to the next step.
Add a link to each entry in the table of contents
Because we created a manual table of contents, we must add a link to each entry to make them interactive. Do the following to add links to your table of contents.
- Select the first entry in your table of contents.
- On the Insert tab, under Links, select Link. You can also right-click the selected entry and select Hyperlink from the shortcut menu. You can also press CTRL+K on the keyboard.
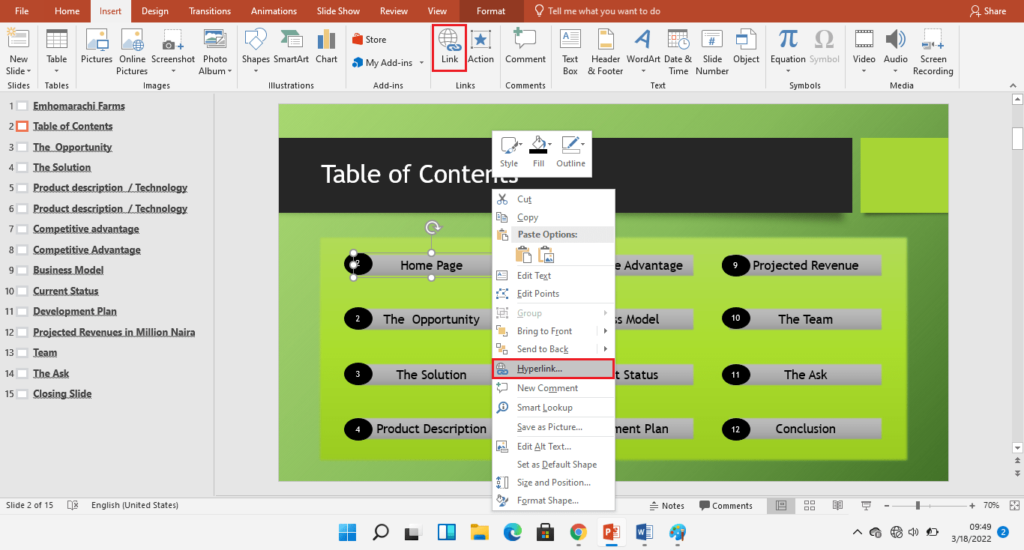
- The Add Link dialog box will appear.
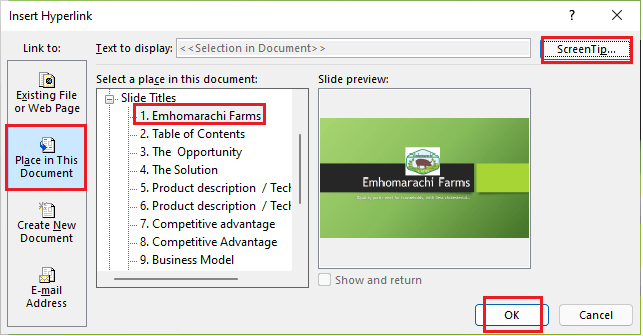
- In the dialog box, select Place in This Document. Under Select a place in this document, select the appropriate slide.
- To add a screen tip, click the ScreenTip button and enter a description, e.g. Home Page. When a user points at the link, it will display the screen tip.
- When done, click the OK button to add the link.
- Follow the above steps for each entry in the table of contents.
Create a link back to the contents
We created a link above to make our table of contents interactive. What happens when a user goes to slide 9 and wants to return to the table of contents?
To solve this problem, we shall add action buttons to our slides. A user will use the buttons to return to the contents, home previous, or go to the next slide.
Action buttons are objects that help users create interactive buttons in PowerPoint. They are located in Shapes – they are the last set of objects found in shapes. To use the action buttons to link back to contents and other slides do the following:
- On the View tab, under Master Views, select Slide Master.
- On the Insert tab, under Illustrations, select the Shapes.
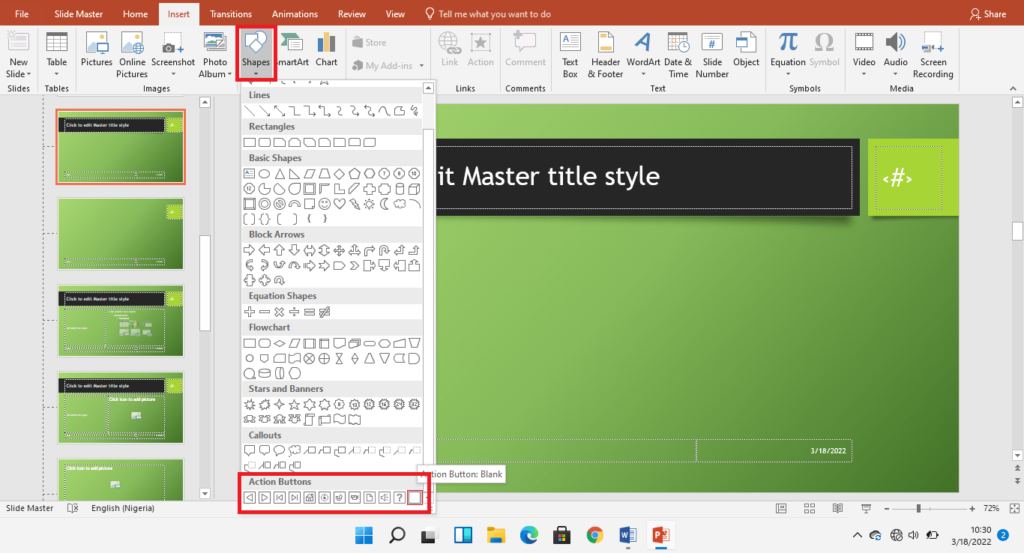
- From the dropdown menu, scroll down to Action Buttons and select the Blank action button.
- Drag and draw to add the button on all slides of the presentation. A dialog box appears.
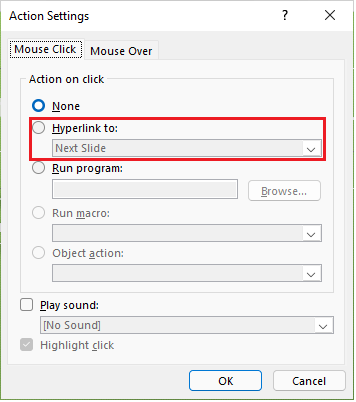
- On the dialog box, select Hyperlink to:
- From the dropdown list, select Slide… Another dialog box appears.
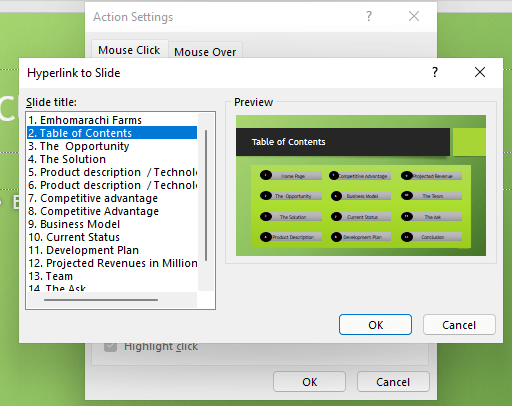
- On the dialog box, locate and select the slide with the table of contents and click OK.
- Click OK on the Action Setting dialog box.
- Right-click the action button you added and select Edit Text from the menu. Type a name for the button, e.g. ToC or simply Contents.
- Format and position the action button appropriately. When done, close the Slide Master view.
The action button is now added to all the slides of your presentation. At any slide the viewer is, he/she can go back to the table of contents.
You can also add the Next and Previous action buttons appropriately. For the Next action button, follow the above steps, in the Action Setting dialog box, click OK. Do the same for the previous action button.
Conclusion
In this tutorial, you learned how to organize a PowerPoint presentation into sections and a table of contents.
Sections help the presenter to put together the slides in a presentation into categories for an efficient presentation. The table of contents helps viewers interact with the content of the presentation efficiently.
You also learned how to use the action buttons. Action buttons make it easier to create an interactive PowerPoint presentation. You can use any of the preset action buttons like Next, Home, etc, or define one using the blank action button. If you have any questions use the comment box or contact us. Please, if this tutorial is helpful, share it with friends and colleagues.


