Paragraph formatting is a process of organizing and arranging texts in a document to follow a stipulated pattern. It is a process that uses alignment, bullets & numbering, spacing, and indentation commands to make documents presentable.
Paragraphs help writers to organize their work in a readable and logical manner. It is used to describe an idea in a series of sentences. A paragraph could contain about 250 logically organized words that explain an idea. There are about 7 types of paragraphs, depending on the purpose of writing, namely:
- An argument paragraph that provides evidence to support a point of view. This could be called the persuasive paragraph which is used to convince a reader about the position of the writer.
- A classification paragraph is used to group items according to their shared characteristics.
- A compare/ contrast paragraph focuses on similarities and differences between items.
- A definition paragraph is used to define or describe an item or a concept.
- A Descriptive paragraph is used to provide detailed information about an item or a concept.
- An expository paragraph is used to explain how an item or a concept works.
- An illustration paragraph is used to provide examples of how an item or a concept works. It can complement the expository paragraph for clarity and a better understanding.
In a word document, a paragraph is created whenever the ENTER key on the keyboard is pressed while entering text. Paragraph formatting is an important part of setting up your document. It makes a document look elegant and admirable.
Paragraphs can be created by using simple number lists or by using pilcrows to form simple descriptive sentences. When a group of paragraphs is logically joined together, they form a document. Therefore, paragraph formatting is important to make your document presentable and appealing to your audience.
In this tutorial, you will learn how to use the following paragraph formatting styles
- The paragraph marker (pilcrow)
- Bullets & numbered lists
- Indentation and Alignment
- Paragraph borders and shading
The Paragraph Mark or Pilcrow
When adding text content to a document using the keyboard approach, the carriage return key is usually pressed. Whenever this key is pressed (Return key in Mac) or (Enter key in Windows), a pilcrow is formed.
In older versions of Microsoft Word (97 – 2003), the paragraphs and line spacing are the same. This makes it difficult to determine where a paragraph ends and begins except in documents that used indentation. Also, in a recent Microsoft Word app where the before and after paragraph spacing is zero (0). There will be no clear indication of the end and beginning of a paragraph.
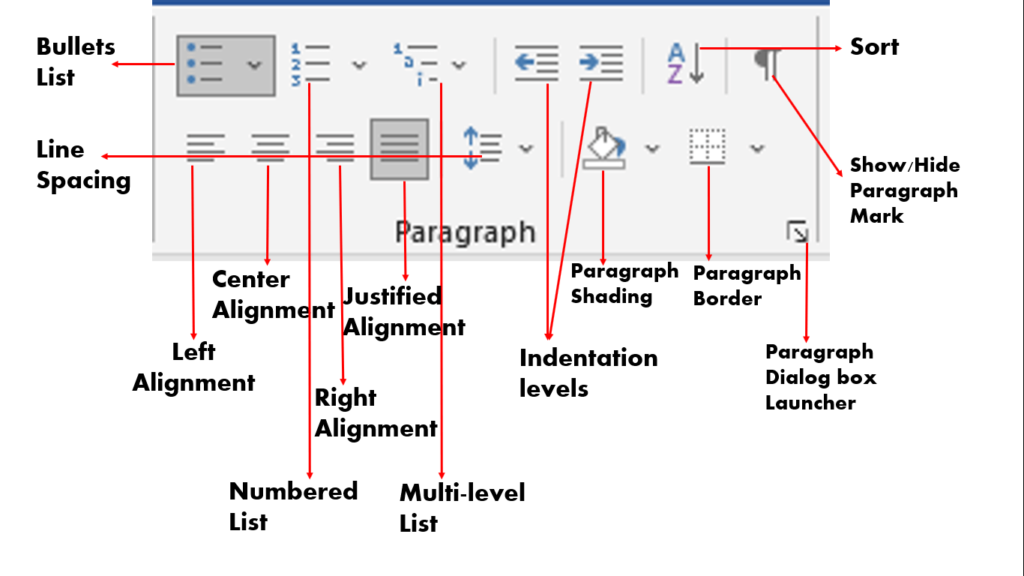
If you are faced with such a situation, you can easily identify where a paragraph end using the paragraph marks. This is the essence of the pilcrow, it makes it easy to identify where a paragraph ends and begins. See the diagram below.
NOTE: Without using the hide/show paragraph mark, you can differentiate the paragraphs by applying paragraph spacing. See Creating documents in Microsoft Word.
Show/hide the paragraph mark
To show/ hide the paragraph marks in a document, follow the steps below.
- On your current word document, go to the Home tab, under the Paragraph group, select the Paragraph Mark icon. See the Paragraph group diagram above.
- The paragraph marks appear at the end of all the paragraphs in your document.
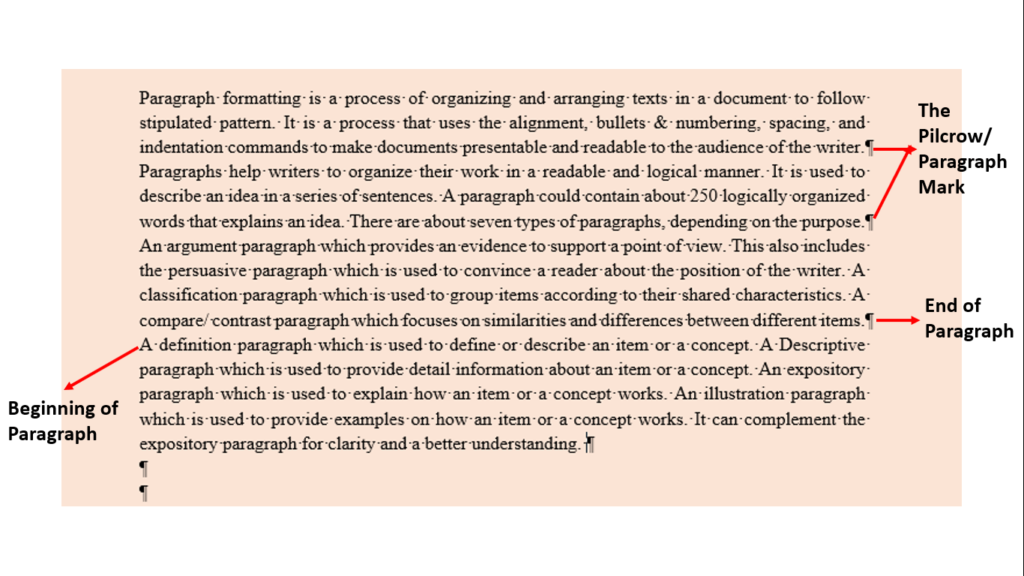
- Select the Paragraph Mark icon again to hide the pilcrow in your document.
Using the Bullets and Numbered List
Bullets and numbers are used to create itemized content in a document. Bullets can be used to indicate items that require attention while numbers can be used to create logical order. When creating a document that requires orderliness or step-by-step instruction, it makes sense to use a numbered list.
While bullets may not necessarily indicate orderly instructions, numbers are used for such instructions. Both can also be used to create items that do not need orderliness for listing purposes. For example, itemizing the products on sale or detail of different customers.
You can easily add bullets and numbered lists to the content of a document. Bullets and numbers are added at the paragraph level. To add bullets and numbers to the already existing content of a document, do the following:
- Select the paragraph or group of paragraphs you want to itemize.
- On the Home tab, under the Paragraph group, select bullets or numbering icons depending on what you want.
- Bullets or numbered lists will be automatically applied to the selected paragraphs.
Adding bullets to a document
To exclusively add bullets to a document when entering text, do the following:
- Place the insertion point where you want to start adding bullets to your document.
- On the Home tab, under the Paragraph group, select the Bullets icon.
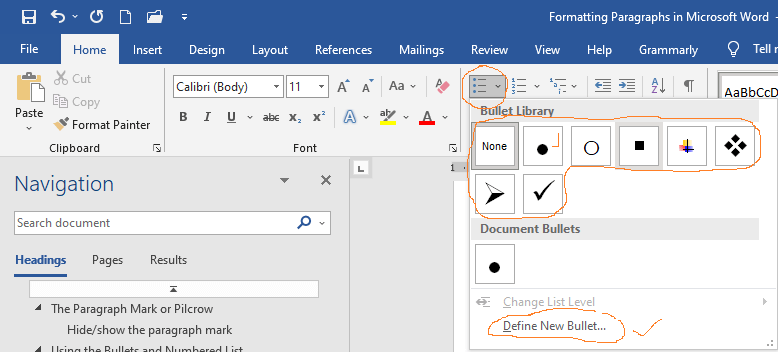
- From the dropdown list, choose your desired bullet style.
- The selected bullet design appears on the document. Start creating your text on the document by typing or copying and pasting.
- When the first item is entered, press the Return or Enter key on the keyboard.
- You will automatically begin another item below the first item with the same bullet style.
- Continue until you have completed all items on your list.
- After entering the last item on your list, press the Return or Enter key twice to turn off bullets.
- You can also click on the bullets icon to turn off bullets.
Adding a numbered list to a document
To exclusively add a numbered list to a document, do the following:
- Place the insertion point where you want to start adding numbers to your document.
- On the Home tab, under the Paragraph group, select the Numbering icon.
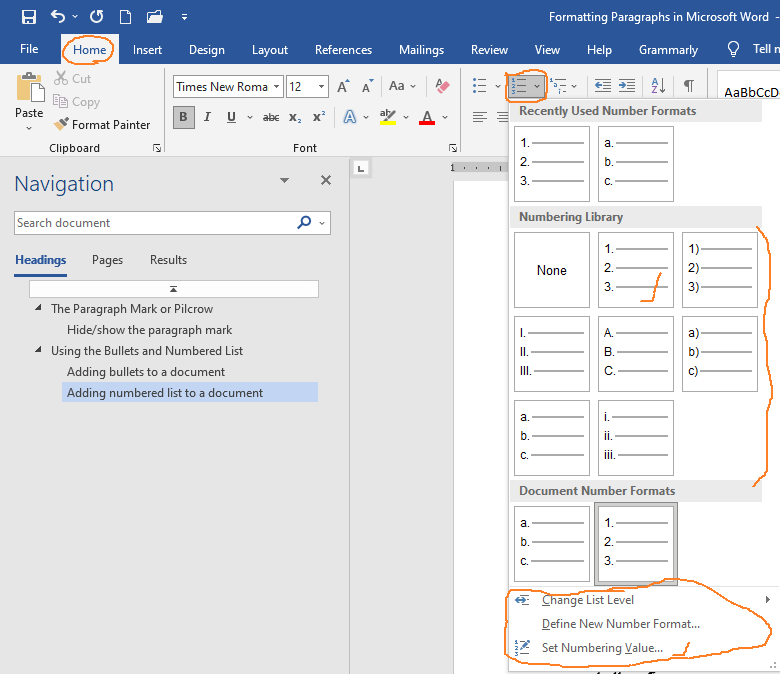
- From the dropdown list, choose your desired numbering style.
- The selected numbering style appears on the document. Start creating your text on the document by typing or copying and pasting.
- When the first item is created, press the Return or Enter key on the keyboard.
- You will automatically begin the second item (say, b.) below the first item. This will increase the numbered items.
- Continue until you have completed all items on your list.
- After entering the last item on your list, press the Return or Enter key twice to turn off the numbering.
- You can also click on the numbering icon to turn off the numbering.
Customize the numbering list
You can customize the numbering list when creating orderly items. For example, you can change the numbering value at any point in your numbered list.
- Follow the steps above to create a numbered list.
- To change the number of an item, do the following:
- Select the item or paragraph you want to renumber
- Click the Numbering icon, from the dropdown list, select Set Numbering Value…
- The Set Numbering Value dialog box appears.
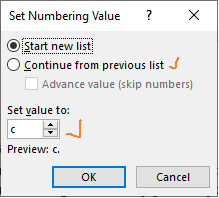
- On the dialog box, set the new value you want for your list. For example, you can start a new list, restart numbering or continue from the previous list.
- Set your desired value and click the OK button to apply.
- Continue with your itemized list as required until you are done.
Working with a multilevel list in paragraph formatting
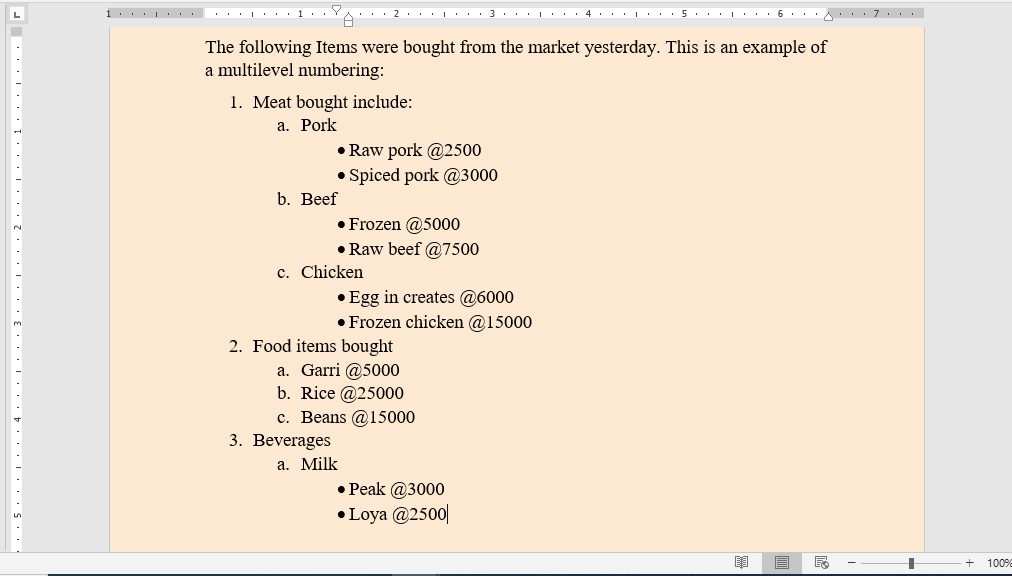
The immediate example shown above (customize the numbering list) is a typical example of a multilevel list. It is a numbering system that helps you divide items in a document into sections and subsections.
Items within a subsection are indented to signify their numbering level. In multilevel numbering, you can use the combination of bullets and numbering to itemize your list. See the diagram below.
Create a multilevel list
To add a multilevel list to a document, do the following:
- Place the insertion point where you want to start adding numbers to your document.
- On the Home tab, under the Paragraph group, select the Multilevel List icon.
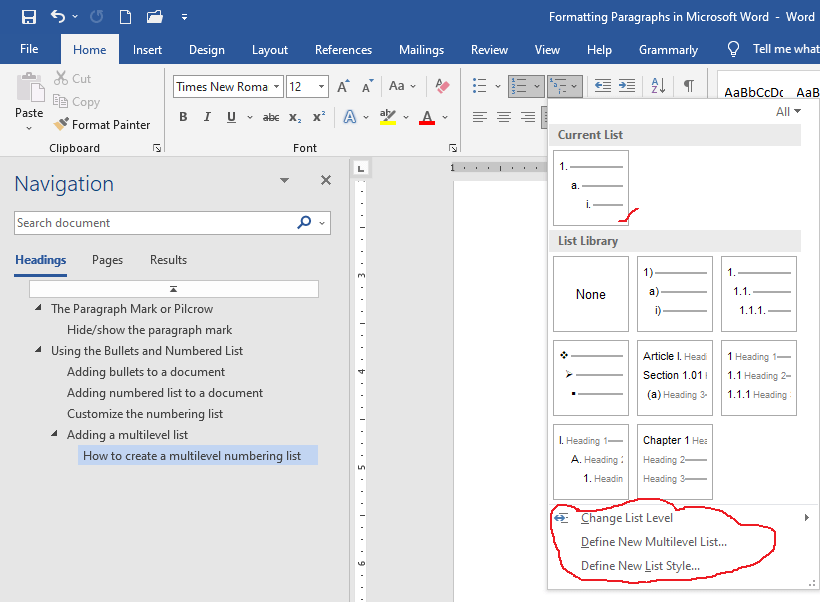
- From the dropdown list, choose your desired multilevel style.
- The first level of the selected multilevel style appears on the document. Start entering your first-level text on the document either by typing or copying and pasting.
- When the first-level item is created, press the Return or Enter key on the keyboard.
- You will automatically begin the second first-level item (say, No. 2) below the first first-level item.
- To create a second-level item (a subsection of the first-level item), do any of the following:
- On the second item, press the Tab key on the keyboard, the list level will change
- On the Paragraph group, select the Increase Indent icon, the list level will change
- Do the same to create third-level, fourth-level, etc., items.
- To return to the previous level list, do the following:
- Continue to press the ENTER key on the keyboard until you return to the desired level.
- On the Paragraph group, select the Decrease Indent icon, the list level will change. Stop when you return to the desired level.
Use the Change list level command
You can conveniently change to any list level on your word document when creating a multilevel list. To achieve this, use the change list level command on the multilevel list menu. Follow these steps to change a list level:
- Place the insertion point on the item you want to change its list level.
- On the Paragraph group, select the Multilevel list.
- From the dropdown list that appears, point to Change List Level…
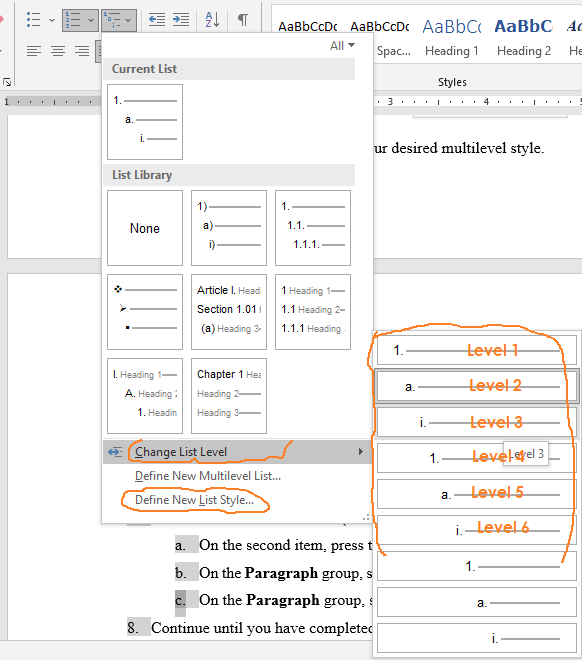
- From the submenu that appears, select your desired list level.
- The list level selected will apply automatically.
- Continue with your list items until you are done.
- After the last item on your list has been entered, keep pressing the Enter key until the numbering turns off.
- You can also click on the multilevel list icon to turn off the multilevel list.
Define a multilevel list style
If the preset multilevel list styles available do not appeal to you, you can define a new style. When you define and save a list style, it will be available for your use. To define a new multilevel list style, do the following.
- On the Home tab, under the Paragraph group, select the Multilevel list.
- From the dropdown menu, select Define New List style… The define new list style dialog box appears.
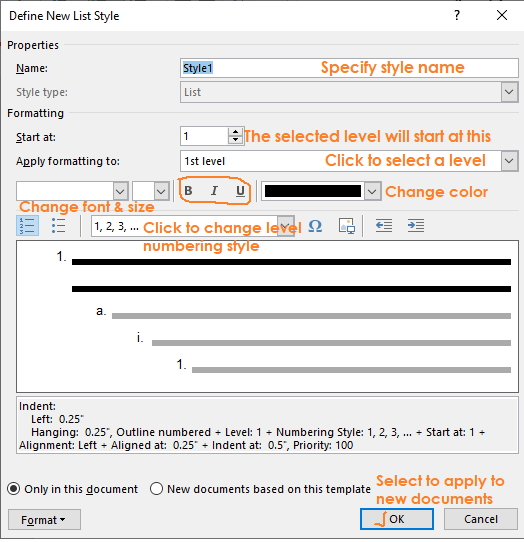
- On the dialog box, define a name for your new list.
- Under Apply formatting to: click and select a level, e.g., 1st level, 2nd level, etc.
- Under 1, 2, 3, …, click to select the bullet or numbering style you want.
- Under Start at: indicate the value you want this level to start at, e.g., 1, a, i., etc.
- Perform any other formatting you desire, e.g. add color, font, size, etc.
- Select the New documents based on this template radio button for this style to show in other documents.
- When done, click OK to save and apply. Your new list has been created.
You can also format how indentation of your multilevel list will apply by using the Define New Multilevel List… command. However, the default values are ok.
Indentation and Aligning texts
Indentation is mostly used to set off block quotations in a document. In this case, either the left or both left and right margins will be set off. Alignment is a command that specifies the extent to which a paragraph’s content covers the left and right margins. When formatting paragraphs, indentation, and text alignment are important because they make documents presentable.
You can indent the first line of every paragraph in your document or create a hanging indent as in endnotes. While you can apply any of the four alignment commands available to a paragraph.
Applying indentation
You can indent a paragraph by using the:
- increase and decrease indent commands on the Paragraph group. Simply click the increase and decrease indent icons to increase or decrease indent in a selected paragraph.
- indent triangle points on the horizontal ruler in your Word document. When you click and drag the triangles on the ruler, you create an indentation point within a selected paragraph. If you drag the box under the left indent triangle, you will set both indents together.

- indentation command in the Paragraph dialog box. You can use this command to set the precise indentation to your selected paragraphs. To use this command, do the following:
- On the Home tab, under Paragraph group, select the paragraph dialog box launcher.
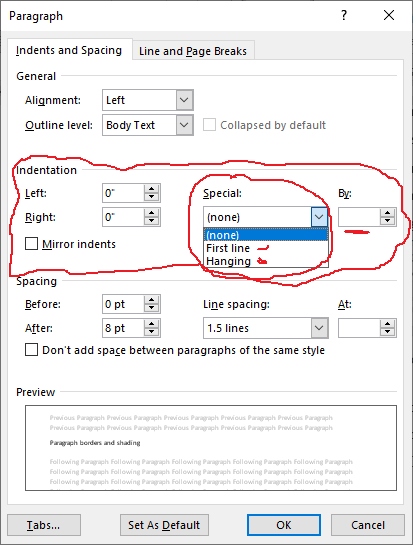
- On the dialog box, under Indentation, do the following:
- To create a blockquote, enter values in the left and right boxes to indent both margins.
- To indent the first line of paragraphs, select First line under Special: Then enter a value in the By: box.
- To indent subsequent lines of paragraphs, select Hanging under Special: Then enter a value in the By: box.
- Click OK when you are done.
Aligning paragraphs
There are four kinds of paragraph alignment:
- Left: makes lines in a selected paragraph to flush on the left and shabby on the right margin.
- Right: makes lines in a selected paragraph to flush on the right and ragged on the left margin.
- Center: centers lines in a selected paragraph and makes left and right margins to be shabby.
- Justify: makes lines in a selected paragraph to flush on the left and right margins. To achieve this, spaces are created within letters and words in lines of a paragraph.
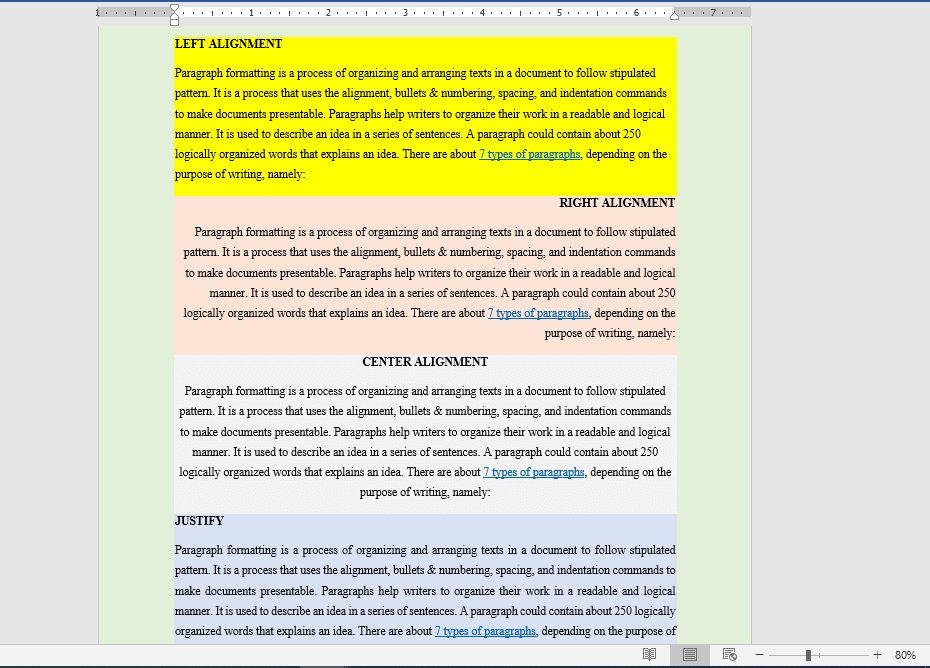
Applying alignment to paragraphs
To align text in a paragraph, do the following:
- Select the paragraph or group of paragraphs you want to apply formatting on.
- On the Home tab, under Paragraph group, select the type of alignment you want.
- You can also use the following keyboard shortcuts:
- CTRL+L for left alignment
- CTRL+R for right alignment
- CTRL+E for center alignment
- CTRL+J for justify alignment.
Paragraph borders and shading
Borders and shading can be used to create attention or add beauty to a paragraph. Paragraph shading is used to add color to a selected paragraph as shown in the example above. Paragraph borders are used to add demarcating boxes to a paragraph.
You can use either or both to create an outstanding document.
Add paragraph shading
To add shading to a paragraph, do the following:
- Select the paragraph or group of paragraphs you want to apply formatting on.
- On the Home tab, under Paragraph group, select the Shading dropdown arrow.
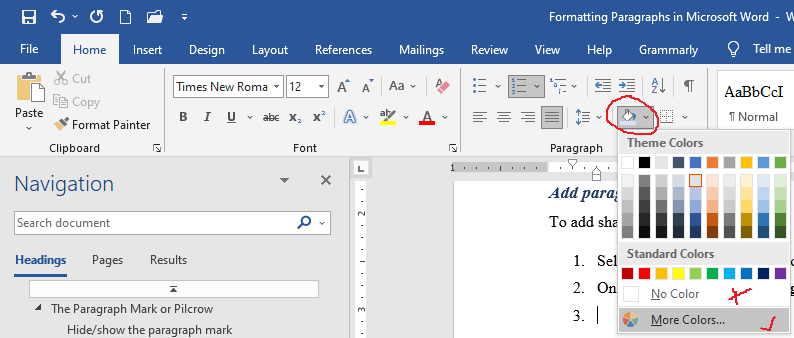
- From the color palettes that appear, choose a color of your choice.
- You can select the More Colors… option to mix a color.
- To remove shading, on the shading dropdown list, select No Color.
Add paragraph borders
To add shading to a paragraph, do the following:
- Select the paragraph or group of paragraphs you want to apply formatting on.
- On the Home tab, under Paragraph group, select the Borders dropdown arrow.
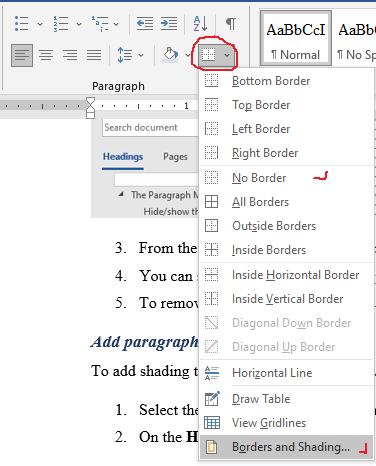
- From the borders dropdown list, choose a border of your choice. You can select Top, Botton, etc., borders.
- To customize your borders, select the Borders and Shading… option on the list.
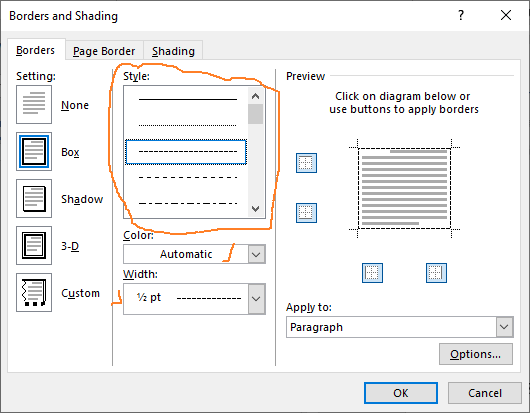
- From the dialog box that appears, select a border style, color, and width.
- Click OK when done.
- To remove borders, from the list of borders, select the No Border option.
Conclusion
Paragraph formatting makes your document look elegant and presentable to your audience. It also makes your document readable.
Microsoft Word provides commands that help you to format your paragraphs when creating a document. Some of these commands include alignment, bullets and numbering, spacing, and indentation.
While these commands can help make your documents readable, borders and shading can add beauty to them. Learning how to apply paragraph formatting is important to everyone using word processing applications.
We believe that this tutorial will help you achieve a greater level of mastery in the use of Microsoft Word. If there is any area you think we did not cover in this topic, please inform us.
Thank you for being part of this tutorial, we shall continue next week with the topic “Inserting tables.” Before then, take a minute to help us share this tutorial.
Links to Previous Microsoft Word Tutorials (Parts 1 – 4):


Dear AGOMUO KELECHI,
You have added deep idea on writing paragraph. It’s really helpful for every one. It will be better if you will add some video with this article because it will be helpful for us to know practically.
Regards,
Jabed
Thank you Jabed, We are planning on adding videos to all our tutorials as soon as we complete tutorials on PowerPoint. From our schedule, video tutorials will be added from Mid April, 2022. If you have subscribed to our newsletter, you will be among the first to receive the vide tutorials.
Thank you once again.