Many times, printing Excel worksheets and workbooks are tasking for b\eginners. Inexperienced Excel users usually find it difficult to perform important printing tasks such as:
- How to print Excel sheet with lines (gridlines)
- How to print excel sheet with rows and columns
- How to print excel spreadsheet on multiple pages
- How to print the entire workbook
- Printing the print area in excel
In this tutorial, you will learn how to print excel worksheets and workbooks.
- Share and Print a Document in Word
- How to use PivotTable in Excel 2016
- Types of Charts in Excel and Their Uses
Prepare Excel Sheet before Printing
Before you start printing Excel worksheets and workbooks, you should have:
- entered relevant data in the worksheet – learn how to insert and format data in Excel
- setup your worksheets – learn how to print excel sheets in A4 size
If you are preparing a worksheet for printing, you should, first of all, choose the paper size and the orientation.
Setting up your worksheet – print excel sheet in A4 size
To set up your worksheet and get ready for printing, do the following:
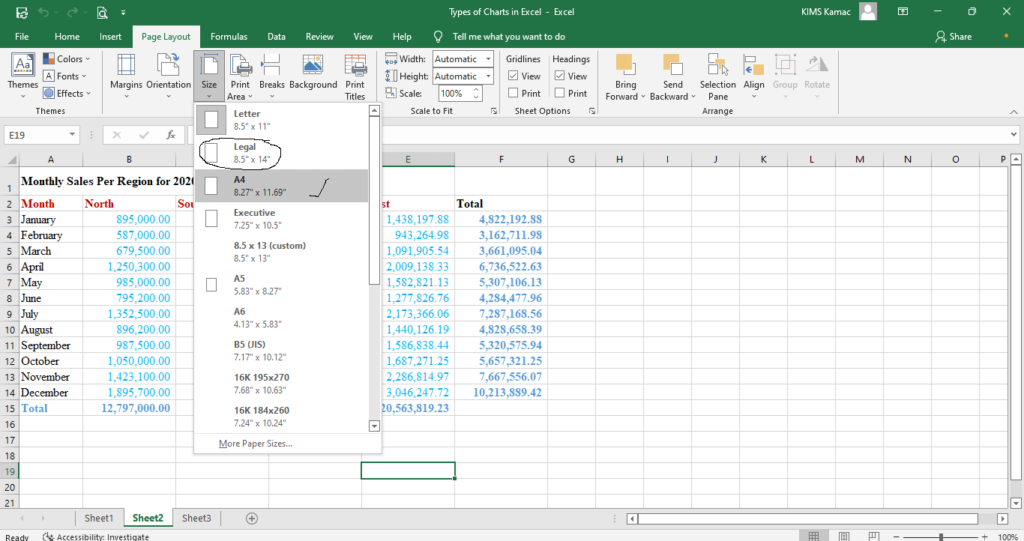
- On the Page Layout tab, under Page Setup, select Size.
- From the dropdown menu, select any paper size of your choice. To print an excel worksheet in A4 size, select the A4 paper size. To print in foolscaps, select legal paper size, etc.
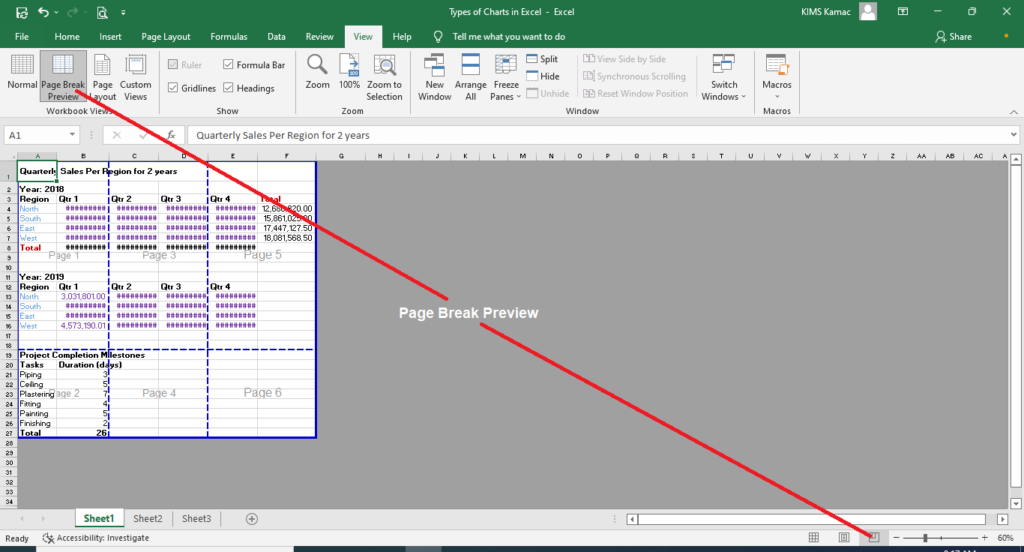
- After selecting the appropriate sheet size, dashed vertical and horizontal lines will appear on the worksheet. The lines divide each page from another.
- To know the number of pages is in the sheet, select Page Break Preview. (From the View tab, under Workbook views OR on the status bar, select Page Break Preview icon).
- If you need to adjust the margins, then visit the Page layout, and select a preset Margin.
- To change the page orientation, on the Page Layout, select Orientation, and choose either Portrait or Landscape.
You have set up your sheet for printing using the paper size and orientation, however, there are a few necessary adjustments.
How to print Excel sheet with lines
By default, when printing Excel worksheet, the gridlines do not show. It shows like a plain word document as shown below.
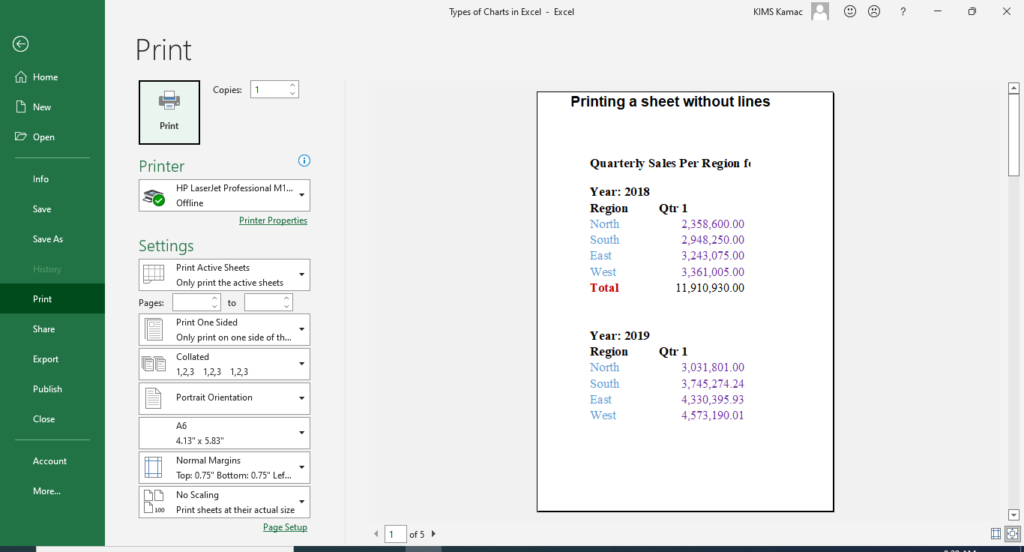
To ensure that you print the excel sheet with lines, you will do any of the following:
- Turn on the gridlines
- Apply line borders (recommended)
Turn on gridlines
You can turn on printing with gridlines, however, this option is not professionally recommended. This is because the presence of the lines may distort the flow of the data and your presentation. To print with gridlines, do the following:
- On the Page Layout, under Sheet Options, select the Print option button under Gridlines.
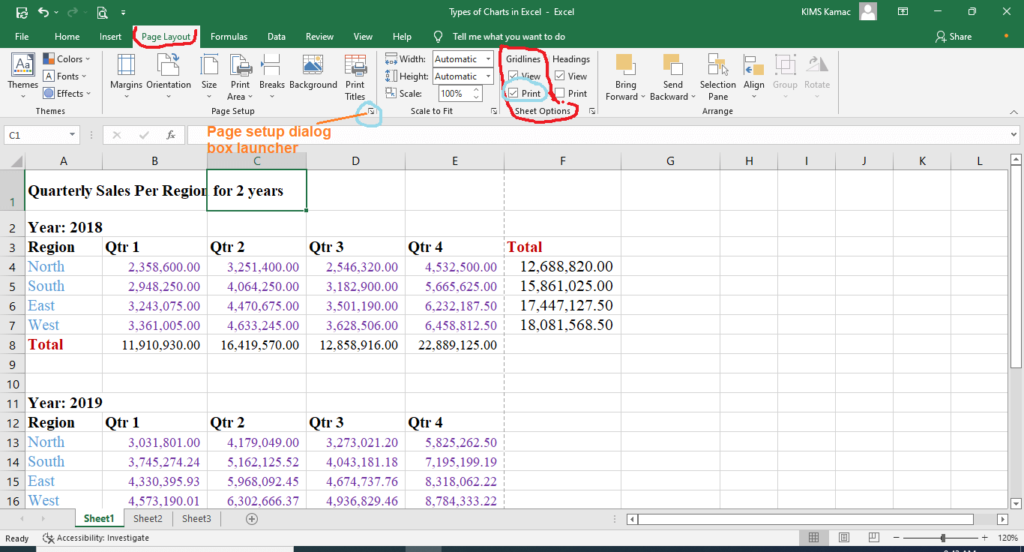
- You can use this option instead:
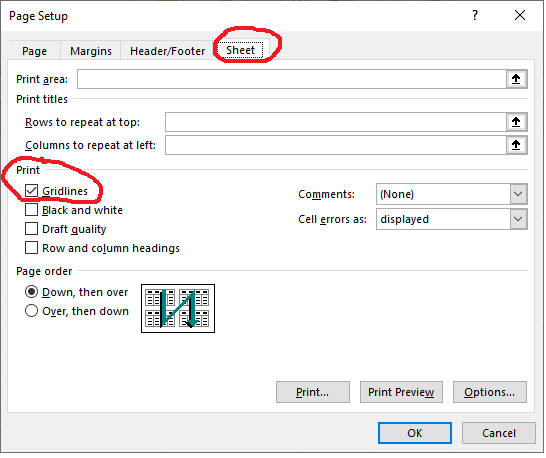
- Select the Page Setup dialog box launcher
- Select the Sheet tab on the dialog box that appears
- Under Print, select the Gridlines option button and click OK.
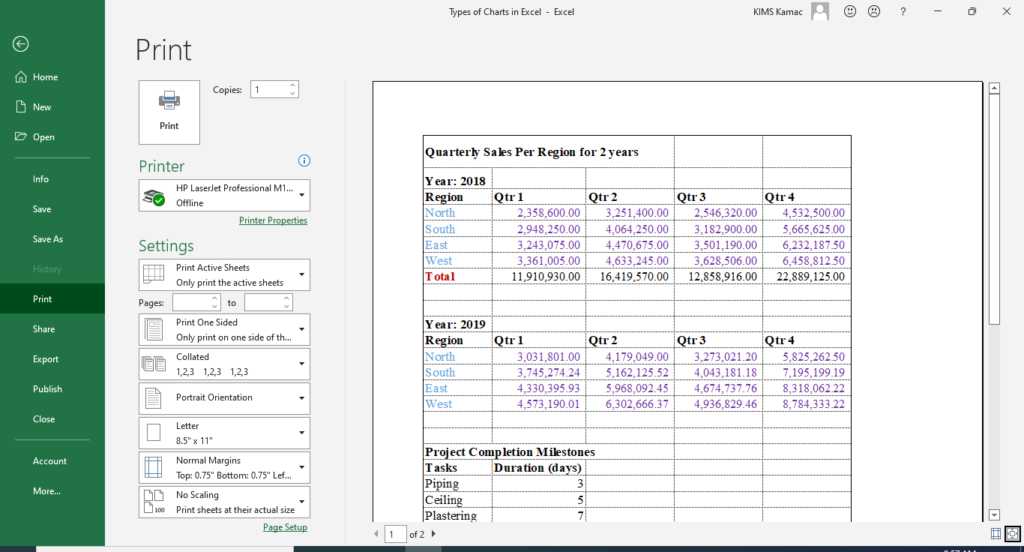
Whichever method you chose, if you completed the process successfully, you have activated the printing sheet with gridlines. An example is shown below.
Apply line borders
Using line borders is mostly recommended because it makes your presentations look professional. When applying line borders, you can separate your data accordingly without showing clumsy lines as shown above. To apply line borders when printing an excel sheet with lines, you must turn off print gridlines.
The simplest way to apply line borders is to do the following:
- Select a cell or range of cells you want to apply line borders on.
- On the Home tab, under the Font group, select the border icon.

- From the dropdown menu, select All Borders.
- You may decide to use the following option:
- On the Home tab, under the Font group, select the font dialog box launcher (CTRL + 1).
- On the dialog box, select the Border tab.
- Under, Line Styleselect aline style of your choice.
- Under Preset, select any of the presets. Outline applies outside border to selected cells, while Inside applies inside border to selected cells.
- You can also use the borderlines under Border to apply any of the top, bottom, right, etc. borders. In either case, you will see the preview in the window.
- When done, click OK.
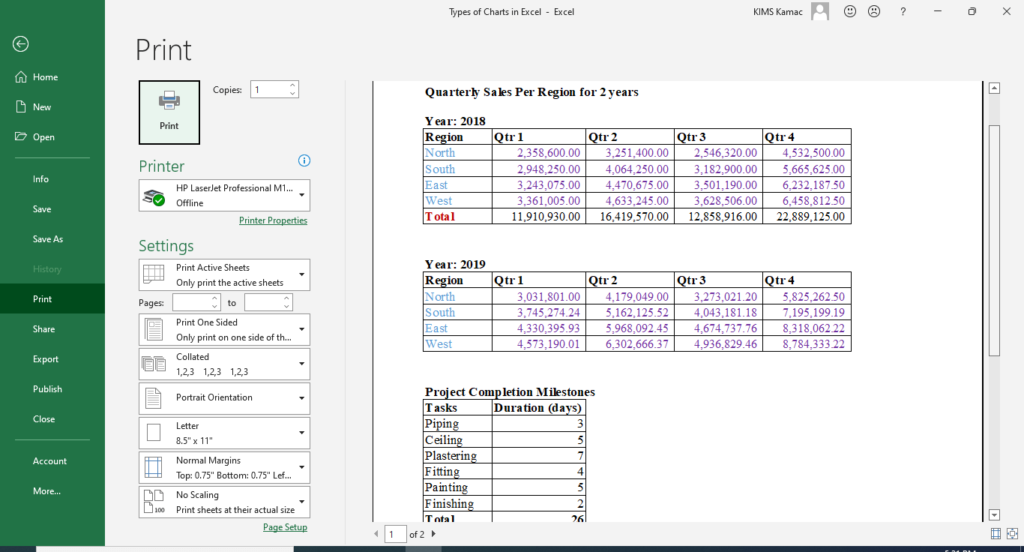
If you chose to apply borderlines in the worksheet, then the printout sheet will look like this. Compare this image with the above image when we used the gridline. Which one is more presentable?
How to print excel sheet with rows and columns
You can print an Excel worksheet with the row and column headings. The heading row and column are the numbers and alphabets used in cell addresses. For reference, you may decide to print them for a clearer presentation.
To print excel sheet with rows and column headings, do the following:
- On the Page Layout, under Sheet Options, select the Print option button under Headings.
- You can use this option instead:
- Select the Page Setup dialog box launcher
- Select the Sheet tab on the dialog box that appears
- Under Print, select the Row and Column Headings option button, and click OK.
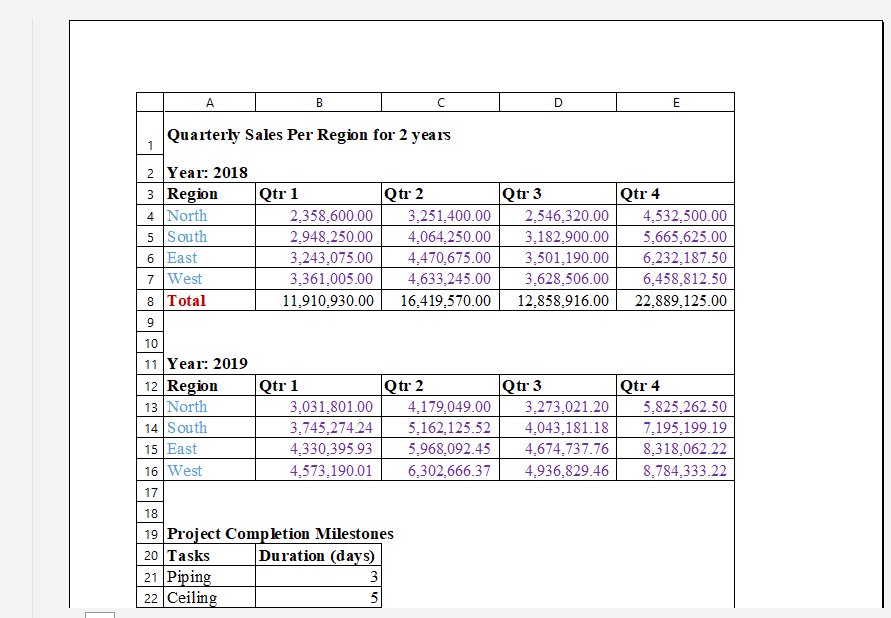
If you can complete the above steps, the excel sheet printout will look like this.
How to print excel spreadsheet on multiple pages
You can print excel spreadsheet on multiple pages. This is true when you have a large worksheet or when printing the entire workbook that has multiple sheets. To print an excel spreadsheet on more than one page, you will need to set the following for clarity:
- Page numbers
- Page order, and
- Print titles
Set page numbers on multiple pages
When a sheet has more than one page, you can print the page by adding page numbers. In Excel, page numbers can be added as a header or footer. To add page numbers, do the following:
- On the Page Layout, select the Page Setup dialog box launcher.
- On the dialog box that appears, select the Header/Footer tab.
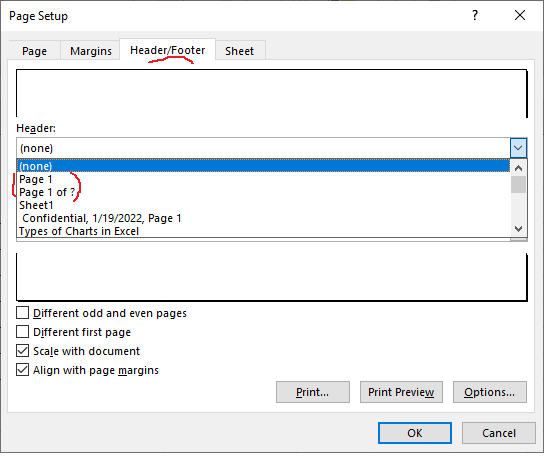
- Under Header or Footer (depending on your choice of placement), select Page 1 or Page 1 of ?.
- Click OK when done.
Specify page order
In Microsoft Excel, the default page order is down, then over. This means that the page count will go down first before coming up again. That is, the first columns are printed first before subsequent columns. See the example below.
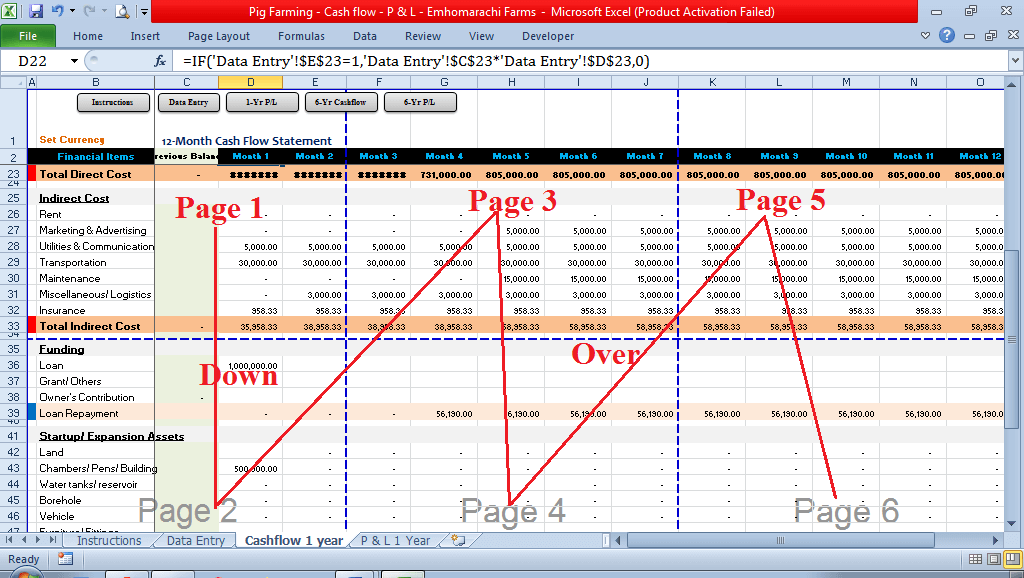
In the example above, the data span up to 3 A4 sheets from Financial Items, Month 1 to Month 12. Also, the down part exceeds 1 A4 sheet from row 1 to row 56. The total A4 sheets or A4 pages is 6. By default, it will print as shown above.
However, you can change the pattern to print Over, then down. This means that the first rows are printed first before subsequent rows.
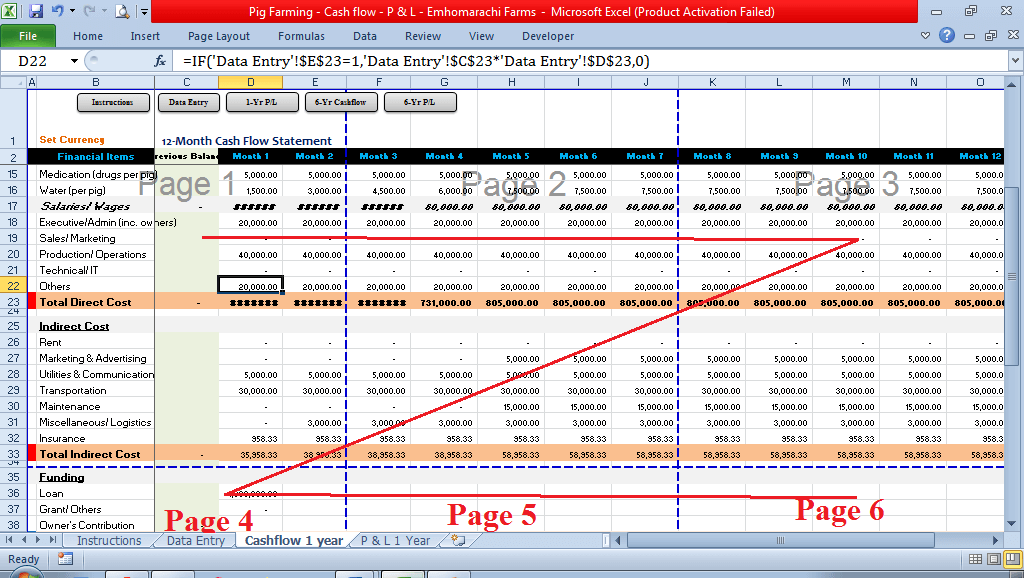
Whichever style you choose depends on what comes first. For example, if the span of the worksheet to the right is more relevant when they stay together then, choose over, then down. Else, leave the default option.
To change the page order, do the following:
- On the Page Layout, select the Page Setup dialog box launcher.
- On the dialog box that appears, select the Sheet tab.
- Under Page, order select Over, then down.
- Click OK when done.
Define print titles
When printing multiple pages in an Excel spreadsheet application, you can include the titles on each page. A worksheet may have row and column titles, or either row or column titles. In either case, it makes sense to repeat the title on each page of the printed sheets. This will help the reviewer understand which column belongs to a title heading without referring back to page 1.
When printing titles, you can specify columns to repeat at left if the worksheet spans more columns. Similarly, you can specify the rows to repeat at the top of the worksheet that spans more rows. To print titles on multiple spreadsheet pages, follow these steps:
- On the Page Layout, select the Page Setup dialog box launcher.
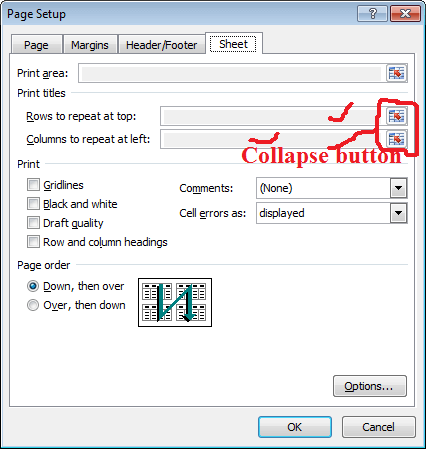
- On the dialog box that appears, select the Sheet tab.
- Under Print titles, If you want to repeat rows at the top of pages, then do the following:
- Click the collapse button under Rows to repeat at top.
- On the worksheet window, click the arrow pointer to select the rows to repeat at top of sheet pages
- Click the collapse button to return to the Page Setup dialog box.
- Click OK when done. The titles in the selected row(s) will appear at top of every page of the worksheet.
- Under Print titles, If you want to repeat columns at the left of pages, then do the following:
- Click the collapse button under Columns to repeat at left.
- On the worksheet window, click the arrow pointer to select the columns to repeat at the left of sheet pages
- Click the collapse button to return to the Page Setup dialog box.
- Click OK when done. The titles in the selected column(s) will appear at the left of every page of the worksheet.
When you are done setting up your sheet for printing, you can now print either the current worksheet or the entire workbook.
Printing Excel Worksheets
After setting up your sheet for printing, and applying necessary formatting, you can print the excel sheet. You can print:
- A selection or print area
- The active worksheet
- The entire workbook
To print excel sheet, do any of the following:
- Select the Print Preview and Print icon on the quick access toolbar.
- Go to File and select Print from the dropdown menu.
- Press CTRL + P on the keyboard.
Whichever method you chose, the print preview and print window will appear.
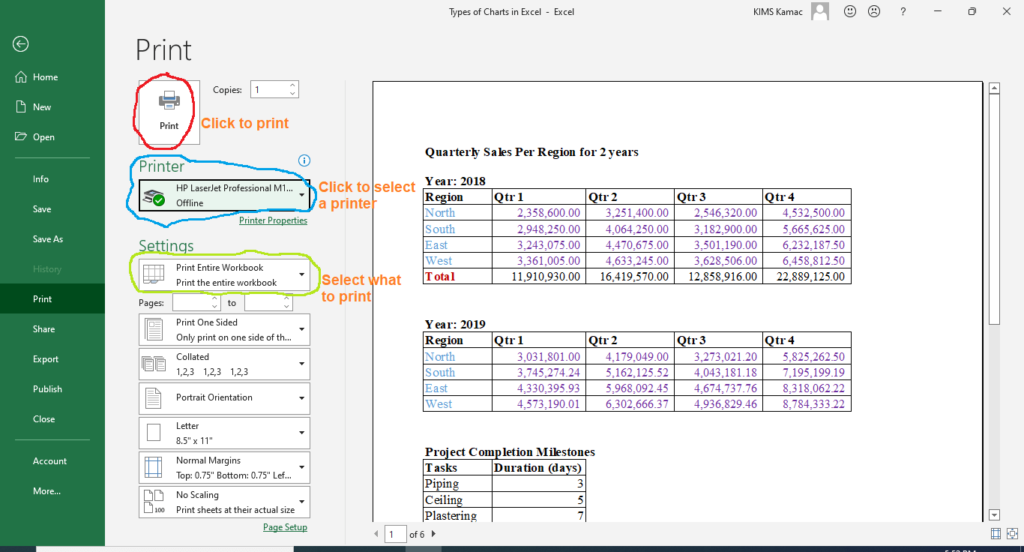
- On the Print window, select a printer from the list of printers. You can choose Microsoft Print to PDFif you want to save the sheet as a pdf file. (To learn more, visit Share and Print a Document in Word).
- If satisfied with all your sheets settings, click the Print button to print.
Choose what to print in Excel
You can print a range of cells as a selection or convert them to a print area before printing.
How to print a selection
- Select a range of cells that you want to print. In this case, you are not printing the entire worksheet.
- Go to Print Preview and Print window.
- Under Settings (under select what to print as shown above), select Print Selection from the dropdown menu.
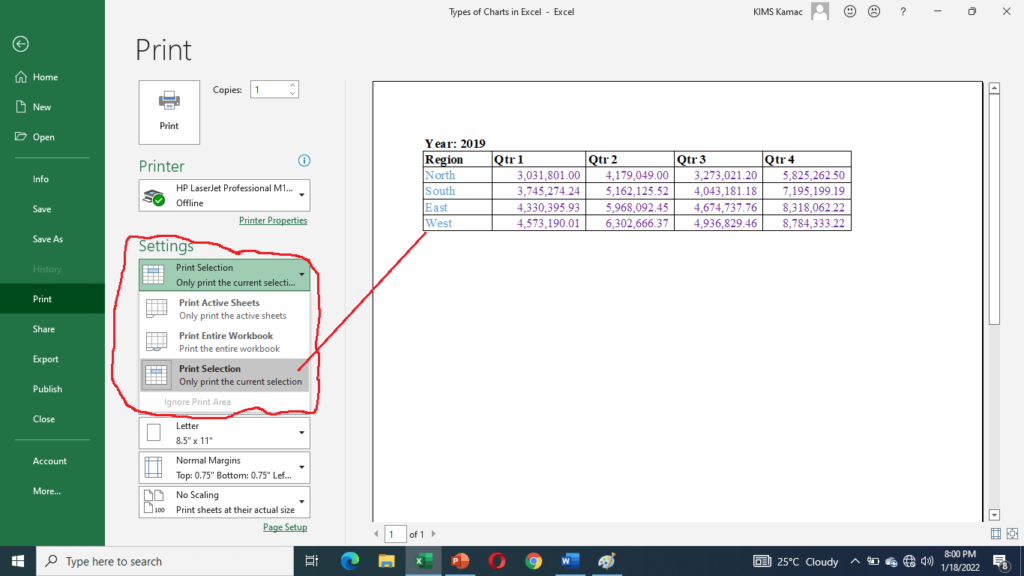
- The selected range will be displayed on the preview window for printing.
Printing the print area in excel
Printing the print area is like printing a selection. The difference is that the print area is saved in Excel memory.
Before you print a print area in excel, you will need to create it. To create a print area, do the following:
- Select a cell or range of cells that you want to print.
- On the Page Layout tab, under the Page Setup group, select Print Area.
- From the dropdown menu, select Set Print Area.
- Go to Print Preview and Print window.
- Under Settings, select Print Active Sheets from the dropdown menu.
- The Print Area you created will be displayed in the print preview window.
- If you want to print the entire active sheet instead of the print area, select Ignore Print Area.
- To clear the print area, visit Page Layout, Print Area, Clear Print Area.
Print the entire workbook
Before you print the entire workbook, ensure that you set up all the sheets in the workbook.
- Go to Print Preview and Print window.
- Under Settings, select Print Entire Workbook from the dropdown menu.
Conclusion
From what you have learned so far you should know why beginners in Excel find printing excel sheets complicated. However, I believe that you have understood how to effectively print excel worksheets and workbooks.
We are creating video tutorials to assist your deeper understanding of these lessons. Please, subscribe to our newsletter or our YouTube Channel to get the videos in your inbox. We welcome questions, comments, and contributions. Thank you for staying with us; please, kindly share with your friends, family, and colleagues.


