After you have finished creating and formatting your document, you will need to print your document.
To print a document in word, you need a printer. The printer can either be installed on your computer system or you have access to connect your device to it.
You can connect to a printer in two ways:
- Through point-to-point connection with a USB connector: You can directly connect your device using this method if you own a printer. It requires you to install a printer driver on your device for the printer to function effectively.
- Through wireless connectivity channel: Though you can also connect your devices using this channel if you own a wireless printer. But it makes it easier for you to connect and print to an external printer. To print a document in a cybercafe or a hotel, etc., you can connect to their wireless printer. This is possible if such a service is available. In some cases, you may be required to install a print driver.
To print a document and distribute it is not the only way to get your document to the right audience.
A document can get to the final user in two ways:
- As a softcopy: This is the modern way of sharing and delivering information. Information technology makes this method easy and provides avenues for effective information delivery. It also enhances teamwork, productivity, and collaboration, making for fast and instant updates to a document.
- As a hardcopy: This method requires you to print a document before it reaches the supposed audience. It is a manual means of disseminating information and requires that you own or have access to a printer.
In this tutorial, we shall look at the following:
- How to share a document in word
- How to print a document in word
How to Share a document in Word
Sharing a document is an electronic means of delivering your document to your audience. There are different ways to achieve this, including:
- Delivering your document through an email service like Mailchimp
- Publishing your document on a blog service like Blogger.
- Posting your document on a public or personal website.
- Sharing your document using cloud service.
Microsoft Word provides four ways of sharing a document with your audience. They include:
- Email service: This method allows you to send your document as an attachment to your audience’s email address. It uses Outlook to manage and deliver emails.
- Online presentation: This method enables you to use an office presentation service to deliver your document to an online audience. It requires that you own a Microsoft account.
- Blog post: You can use this method to post your content to any of the popular blog sites. You need to register and connect your blog account to make a post.
- Cloud service: This method allows you to share and collaborate with others using Microsoft cloud service. You need a Microsoft account to use this service.
Let us elaborate on how to share a document using email and cloud services.
Share a document using an email service
MS Word provides users with the option of sharing their documents through an email service. The email service used in this case is Microsoft Outlook. To share your document using email do the following:
- After creating and formatting your document, go to File, and click on Share.
- The share and print a document window will appear.
- Select Email from the share list.
- From the Email options, select any of: Send as Attachment, Send as PDF or Send as XPS.
- The Outlook email service window will appear with the attached document. NOTE: If you are using Outlook for the first time, you will need to set it up.
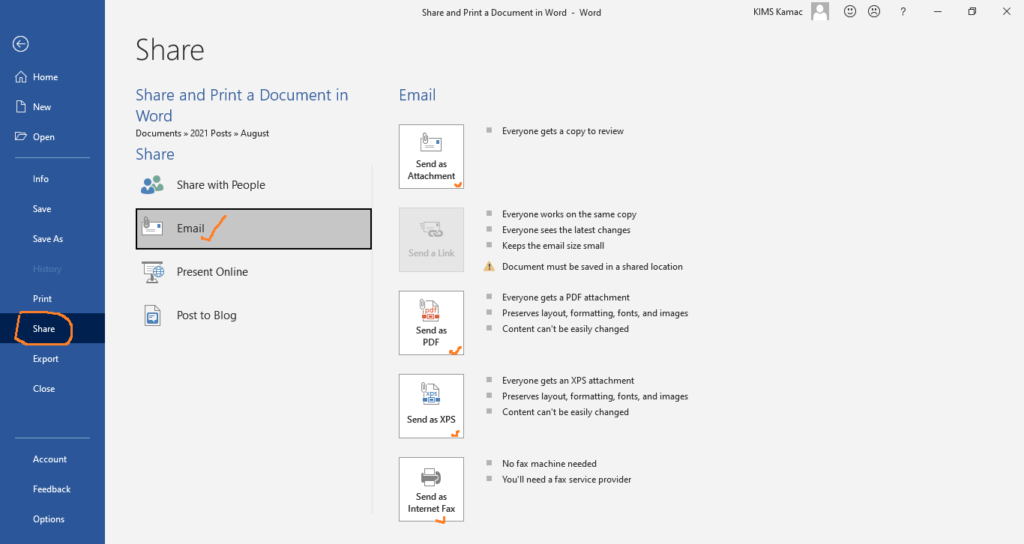
- On the outlook window, enter the email addresses of recipients, separated by a comma.
- Click the Send button to send the document.
Share a document using cloud service
You can also share a document using the Microsoft cloud service. This requires that you have a Microsoft account. To get started, do the following:
- After creating and formatting your document, go to File, and click on Share.
- The share and print a document window will appear.
- Select Share with People from the share list.
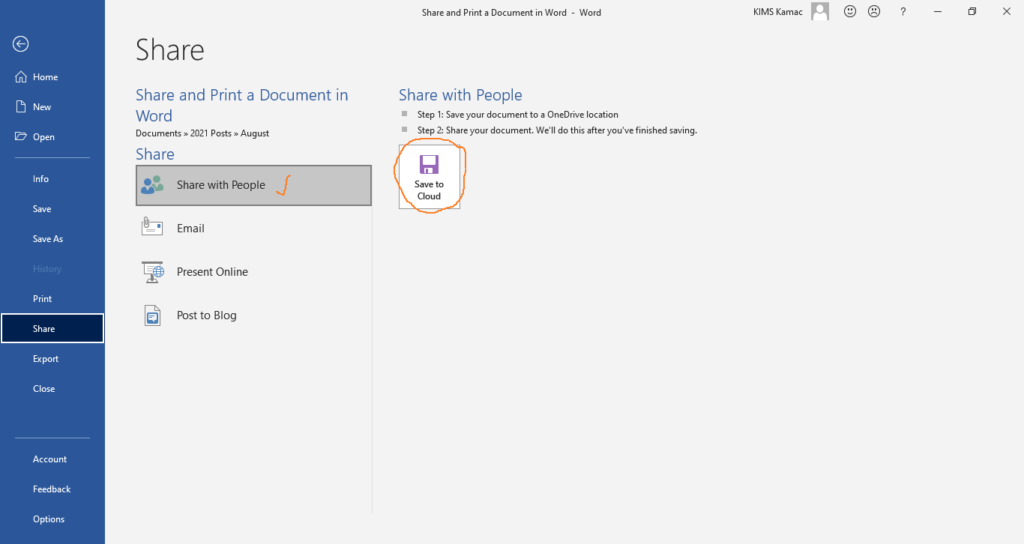
- From the Share with People options, select the Save to Cloud button.
- The Save as window will appear.
- On the save as window, select the OneDrive option. (Your Microsoft account should be active. If it is not active, log in to your Microsoft account by clicking on the Sign-in option on the top-right corner.)
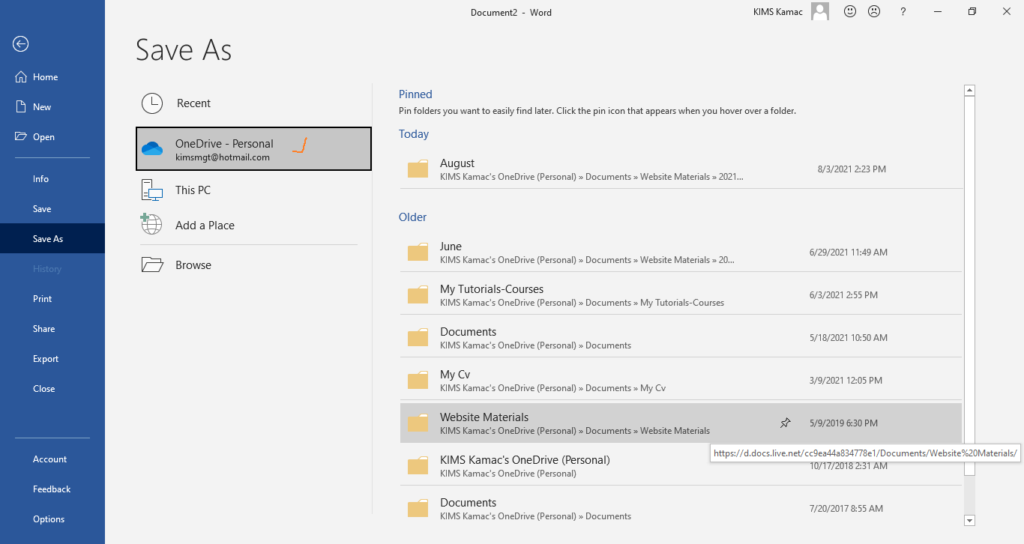
- Select a folder and save the file in OneDrive (NB: internet connection should be active).
- After the file is successfully saved, go to File and click on Share.
- Select the Share with People option on the share list.
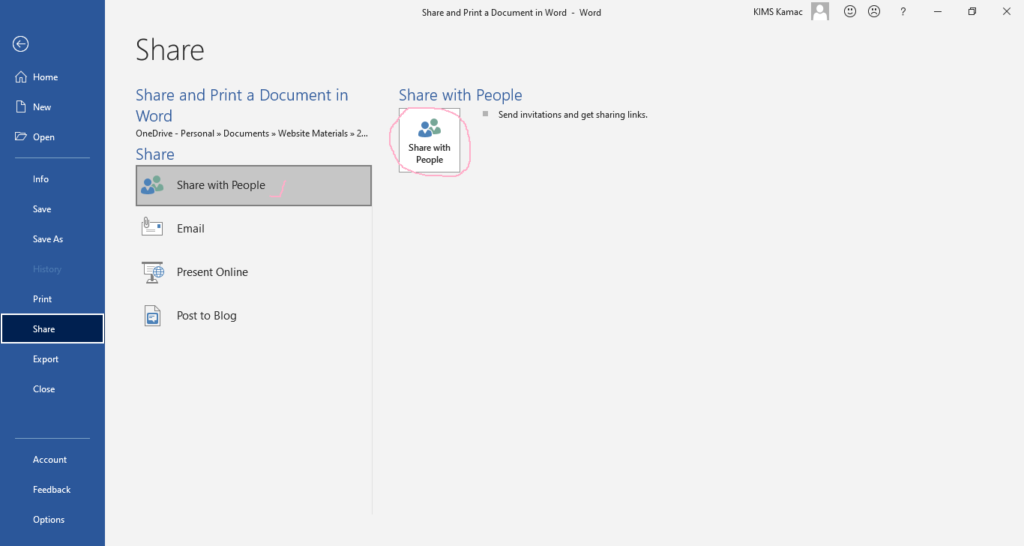
- Click on the Share with People button. A share window appears on the right side of your main window.
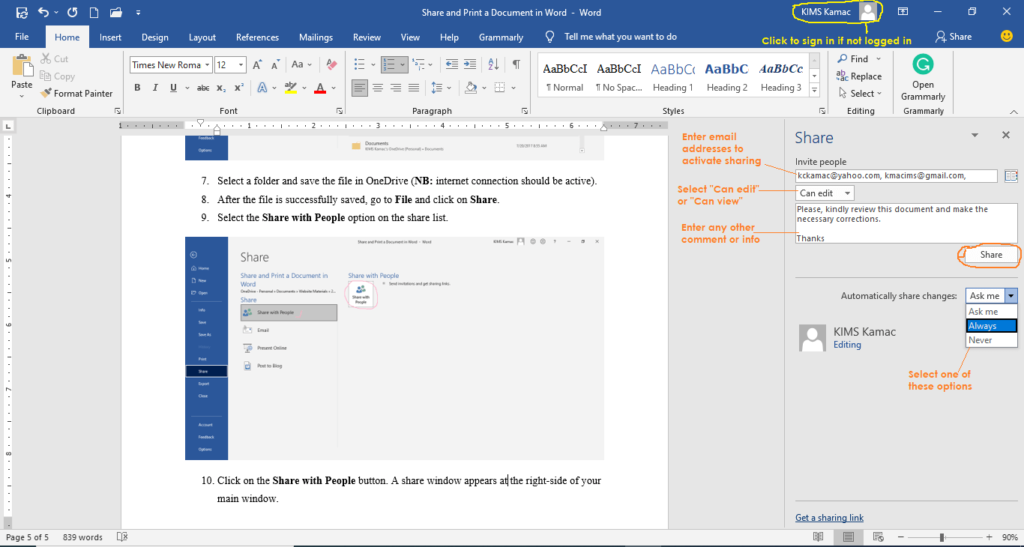
- Enter the recipients’ email addresses, separated by a comma.
- Indicate if the recipients’ should be allowed to edit the document or not. To collaborate with team members, activate this option.
- Include any other comment or optional message in the message box.
- Will changes made to the document be automatically shared? Indicate this by selecting any of: Ask me, Always or Never.
- When done, click the Share button. An email will be sent to each of the email addresses specified.
- After the email is sent, click on the Get a sharing link at the bottom of the share pane.
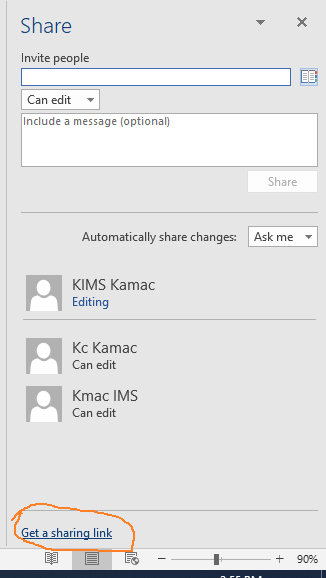
- On the get a sharing link window, click on any of the following options:
- Create an edit link if you want users to edit the document.
- Create a view-only link if you want users to see but not edit the document.
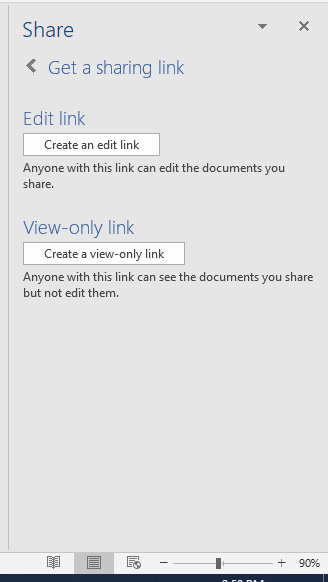
- Copy the generated link, e.g. https://1drv.ms/w/s!AuF4R4NKpJ7MjBVjvSJ7UbXxIqk5
- You can send the link to anyone you want. Anyone with the link can either view or help you edit the document.
With the above, you can easily collaborate with your friends or team members to create a document. For example, you might typeset a document and allow another person to help you format the document.
How to print a document in Word
As earlier highlighted, before you can print a document, you should have access to a printer. However, Microsoft Word allows you to print to pdf, XPS, or OneNote if you do not have a printer.
Let us assume that you have a printer and have successfully installed it on your device. To print your document, do the following:
- After creating and formatting your document, go to File and select Print. You can also select Print Preview and Print on the Quick Access toolbar. Or press CTRL+P on the keyboard.
- The print preview and print dialog window will appear.
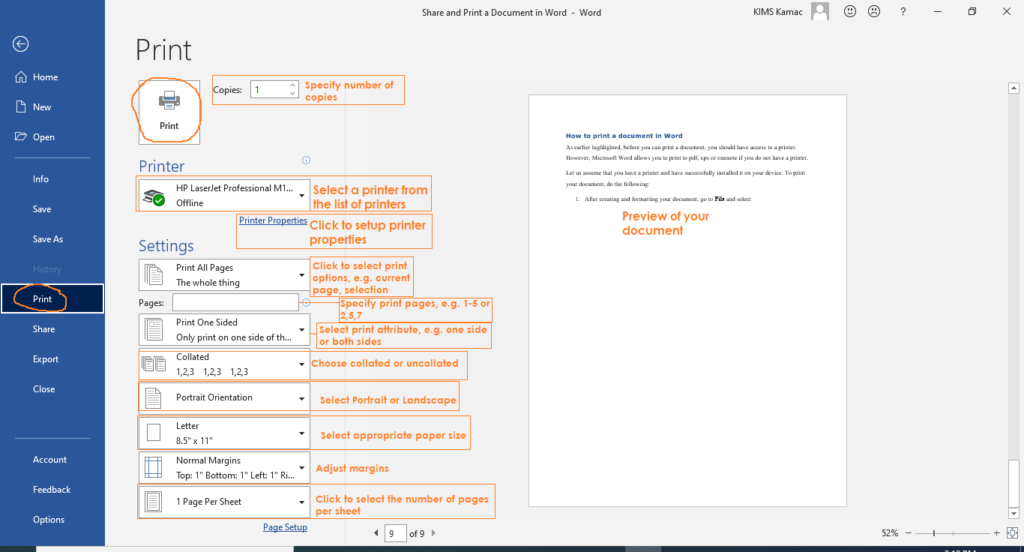
- On the print window, do the following:
- Specify the number of copies of the document you want to print, e.g., 10.
- Under Printer, click to select a printer if you have more than one printer. You can also select pdf, XPS, or OneNote if you do not have a printer.
- If you wish to change the printer properties, click on the Printer Properties link.
- The printer properties dialog window will appear.
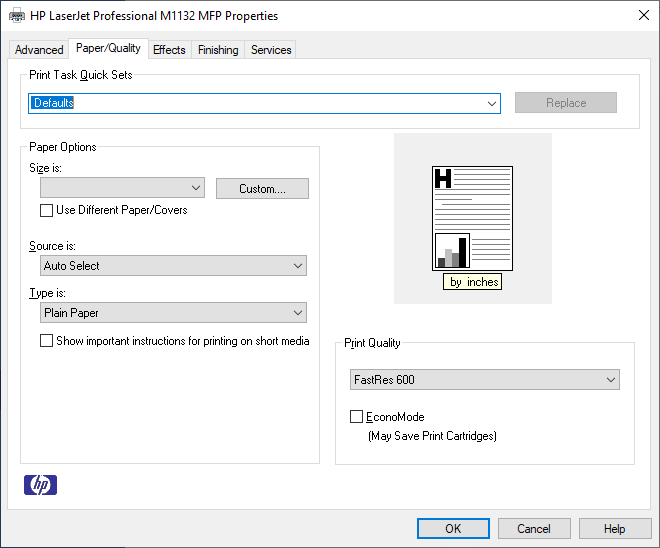
- Make the necessary changes, e.g. print quality, print in black or color, etc.
- Under Settings, select whether to print all pages or selected pages.
- If you want to print selected pages, indicate in the Pages box, the pages you want to print. E.g. 1,2,5-7.
- Choose Print One Sided if you are printing only on one side of the paper. If you are printing on both sides, choose Print on Both Sides. (NB: Printing on both sides is a bit technical, but follow the printer instructions when printing).
- Select Collated or uncollated. Collated means that your document will be printed from page 1 to last in sequence when printing more than one copy. Uncollated means your document will complete the copies of each page individually.
- Select the orientation if there is a need to change page orientation.
- Change the paper size, if there is a need for this. You can also change the paper size in the printer properties.
- If you want to adjust print margins, you can do it here.
- Select the number of pages to be printed on each sheet. The default is 1 page per sheet.
- When done with your selections, click the Print button.
- Your document will be sent to the printer and printing will automatically commence.
Documents printed to PDF or Onenote are electronic documents. You can also print them whenever the printer is available.
Conclusion
We discussed how to share and print a document in Microsoft Word. To share a document you can use an email or a cloud service. Microsoft provides both services to their users using outlook and OneDrive respectively.
To print a document, your device must be connected to a printer. If you do not have a printer, you can print to pdf, XPS, or OneNote.
If you are missing anything, or have a question, please, kindly share it.
This is the end of our Microsoft Word tutorials for beginners. We shall discourse individually on intermediate and advance topics.
If there are areas you feel you want us to cover that we did not, share them with us. Do not forget that this tutorial has other parts in the series. You can access them using the following links:


